Imagine stepping into your greenhouse on a scorching July afternoon to find your prized tomatoes wilting under 120°F heat, despite your morning efforts to crack the vents. This all-too-common scenario is precisely why thermostatically controlled vents have revolutionized modern greenhouse management. These intelligent systems act as your 24/7 climate guardian, automatically adjusting ventilation based on real-time temperature fluctuations—ensuring your plants thrive while you’re away at work or sleeping peacefully through the night.
Whether you’re a commercial grower managing a quarter-acre operation or a passionate hobbyist with a lean-to greenhouse, understanding the nuances of automated vent control isn’t just about convenience—it’s about creating the stable microclimate that separates struggling plants from spectacular harvests. This comprehensive guide dives deep into everything from the physics of heat dissipation to the subtle engineering differences that can make or break your investment.
Top 10 Greenhouse Thermostatically Controlled Vents
Detailed Product Reviews
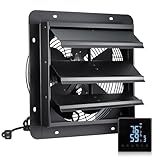
1. VEVOR 10 inch Shutter Exhaust Fan, Wall Mounted Attic Vent Fan with Smart Programming Variable Speed Temperature Control, 1000 CFM,EC Motor,Timer, for Shed,Garage,Greenhouse Ventilation Cooling,Black

Overview: The VEVOR 10-inch Shutter Exhaust Fan delivers powerful ventilation for enclosed spaces, moving 1000 cubic feet per minute to eliminate heat, moisture, and odors. Designed for sheds, garages, and greenhouses, this wall-mounted unit combines smart technology with robust construction to maintain optimal air quality year-round.
What Makes It Stand Out: The intelligent controller sets this fan apart, offering temperature and humidity triggers with 10 automatic speed settings. Unlike basic on/off models, it adapts to changing conditions seamlessly. The premium EC motor operates at just 30W while reaching 1900 RPM, delivering exceptional efficiency with minimal noise. The all-metal steel construction and integrated rain guard shutters provide durability that plastic alternatives can’t match.
Value for Money: At $72.90, this fan punches well above its weight class. Comparable smart exhaust fans typically cost $100-150, making this an excellent mid-range option. The energy-efficient EC motor reduces long-term operating costs, while the durable metal construction eliminates replacement concerns. For greenhouse growers or workshop owners needing reliable automated ventilation, the feature-to-price ratio is outstanding.
Strengths and Weaknesses: Strengths include powerful 1000 CFM output, intelligent variable-speed control, energy-efficient EC motor, all-weather metal construction, and integrated rain protection. The primary weakness is the 10-inch size may be insufficient for very large spaces exceeding 1500 square feet. Installation requires basic electrical knowledge, and the smart controller has a learning curve for programming optimal settings.
Bottom Line: This VEVOR exhaust fan offers professional-grade ventilation automation at a consumer-friendly price. It’s an ideal solution for anyone serious about climate control in medium-sized enclosed spaces.
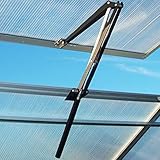
2. Auto Vent Opener Automatic Greenhouse Window Opener Cylinder Roof Vent Opener Autovent Kit Solar Heat Sensitive Agriculture Gardening Tools Automatic Greenhouses Supplies (Single Spring Lifts 15 Lbs)

Overview: This solar-powered automatic window opener provides hands-free ventilation for greenhouses, responding to temperature changes without electricity. Lifting up to 15 pounds and opening windows to 18 inches, it ensures plants receive optimal airflow throughout the day while preventing overheating.
What Makes It Stand Out: The completely passive solar operation is the key selling point—no wiring, batteries, or manual intervention required. The cylinder uses wax expansion technology activated by heat, making it both reliable and environmentally friendly. Constructed from rust-resistant aluminum and stainless steel, it’s built to withstand humid greenhouse conditions where cheaper alternatives would corrode.
Value for Money: Priced at $27.59, this represents exceptional value for automated greenhouse management. Manual ventilation requires constant monitoring, while electric systems cost significantly more and increase energy bills. This single unit pays for itself by preventing plant loss from heat stress, making it a smart investment for serious gardeners.
Strengths and Weaknesses: Strengths include zero operating costs, durable corrosion-resistant materials, straightforward installation with included hardware, and reliable temperature-sensitive operation between 60-77°F. Weaknesses include the 15-pound lift limit restricting use to lighter windows, sensitivity to direct sunlight placement, and potential inconsistency in partially cloudy conditions. The initial setup requires chilling the cylinder, which may confuse some users.
Bottom Line: An affordable, eco-friendly solution for automated greenhouse ventilation. Perfect for hobbyists wanting reliable climate control without complexity or ongoing costs.
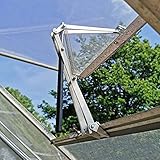
3. 2X Auto Vent Opener Solar Automatic Window Opener for Greenhouse Heat Sensitive Roof Vent Opener Auto Vent Kit Gardening Tools Greenhouse Accessories Hothouse Roof Vent Kit (Dual Spring Up to 30lbs)

Overview: This dual-pack solar vent opener system offers enhanced lifting power for larger greenhouse windows, with each unit supporting up to 30 pounds. The double-spring design provides superior wind resistance, making it ideal for challenging climates where single-spring models might fail.
What Makes It Stand Out: The dual-spring configuration delivers twice the lifting force of standard models, crucial for windy mountainous regions where gusts can twist weaker mechanisms. The black powder-coated aluminum alloy frame combines aesthetics with durability, resisting corrosion season after season. Operating purely on solar heat energy, these units require zero maintenance or electrical connections.
Value for Money: At $58.99 for two units, the per-unit cost of $29.50 offers excellent value compared to buying individual openers. The increased 30-pound capacity eliminates the need for more expensive electric actuators on heavier windows. For greenhouse owners needing multiple vents, this dual-pack saves both money and shipping costs while providing professional-grade performance.
Strengths and Weaknesses: Strengths include robust 30-pound lifting capacity, wind-resistant dual-spring design, corrosion-resistant powder-coated aluminum, precise 60-77°F temperature range, and easy installation. Weaknesses involve the higher upfront cost versus single units, potential overkill for small greenhouses with lightweight windows, and the same temperature sensitivity limitations as all wax-based systems. Performance can vary with inconsistent sunlight.
Bottom Line: A powerful, reliable solution for larger or wind-exposed greenhouses. The dual-spring design justifies the premium for serious growers in demanding environments.
4. DEWENWILS Digital Temperature Controller, Heavy Duty 15A/1800W Thermostat Outlet Plug, VA Display Heating Cooling Control Timer, -40℉~210℉, Cyclic Timing/Countdown, for Greenhouse Incubator, Black

Overview: The DEWENWILS Digital Temperature Controller provides precise climate management for greenhouses, incubators, and brewing setups through a heavy-duty 15-amp outlet. With a remarkable -40°F to 210°F range and multiple timing modes, it automates heating and cooling equipment with professional accuracy.
What Makes It Stand Out: The VA display with self-illuminating font technology ensures readability in any lighting condition—a critical feature for dark greenhouse corners or basement brewing stations. The 15A/1800W capacity handles high-power devices like space heaters and air conditioners without risk of overload. Cyclic timing functions allow complex on/off schedules beyond simple temperature triggers.
Value for Money: At just $21.49, this controller dramatically undercuts competitors offering similar heavy-duty capacity, which often exceed $35. The power memory feature preserves settings during outages, preventing costly temperature fluctuations. For applications requiring both heating and cooling cycles, this dual-mode functionality eliminates the need for separate controllers.
Strengths and Weaknesses: Strengths include exceptional temperature range, high power handling, clear VA display, versatile timing modes, power memory, and calibration capability. Weaknesses include the basic outlet design limiting hardwired installations, potential complexity for users wanting simple operation, and lack of humidity control found in premium models. The plastic housing may not suit extremely harsh outdoor conditions without protection.
Bottom Line: An affordable, feature-rich controller that delivers professional performance for demanding climate control applications. Excellent value for serious hobbyists and small-scale professionals.
5. BIBISTORE Solar Automatic Window Opener for Greenhouse Heat Sensitive Auto Greenhouse Vent Opener Greenhouse Accessories Hothouse Roof Vent Kit-Lifts 15 Lbs
Overview: The BIBISTORE Solar Window Opener offers automated ventilation for greenhouses using passive solar energy. Lifting 15 pounds, it responds to temperature fluctuations to maintain ideal growing conditions while preventing overheating damage to plants.
What Makes It Stand Out: The thicker steel construction distinguishes it from aluminum competitors, providing enhanced durability in windy conditions where lighter materials might bend or warp. The attractive black powder coating prevents rust while maintaining a professional appearance. Operating without electricity, it delivers silent, maintenance-free performance that activates precisely when needed.
Value for Money: At $29.39, this opener sits in the mid-range for solar vent solutions. The steel construction justifies the slight premium over basic aluminum models, offering better long-term value for exposed locations. While single-unit pricing is higher than budget options, the wind-resistant design prevents costly failures in challenging weather.
Strengths and Weaknesses: Strengths include robust steel frame, corrosion-resistant powder coating, included installation hardware, eco-friendly solar operation, and reliable 60-77°F temperature response. Weaknesses include the standard 15-pound capacity limiting heavier windows, steel’s slightly heavier weight complicating installation, and performance dependence on direct sunlight exposure. The fixed temperature range lacks adjustability for specialized plants.
Bottom Line: A durable, wind-resistant solar opener ideal for exposed greenhouses. The steel construction makes it worth the modest premium for growers in windy regions seeking reliable passive ventilation.
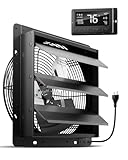
6. GROWNEER 12 Inch Shutter Exhaust Fan with Temperature Humidity Controller, 1200 CFM Remote Control Vent Fan, 10-Speed Adjustable Wall Mount Attic Fan for Greenhouses Garages Sheds
Overview:
The GROWNEER 12 Inch Shutter Exhaust Fan delivers heavy-duty ventilation for spaces up to 1,400 square feet with an impressive 1,200 CFM airflow. Designed for demanding environments like greenhouses, garages, and barns, this aluminum alloy unit removes heat, humidity, and stale air efficiently while promising a 20,000-hour lifespan. Its wall-mount design integrates smart climate automation for hands-free operation.
What Makes It Stand Out:
The intelligent controller with 20-meter remote range offers three modes—Auto, Manual, and Eco—setting it apart from basic thermostatic fans. The 10-speed adjustment provides exceptional granularity for precise climate management. Auto mode monitors real-time temperature and humidity, activating only when needed, which eliminates constant manual adjustments and optimizes energy usage throughout the day.
Value for Money:
At $148.99, this fan commands a premium but justifies the cost through superior airflow and advanced automation. Comparable smart-controlled models often exceed $180, while non-automated 1,200 CFM units average $100-120. The Eco mode reduces electricity expenses, and the durable aluminum construction minimizes replacement costs, delivering long-term savings that offset the initial investment for serious users.
Strengths and Weaknesses:
Strengths include exceptional 1,200 CFM capacity, versatile smart controls, robust aluminum build, and wide coverage area. The 10-speed settings offer unmatched precision. Weaknesses involve potential overkill for spaces under 800 sq ft, and the price may deter casual users. Installation requires basic electrical knowledge despite straightforward mounting hardware.
Bottom Line:
Ideal for commercial growers and workshop owners needing powerful, automated climate control. The smart features and durability make it worth the premium for large-space applications where consistent ventilation is critical.
7. Yziixi Greenhouse Automatic Window Opener Auto Greenhouse Acessories with Solar Power Sensor Vent Roof Opener Replacement Cylinder Temperature Control Lifts 7kg/15Lbs (Double Springs Opener)

Overview:
The Yziixi Greenhouse Automatic Window Opener provides solar-powered temperature regulation for greenhouse ventilation. This budget-friendly device automatically opens and closes vents as temperatures fluctuate, supporting windows up to 15 pounds without requiring electricity. Its dual-spring design offers enhanced reliability for maintaining optimal growing conditions.
What Makes It Stand Out:
The double-spring mechanism delivers stronger lifting force than single-spring alternatives, making it suitable for wind-exposed locations. Pure solar operation means zero running costs and eliminates complex wiring. The aluminum alloy construction resists rust in humid greenhouse environments, while the pre-punched holes and included clamps enable tool-free adjustment for most standard greenhouse frames.
Value for Money:
Priced at $28.39, this opener represents exceptional value. Manual ventilation demands constant attention, while electric systems cost hundreds. Competing solar openers typically range $35-45, making this an affordable entry point. The time saved and prevention of heat-stressed plants provide immediate returns, essentially paying for itself within a single growing season.
Strengths and Weaknesses:
Strengths include affordability, reliable solar operation, easy installation, and wind-resistant dual springs. The 15-pound capacity handles most residential greenhouse windows. Weaknesses involve insufficient power for heavy commercial glass panels, slower response in low-light conditions, and limited adjustability compared to electronic controllers. Performance may vary in extreme climates.
Bottom Line:
A must-have for hobby greenhouse owners seeking hands-free ventilation on a tight budget. While not industrial-grade, it reliably prevents overheating in most small-to-medium greenhouse setups.
8. AITECAC 10 Inch Shutter Exhaust Fan, High-Speed Vent Fan with Temperature Humidity Controller, Suitable for Attics, Greenhouses, Garages

Overview:
The AITECAC 10 Inch Shutter Exhaust Fan offers moderate ventilation with intelligent climate controls for smaller spaces requiring 576 CFM airflow. Its all-metal construction features a powder-coated steel frame and aluminum components, emphasizing weather resistance for attics, greenhouses, and workshops. The unit prioritizes smart functionality over raw power.
What Makes It Stand Out:
The digital controller manages temperature (32-122°F) and humidity with five adjustable speeds and a 24-hour timer—features uncommon in mid-sized fans. The 11.5-foot power cord enables true plug-and-play installation without wiring. Automatic blinds seal the unit when inactive, preventing back drafts and weather intrusion while extending the fan’s lifespan through protective closure.
Value for Money:
At $149.99, the price-to-performance ratio raises concerns, as similarly priced 12-inch models deliver nearly double the CFM. However, the advanced controller, rust-proof construction, and timer functionality justify the cost for users prioritizing automation over maximum airflow. Comparable smart fans under 600 CFM typically retail for $130-160, placing this in the expected range for its feature set.
Strengths and Weaknesses:
Strengths include excellent build quality, user-friendly digital controls, generous cord length, and automatic sealing blinds. The 24-hour timer adds scheduling convenience. Weaknesses center on the relatively low 576 CFM output for the price, limiting coverage to approximately 700 sq ft. Five speeds offer less granularity than 10-speed competitors, and the 10-inch size may prove insufficient for larger applications.
Bottom Line:
Best for users prioritizing smart features and construction quality over raw ventilation power. Consider only if your space doesn’t demand the higher airflow of similarly priced alternatives.
9. BIBISTORE Automatic Greenhouse Vent Opener Solar Powered Auto Hothouse Window Opener Wooden Cold Frame Roof Vent Opening Kit Greenhouse Accessories-(Lifts 15.4 Lbs,Double Spring)
Overview:
The BIBISTORE Automatic Greenhouse Vent Opener provides reliable solar-powered temperature control for greenhouse windows. Lifting up to 15.4 pounds, this double-spring mechanism automatically responds to heat buildup without electricity. The combination of aluminum and stainless steel components ensures durability in damp growing environments while preventing overheating damage to plants.
What Makes It Stand Out:
Engineered for windy mountain areas, the double-spring system resists wind twist while maintaining consistent lifting force. The stainless steel hardware provides superior corrosion resistance compared to all-aluminum models. A comprehensive fitting accessory pack and detailed manual enable straightforward installation for non-technical users, while the pure solar operation eliminates ongoing energy costs.
Value for Money:
At $30.99, this opener delivers solid mid-range value. It’s priced slightly above basic solar openers but offers enhanced materials and wind resistance. The durability and automatic operation prevent costly plant losses from temperature extremes, paying for itself within one growing season. Most comparable dual-spring models retail for $32-40, making this competitively positioned.
Strengths and Weaknesses:
Strengths include robust aluminum and stainless steel construction, wind-resistant dual springs, straightforward installation, and reliable solar operation. The 15.4-pound capacity suits most residential applications. Weaknesses include moderate lifting power insufficient for commercial windows, reduced efficiency in persistently cloudy climates, and the lack of manual override or adjustment settings found in powered systems.
Bottom Line:
A dependable choice for residential greenhouse owners in variable climates. The enhanced durability justifies the modest price premium over entry-level options, especially for exposed locations.
10. HG Power 12 Inch Attic Fan with Thermostat, 971 CFM Shutter Exhaust Fan with Smart Temperature Humidity Controller, Wall Mounted Greenhouse Fan with EC Motor for Garage, Shed Ventilation, Black
Overview:
The HG Power 12 Inch Attic Fan balances performance and value with 971 CFM airflow and intelligent climate controls. Featuring an energy-efficient EC motor, this wall-mounted unit serves garages, sheds, and greenhouses requiring substantial ventilation without excessive noise. The smart thermostat automates temperature and humidity management through a user-friendly digital interface.
What Makes It Stand Out:
The advanced digital controller offers 10 speed levels and a 9-hour timer with a clear, easy-to-read display—providing more granular control than most competitors. EC motor technology delivers high airflow at lower energy consumption and reduced noise levels. The rust-resistant aluminum and powder-coated steel construction withstands harsh environmental conditions while maintaining quiet operation.
Value for Money:
At $107.99, this fan undercuts many smart-controlled alternatives while offering premium features. Units with similar CFM and basic thermostats typically cost $90-110, making the advanced controller and EC motor genuine value additions. The energy savings from the efficient motor recover costs over time, while the durable build minimizes replacement expenses.
Strengths and Weaknesses:
Strengths include excellent price-to-performance ratio, quiet EC motor operation, comprehensive digital controls, and durable construction. The 10 speeds enable precise adjustment. Weaknesses include an 8-foot cord limiting placement flexibility, a 9-hour timer potentially insufficient for some applications, and 971 CFM falling short of premium 1,200 CFM models for the largest spaces.
Bottom Line:
The smart choice for budget-conscious buyers wanting advanced features without sacrificing quality. Delivers premium performance at a mid-range price point, ideal for most residential and light commercial applications.
Understanding Thermostatically Controlled Greenhouse Vents
What Exactly Are Thermostatically Controlled Vents?
Thermostatically controlled vents are automated openings in your greenhouse structure that respond to temperature changes without human intervention. Unlike manual vents that require you to physically open and close them—or even timer-based systems that operate on a fixed schedule—these smart solutions use temperature sensors and actuators to modulate airflow precisely when your plants need it most.
The core principle is beautifully simple: a temperature-sensitive mechanism triggers an actuator that physically moves the vent panel. However, the execution involves sophisticated engineering. Modern systems can manage multiple vents simultaneously, create staged opening sequences, and even integrate with humidity sensors, rain detectors, and wind speed monitors to provide holistic environmental control.
The Science Behind Automatic Ventilation
The physics governing greenhouse ventilation is rooted in the stack effect and convective heat transfer. As solar radiation warms the air inside your greenhouse, it becomes less dense and rises. Properly positioned vents allow this hot air to escape while drawing cooler outside air through lower intake points. Thermostatically controlled vents optimize this process by maintaining the temperature differential that drives airflow.
What many growers don’t realize is that timing is critical. Opening vents too early can over-cool your space, stressing heat-loving plants. Waiting too long creates dangerous heat spikes that can shut down photosynthesis. The best systems use proportional control, gradually increasing vent opening as temperatures rise rather than employing a simple on/off mechanism.
Why Your Greenhouse Needs Automated Climate Control
The Hidden Costs of Manual Vent Management
Let’s be brutally honest: manual ventilation is a losing battle against nature. A single missed hot afternoon can wipe out weeks of careful propagation work. But the costs extend beyond catastrophic failures. Inconsistent temperatures trigger plant stress responses, leading to:
- Reduced fruit set in tomatoes and peppers
- Leggy, weak growth in seedlings
- Increased susceptibility to pests and diseases
- Lower essential oil production in herbs
- Delayed flowering in ornamental crops
Your time has value, too. Daily vent adjustments consume 15-30 minutes that could be spent on more productive tasks. Over a growing season, that’s 30-60 hours—nearly a full work week—spent simply opening and closing panels.
Precision Growing: Beyond Convenience
Automated vents enable a level of climate precision that manual management can’t match. They maintain temperatures within a 3-5°F range, creating the stable environment that maximizes plant metabolic efficiency. This consistency is particularly crucial for:
- Seed germination: Many species require precise temperature ranges for optimal sprouting
- Disease prevention: Eliminating condensation cycles that foster fungal pathogens
- Energy efficiency: Coordinating with heating systems to minimize temperature overshoots
- Pollination management: Maintaining optimal conditions for pollinator activity or self-pollinating crops
Types of Thermostatically Controlled Vent Systems
Wax Cylinder (Passive) Actuators
These non-electric marvels use phase-change materials that expand when heated. As temperature rises, wax inside a sealed cylinder melts and expands, pushing a piston that opens the vent. When temperatures drop, the wax solidifies and a spring closes the vent.
Pros: No electricity needed, completely silent, extremely reliable with minimal moving parts, ideal for remote locations or off-grid operations.
Cons: Less precise temperature control (typically ±7-10°F), slower response time, limited opening force, can’t integrate with smart systems.
The best applications are small to medium hobby greenhouses in moderate climates where ultra-precise control isn’t critical. Look for cylinders with stainless steel housings and UV-resistant seals—cheap plastic versions fail within two seasons.
Electric Linear Actuators
These motorized push-pull devices offer the most precise control and integration capabilities. A small motor drives a lead screw or belt system, providing strong, consistent force to open even heavy vents. Modern units include position feedback sensors and can be controlled via analog thermostats or digital controllers.
Pros: Exact positioning control, fast response, high force output (some models handle 200+ lbs), easy integration with environmental control systems, programmable temperature setpoints.
Cons: Requires electrical supply, more moving parts mean more maintenance potential, higher initial cost, vulnerable to power outages unless backed up.
When evaluating electric actuators, pay close attention to the IP (Ingress Protection) rating. Greenhouse environments are brutal on electronics—moisture, dust, and temperature extremes demand IP65 or higher ratings.
Pneumatic and Hydraulic Systems
Less common in residential greenhouses but dominant in commercial operations, these systems use compressed air or fluid pressure to operate vents. A central pump or compressor serves multiple vents through a network of tubes.
Pros: Extremely powerful, centralized control, no electrical components at vent locations, smooth operation.
Cons: Complex installation, potential for leaks, higher maintenance requirements, significant upfront investment.
These systems shine in large gutter-connected greenhouses where centralized management of dozens of vents is essential.
Solar-Powered Vent Controllers
A hybrid solution gaining traction, these systems use a small solar panel to charge a battery that powers an electric actuator. The thermostat and control logic remain the same as grid-powered systems, but the energy source is renewable.
Pros: Off-grid capability, lower operating costs, environmentally friendly, qualifies for some agricultural renewable energy incentives.
Cons: Higher upfront cost, battery replacement every 3-5 years, requires adequate sun exposure for the panel, may need grid backup in cloudy climates.
Key Features That Separate Good Vents from Great Ones
Temperature Range and Accuracy
Premium thermostats offer adjustable ranges from 60°F to 100°F with ±2°F accuracy. Budget models might only provide 70-90°F ranges with ±5-7°F variance. For specialty crops like orchids or cannabis, that precision gap can mean the difference between thriving plants and mediocre yields.
Look for thermostats with adjustable differential—the gap between opening and closing temperatures. A 5-10°F differential prevents constant cycling, while a narrower differential provides tighter control for sensitive crops.
Opening Force and Vent Weight Capacity
This is where many buyers make critical mistakes. Calculate your vent’s weight including glazing, frame, and any snow load potential. Then add a 50% safety margin. A 40-pound vent needs an actuator rated for at least 60 pounds. Undersized actuators strain, overheat, and fail prematurely.
Stroke length matters too. Measure the distance from fully closed to fully open positions. Most greenhouse vents require 12-24 inches of travel. Actuators with adjustable stroke provide installation flexibility.
Build Quality and Weather Resistance
Greenhouse environments accelerate corrosion and material degradation exponentially. Examine these components:
- Housing: Powder-coated aluminum or stainless steel; avoid painted steel
- Seals: Silicone or EPDM rubber; nitrile seals crack under UV exposure
- Fasteners: Stainless steel throughout; galvanized hardware rusts within two years
- Cables: UV-resistant jacketing on any wiring
Quality actuators carry 3-5 year warranties. Read the fine print—some exclude greenhouse environments specifically.
Manual Override Capabilities
Even the best systems fail. Manual override lets you operate vents during power outages, maintenance, or system malfunctions. The best designs include a simple hand crank or pull cord that disengages the actuator, allowing manual operation without tools.
Avoid systems requiring you to disconnect wiring or remove the actuator to operate manually. You’ll be doing it more often than you think, especially during initial setup and seasonal adjustments.
Sizing and Capacity: Getting the Math Right
Calculating Your Greenhouse Volume
Proper vent sizing starts with accurate volume calculations. For a traditional gable greenhouse: Length × Width × Average Height. But don’t forget to account for sloped roofs and any interior obstructions like benches or hanging systems.
A common error is using only floor area. A 12×16 greenhouse with an 8-foot peak height contains 1,536 cubic feet, not just 192 square feet. That volume determines how much hot air must be exhausted per minute to maintain target temperatures.
Understanding CFM Requirements
CFM (Cubic Feet per Minute) measures ventilation capacity. The general rule: your system should exchange the entire greenhouse volume every 1-2 minutes during peak summer conditions. For that 1,536 cubic foot greenhouse, you need 768-1,536 CFM of exhaust capacity.
But CFM isn’t just about the vent size—it’s about the pressure differential created by the stack effect. Large roof vents with modest opening (12-18 inches) often outperform small vents opened fully because they harness the natural thermal stratification more effectively.
The 20% Rule: Why It Matters
Horticultural engineers recommend total vent area equal to 20% of your greenhouse floor area. A 200 sq ft greenhouse needs 40 sq ft of combined intake and exhaust venting. This ratio provides adequate airflow without creating excessive drafts or heat loss during cooler periods.
However, this assumes standard polyethylene or glass glazing. If you’re using twin-wall polycarbonate with higher insulation values, you might reduce to 15%. Conversely, single-layer glazing in hot climates may require 25-30% vent area.
Strategic Vent Placement for Optimal Airflow
Roof vs. Side Wall Vents
Roof vents excel at exhausting the hottest air that accumulates at the peak. They’re most effective when combined with low side-wall or baseboard intake vents, creating a complete vertical airflow pattern. This configuration leverages the natural buoyancy of warm air, requiring minimal wind to function effectively.
Side-wall vents alone create horizontal airflow, which is less efficient at heat removal but excellent for humidity control and preventing stagnant air pockets. The ideal setup includes both: roof vents for temperature control, side vents for air circulation.
The Importance of Cross-Ventilation
Single vent locations create dead zones. Multiple vents positioned on opposite sides or ends generate cross-ventilation that sweeps fresh air across your entire crop. For greenhouses longer than 20 feet, consider segmented vent control—opening vents progressively from the windward to leeward side to create a gentle, consistent breeze rather than turbulent gusts.
Wind direction matters. In prevailing wind areas, position intake vents on the windward side and exhaust vents leeward. This harnesses natural wind pressure to supplement thermal buoyancy, sometimes doubling effective airflow.
Avoiding Hot Spots and Dead Zones
Even with automated vents, poor placement creates microclimates. Benches, tall crops, and equipment block airflow. Walk your greenhouse on a hot day with a handheld temperature gun—you’ll likely find 10-15°F variations.
Combat this by:
- Installing circulation fans to break up stagnant zones
- Using perforated bench tops that allow vertical air movement
- Placing vents above tall crop canopies
- Creating vent “zones” that operate independently based on local temperature sensors
Installation: What You Need to Know Before You Start
Electrical Requirements and Safety
Most electric actuators run on 24V DC (safer in wet environments) or 120V AC. The 24V systems require a transformer, adding cost but significantly reducing shock risk. For 120V systems, GFCI protection is non-negotiable. Greenhouse moisture and condensation create electrocution hazards.
Wire sizing matters. Voltage drop over long runs can cause actuators to underperform. For 24V systems, keep wire runs under 50 feet or upgrade to 12-gauge wire. Always use stranded wire—solid core cracks under the constant vibration of greenhouse fans and equipment.
Structural Reinforcement Considerations
Vents create weak points in your greenhouse structure. The actuator’s mounting point must transfer opening forces to the frame without flexing or twisting. Many greenhouse kits lack adequate reinforcement for automated vents, requiring you to add:
- Header beams above large vents
- Gusset plates at corner joints
- Additional purlins to prevent roof sag
The actuator’s force vector should align with the vent’s center of mass. Off-center mounting causes binding and premature wear. For heavy glass vents, consider counterweight systems that reduce actuator load by 50-70%.
Weatherproofing Your Installation
Every penetration through glazing is a potential leak point. Use closed-cell foam tape between the vent frame and glazing. Seal all fasteners with butyl rubber caulk, not silicone—silicone fails under constant UV and temperature cycling.
Install drip caps above roof vents to direct condensation and rain away from the opening gap. In snow regions, add snow guards above vents to prevent sliding snow from damaging open panels.
Integration with Your Existing Greenhouse Systems
Connecting to Heating Systems
The magic happens when vents and heaters communicate. A unified controller can prevent both systems from operating simultaneously (wasting energy) and create sophisticated programs like “night cooling” where vents open slightly after sunset to flush accumulated heat while outdoor temperatures are still moderate.
Look for controllers with “dead band” settings—a temperature gap where neither heating nor cooling activates. A 5°F dead band between 65°F (heater off) and 70°F (vents open) prevents system conflict and oscillation.
Working with Shade Cloths and Cooling Pads
In hot climates, vents alone can’t maintain target temperatures. They must coordinate with evaporative cooling pads and shade systems. The optimal sequence: shade cloth deploys first at 80°F, cooling pads activate at 85°F, and vents begin opening at 90°F to exhaust humid air while drawing in fresh air through the wet pads.
This staged approach prevents humidity spikes and ensures the cooling system works efficiently. Without vent coordination, cooling pads can raise humidity to 95%, creating perfect conditions for fungal diseases.
Smart Home and IoT Integration
Modern controllers offer Wi-Fi connectivity and smartphone apps, but the real value lies in data logging and remote monitoring. Systems that track temperature trends, vent cycles, and actuator performance help you fine-tune settings and diagnose problems before they cause crop damage.
API access allows integration with weather forecasting services. Imagine your vents preemptively closing when a cold front is predicted, or opening early on a sunny morning after a cool night. This predictive control saves energy and reduces plant stress.
Climate Zone Considerations
Hot and Arid Climates
In desert regions, vents must work overtime while battling dust infiltration. Specify actuators with sealed housings (IP67 rating) and consider adding insect screens to intake vents. The screen mesh reduces airflow by about 30%, so size vents accordingly.
Night cooling is your secret weapon. Desert temperatures can drop 40°F after sunset. Program vents to fully open at night, flushing the greenhouse and pre-cooling for the next day. This can reduce daytime peak temperatures by 10-15°F.
Humid Subtropical Regions
High humidity reduces evaporative cooling effectiveness and creates disease pressure. Your vent strategy should prioritize humidity removal over temperature reduction. This means opening vents earlier (at 75°F) and wider to maintain air movement that prevents condensation on foliage.
Consider adding exhaust fans that activate when humidity exceeds 85%, even if temperatures are moderate. The combination of thermal buoyancy and mechanical extraction keeps air fresh and dry.
Cold Climate Challenges
In northern regions, vents must prevent overheating on sunny winter days while minimizing heat loss during cold snaps. Dual-stage systems work best: small “chimney” vents that open at 80°F for winter sunscald prevention, and larger summer vents that remain sealed until spring.
Install insulated vent covers with R-values matching your glazing. A poorly insulated vent in winter is essentially a hole in your greenhouse losing 50,000 BTU per day in subzero weather.
Coastal and High-Wind Areas
Salt air corrodes standard actuators within months. Specify marine-grade stainless steel (316) and anodized aluminum components. Wind creates both positive pressure on windward vents and suction on leeward vents—your system must compensate.
Wind sensors that automatically close vents during gusts above 25 mph prevent structural damage. But they must be paired with temperature overrides that reopen vents if temperatures spike dangerously high despite the wind.
Seasonal Adjustments and Fine-Tuning
Spring Startup Protocol
Don’t just flip the switch in March. Gradually introduce automation over 2-3 weeks. Start with manual operation to clear winter debris and verify smooth movement. Then set thermostats 10°F higher than target to observe operation without risking cold damage. Slowly lower setpoints as outdoor temperatures stabilize.
This gradual approach reveals issues like stiff linkages from winter corrosion or rodent damage to wiring before they cause problems during critical growing periods.
Summer Maximum Ventilation Strategy
Peak summer demands maximum airflow. Remove any vent restrictors and verify full opening travel. Clean glazing around vents—dirt and algae reduce light transmission, causing plants to perceive lower temperatures and potentially suffer heat stress despite adequate venting.
Consider “night flushing”: program vents to open fully at sunset when outdoor temperatures drop below indoor levels. This pre-cools the structure and growing medium, delaying next-day heat buildup by 2-3 hours.
Winterizing Your Vent System
Before first frost, clean and lubricate all moving parts. Disconnect and store battery backups indoors. For wax cylinder systems, remove cylinders and store at room temperature—freezing can damage seals. Cover vents with insulated panels, but leave a small gap (1-2 inches) at the peak to prevent moisture accumulation.
Test manual overrides monthly during winter. Frozen linkages or ice-damaged seals caught in December are much easier to fix than in March when you desperately need ventilation.
Transitional Season Management
Spring and fall bring wild temperature swings—50°F differences between night and day aren’t uncommon. This is when programmable differentials shine. Set a wide differential (15°F) to prevent constant cycling. For example, vents open at 85°F but don’t close until temperatures drop to 70°F, giving you stable daytime conditions while preventing nighttime overcooling.
Maintenance and Longevity
Monthly Inspection Checklist
Every 30 days during the growing season, perform these checks:
- Visual: Look for corrosion, loose fasteners, or cracked seals
- Operational: Manually trigger vents and verify smooth, quiet movement
- Electrical: Check connections for corrosion or heat discoloration
- Calibration: Verify thermostat accuracy with a calibrated thermometer
Five minutes monthly prevents 90% of failures. Document everything—patterns emerge that predict component lifespan.
Seasonal Deep Cleaning
Twice yearly, thoroughly clean all components. Remove actuators and clean with compressed air, not water. Water forces contaminants into bearings and seals. Clean vent frames with mild detergent, then apply silicone lubricant to sliding surfaces—not WD-40, which attracts dust and gums up over time.
Inspect glazing seals while cleaning. Brittle or cracked seals allow air leaks that confuse thermostats and reduce efficiency. Replace them proactively; they’re cheap insurance.
Lubrication and Wear Point Management
Different components need different lubricants:
- Linear actuator screws: White lithium grease, applied sparingly
- Hinge points: Dry graphite powder (won’t attract dust)
- Chain drives: Chain wax, not oil
- Electrical contacts: Dielectric grease
Over-lubrication is as bad as under-lubrication. Excess grease captures dust and grit, turning into grinding paste that accelerates wear.
When to Replace vs. Repair
Actuators showing intermittent operation, unusual noise, or reduced opening force are signaling impending failure. Repairing often costs 60% of replacement and provides only temporary relief. Replace actuators after 5-7 years of continuous use, even if they’re still functioning. The cost of a failure during a heatwave far exceeds the price of proactive replacement.
Thermostats drift out of calibration over time. If you notice temperatures consistently running 3-5°F off setpoint, replace the thermostat. They’re inexpensive and critical to system accuracy.
Troubleshooting Common Issues
Vents Not Opening at Set Temperature
First, verify the thermostat isn’t in a dead zone or manual override mode. Then check voltage at the actuator (should be within 10% of rating). If voltage is good, the actuator likely failed. If no voltage, trace wiring back to the thermostat and power supply.
Wax cylinder systems not opening usually indicate cylinder failure. Test by removing the cylinder and placing it in warm water—it should extend smoothly. If not, replace it. Never attempt to disassemble wax cylinders; they’re sealed units.
Incomplete Opening or Closing
This typically indicates insufficient actuator force or mechanical binding. Disconnect the actuator and try moving the vent manually. If it’s stiff, clean and lubricate hinges. If it moves freely, the actuator is undersized or failing.
Check for obstructions like overgrown vines or debris in the vent track. Even a small twig can prevent proper sealing, creating drafts that confuse the thermostat.
Temperature Swings and Overshooting
Large temperature swings usually mean your vents are too small or your differential is set too narrow. Calculate your CFM requirements again—most undersized systems are off by 30-50%.
If sizing is correct, widen the thermostat differential. Constant short-cycling (opening and closing every few minutes) creates temperature oscillations and wears out actuators prematurely.
Noise and Vibration Problems
Grinding or clicking noises indicate worn gears or misalignment. Vibrations suggest loose mounting hardware or an unbalanced vent. Tighten all fasteners to spec—don’t overtighten, which can strip threads in aluminum frames.
Buzzing from the thermostat often means failing relays. Replace the thermostat before the relay welds closed, potentially leaving vents stuck open during a freeze.
Cost Analysis and ROI
Initial Investment Breakdown
A complete system for a 12×16 hobby greenhouse typically runs $800-1,500:
- Actuators: $150-300 each (usually need 2-3)
- Thermostat/controller: $100-400
- Wiring and mounting hardware: $100-200
- Structural reinforcements: $200-400
- Installation labor (if hired): $300-600
Commercial systems scale non-linearly. A 30×96 foot greenhouse might cost $5,000-8,000, but per-square-foot costs drop significantly.
Energy Savings Calculations
Automated vents reduce heating costs by 20-30% by preventing overheating that forces heaters to cycle unnecessarily. In a typical 500 sq ft greenhouse spending $600/year on heat, that’s $120-180 annual savings.
Cooling savings are harder to quantify but often greater. Preventing a single crop loss from heat stress can save $200-500 in replacement plants and lost production time.
Crop Loss Prevention Value
Consider insurance value. A $1,500 vent system protecting $3,000 worth of orchids or rare plants pays for itself with one prevented disaster. Commercial growers factor this into risk management—automated ventilation often reduces insurance premiums by 5-10%.
Long-Term Maintenance Costs
Budget 5-10% of initial cost annually for maintenance and eventual replacement. A $1,500 system costs $75-150/year to maintain—far less than the value of time saved from manual operation.
DIY vs. Professional Installation
When DIY Makes Sense
If you’re comfortable with basic electrical work, structural modifications, and have a full weekend, DIY installation is feasible for single-vent systems in kit greenhouses. The satisfaction of calibrating your own system provides valuable troubleshooting knowledge.
Success requires: accurate measurements, proper tools (including a torque wrench), and patience. Rushing leads to misaligned vents that leak and bind.
Complex Installations That Need Experts
Multi-zone systems, integration with existing environmental controls, or installations in custom-built greenhouses warrant professional help. Certified greenhouse technicians understand load distribution, electrical code requirements, and controller programming nuances that take years to master.
Professional installation typically includes system calibration and a warranty on workmanship—worth the extra cost for complex setups.
Hybrid Approaches
The smart middle ground: hire a professional for the initial consultation and structural work, then handle the simpler tasks like running low-voltage wiring and mounting thermostats yourself. This approach saves money while ensuring critical aspects are done correctly.
Environmental Impact and Sustainability
Energy Consumption Considerations
Electric actuators use surprisingly little power—a typical unit draws 2-3 amps at 24V for 30 seconds per cycle. Even with 20 cycles daily, that’s less than $5/year in electricity. However, manufacturing impact matters. Choose brands with repairable designs and replaceable components rather than disposable units.
Material Choices and Longevity
Aluminum actuators last 15+ years; plastic-bodied units barely survive 5. The environmental cost of replacing cheap systems three times far exceeds the initial resource savings. Invest in durable materials with recyclable components.
Wax cylinder systems have the lowest lifetime environmental impact—no electricity, minimal materials, and 20-year lifespans make them the eco-conscious choice for appropriate applications.
End-of-Life Disposal
Plan for disposal before purchase. Electric actuators contain motors and circuit boards that require e-waste recycling. Many manufacturers now offer take-back programs. Wax cylinders can be disassembled (by recyclers) into steel, aluminum, and wax—each recyclable. Avoid systems with proprietary batteries that can’t be easily recycled.
Frequently Asked Questions
How many vents does my greenhouse actually need?
Calculate 20% of your floor area for total vent space, split equally between high exhaust and low intake vents. A 100 sq ft greenhouse needs 20 sq ft of vents—typically two 2×5 foot roof vents and two 2×5 foot side vents. More smaller vents provide better distribution than fewer large ones.
Can I automate existing manual vents, or do I need to buy new ones?
Most manual vents can be retrofitted with linear actuators. The key is structural integrity—manual vents often lack the reinforcement needed for automated operation. Inspect hinges, frames, and seals. Reinforce as needed before adding actuators. Wax cylinder systems are particularly easy to retrofit since they require minimal mounting hardware.
What’s the ideal temperature to set my vents to open?
For most vegetables, set opening at 75-80°F with a 5°F differential. This keeps temperatures in the optimal 70-85°F range. For cool-season crops like lettuce, lower to 65°F. For heat-lovers like peppers, raise to 85°F. Always set heating systems 10-15°F below vent opening to prevent conflict.
How do I power vents in an off-grid greenhouse?
Solar-powered actuators with battery backup are ideal. Size your solar panel at 2x the actuator’s daily watt-hour consumption to account for cloudy days. A typical setup needs a 20W panel and 12Ah deep-cycle battery. For reliability, add a small wind turbine as backup in cloudy climates.
Will automated vents work in winter, or should I seal them?
Quality systems operate year-round. Set winter opening temperatures 15-20°F higher than summer (around 90-95°F) to prevent heat loss while still preventing dangerous overheating on sunny days. Use insulated vent covers at night. Never completely seal vents—some air exchange prevents disease and condensation.
How long do thermostatically controlled vents typically last?
Electric actuators last 5-7 years in continuous use; wax cylinders last 15-20 years. Thermostats typically need replacement every 3-5 years as sensors drift. Proper maintenance can extend these lifespans by 30-50%. Harsh climates (coastal salt air, extreme temperatures) reduce lifespan by 20-30%.
Can these systems handle snow load on vents?
Standard actuators cannot open against significant snow load. Install snow sensors that prevent vent operation when weight is detected. Better yet, design vent geometry that sheds snow naturally—steeper pitches and smooth surfaces. For heavy snow regions, consider hinged vents that open inward, pushing against snow rather than lifting it.
What’s the difference between a thermostat and a hygrostat, and do I need both?
A thermostat responds to temperature; a hygrostat responds to humidity. For most crops, temperature control is primary. However, tropical plants, propagation houses, and cannabis operations benefit from combined control. Many modern controllers integrate both sensors, prioritizing temperature but opening vents for humidity relief even when temperatures are moderate.
How do I prevent pests from entering through automated vents?
Install insect screening on all intake vents. Use 80-mesh for thrips, 52-mesh for whiteflies, 32-mesh for larger pests. Screens reduce airflow by 25-40%, so increase vent area accordingly. Clean screens monthly—dust and pollen quickly clog mesh. Some systems include automatic screen cleaners that use compressed air bursts.
Are there any crops that shouldn’t have automated ventilation?
Extremely few. Some tropical orchids prefer stagnant air and very high humidity—automated vents can dry them out. For these, use minimal ventilation (5% of floor area) and rely on fogging systems instead. Mushroom cultivation also requires minimal air exchange. For 99% of greenhouse crops, automated ventilation dramatically improves results.