That awkward moment when you’re standing in your shed, surrounded by tools, seasonal decorations, and boxes of who-knows-what, and you realize the real estate you’re not using is above your head. Every square foot of floor space is precious, but that vertical void between your head and the roof? That’s untapped gold. Storage shed loft kits have emerged as the go-to solution for homeowners who need to double their storage without expanding their footprint. But here’s the catch—not all loft kits are created equal, and the difference between a cramped, unusable overhead platform and a spacious, functional storage level boils down to one critical factor: headroom.
Maximizing headroom isn’t just about comfort; it’s about safety, accessibility, and actually using the space you create. A loft you have to crouch in becomes a graveyard for items you never retrieve. The right loft kit, properly planned and installed, transforms dead air into valuable storage while preserving the usability of both the upper and lower levels. This guide walks you through everything you need to know to choose, install, and optimize a loft kit that gives you the vertical space you deserve.
Top 10 Storage Shed Loft Kits for Maximizing Headroom
Detailed Product Reviews
1. 50% Structurally Stronger Truss Design Easy Shed Kit Builds 6’–14’ Widths Any Length - Bonus Miter Template, Storage Shed Garage Barn Playhouse Easy Framing Kit, Peak Roof 2x4 Basic DIY EZ Framer Kit
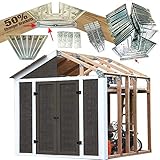
###1. 50% Structurally Stronger Truss Design Easy Shed Kit Builds 6’–14’ Widths Any Length - Bonus Miter Template, Storage Shed Garage Barn Playhouse Easy Framing Kit, Peak Roof 2x4 Basic DIY EZ Framer Kit
Overview: The EZBUILDER Peak Roof Framing Kit offers a structural solution for DIY shed builders seeking customization. At $69.99, this galvanized steel bracket system supports structures from 6’ to 14’ widths and any length, making it versatile for various backyard projects from tool sheds to playhouses.
What Makes It Stand Out: This kit’s 50% stronger truss design addresses common failure points in competitor products, with reinforced brackets that won’t bend during assembly. The patent-pending EZ Miter Template is a unique inclusion that simplifies complex angled cuts, while the lifetime warranty demonstrates manufacturer confidence. The ability to scale from garbage can enclosures to full-sized workshops sets it apart from one-size-fits-all kits.
Value for Money: Compared to hiring contractors at $50-100 per hour, this kit pays for itself immediately. While wood and finish materials add cost, the $69.99 price point is competitive with inferior alternatives. Three kits build a 10’x22’ structure for under $210 in hardware costs—substantially less than pre-fabricated options that limit size flexibility.
Strengths and Weaknesses: Strengths include superior bracket strength, reusable miter template, unlimited size customization, and comprehensive plans. Weaknesses are the separate wood purchase requirement, need for intermediate carpentry skills, and time investment. The kit provides hardware only, which may surprise beginners expecting a complete package.
Bottom Line: Ideal for confident DIYers wanting custom-sized storage solutions. The reinforced design and miter template justify the premium over basic bracket kits, making it a smart investment for long-lasting structures.
2. Handy Home Products Designer 12x10 Wooden Storage Shed with Dormer, Windows, and Floor Kit- Paint and Shingles not Included

Overview: The Handy Home Products Designer 12x10 Wooden Storage Shed represents a premium pre-cut solution for homeowners seeking a substantial, customizable outbuilding. At $3,499.99, this kit includes everything except paint and shingles, featuring a dormer, multiple windows, and a complete floor system for a finished look.
What Makes It Stand Out: This shed arrives with all wood pre-cut and primed, eliminating complex measuring and cutting. The inclusion of both 64" double doors and a 32" service door provides exceptional access flexibility. Treated wood siding resists decay and termites, while the dormer design adds aesthetic appeal and interior headroom that standard sheds lack.
Value for Money: Custom-built sheds of this size often exceed $5,000-7,000 installed. The pre-cut components save 20-30 hours of labor, justifying the price for those lacking advanced carpentry skills. However, paint and shingles add $300-500 to the total investment, and the assembly requires two adults with power tools.
Strengths and Weaknesses: Strengths include professional-grade materials, dual door configuration, pre-cut convenience, and comprehensive floor kit. Weaknesses are the substantial price tag, 4-8 hour assembly requiring intermediate skills, and separate finish material costs. The size may require a building permit in some jurisdictions.
Bottom Line: Best suited for homeowners wanting a permanent, attractive shed without starting from scratch. The quality materials and thoughtful design justify the cost for those prioritizing convenience and longevity over budget.
3. Arrow FDN1014 Storage Shed Base Kit for 10’x12’, 10’x13’ & 10’x14’ Arrow sheds
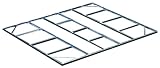
Overview: The Arrow FDN1014 Storage Shed Base Kit provides a critical foundation solution for Arrow and Storboss sheds measuring 10’x12’, 10’x13’, or 10’x14’. At $169.99, this heavy-duty galvanized steel frame ensures proper alignment and structural integrity before wall assembly begins, acting as the skeleton for your shed’s floor.
What Makes It Stand Out: This base kit’s self-squaring design prevents the frustrating misalignment issues that plague many DIY shed projects. Its versatility allows finishing with plywood, gravel, or concrete, adapting to various site conditions and budgets. The HDG steel construction also serves as a concrete form, eliminating additional framing costs for permanent installations and simplifying the hardest part of shed building.
Value for Money: For Arrow shed owners, this kit is essential insurance against structural failure. A poorly squared base can compromise the entire building, making the $169.99 investment negligible compared to potential rework costs. Generic foundation solutions often cost more and lack precise compatibility, while hiring a contractor for a custom base runs $400-600.
Strengths and Weaknesses: Strengths include durable steel construction, perfect Arrow shed compatibility, multi-purpose flooring options, and straightforward assembly. Weaknesses are limited to Arrow/Storboss brands, incompatibility with swing-door models, and requirement for separate flooring materials. The kit provides the frame only, not a complete floor.
Bottom Line: A mandatory purchase for anyone buying a compatible Arrow shed. The precision engineering and foundation security make it worth every penny, ensuring your shed stands straight for decades.
4. Handy Home Products Olympia 10x7.5 Wood Storage Shed with Floor Kit- Does not Include Paint or Roofing Shingles

Overview: The Handy Home Products Olympia 10x7.5 Wood Storage Shed offers a mid-sized solution for homeowners needing robust storage without the premium price of larger models. At $2,002.00, this kit includes a complete wood floor and framing, though paint and shingles are sold separately, requiring additional investment to complete.
What Makes It Stand Out: Engineered to withstand demanding wind and snow loads, this shed provides peace of mind in harsh climates where lesser structures might fail. The 64" extra-wide double doors accommodate lawn tractors and large equipment, a feature often missing in mid-range kits. Its sturdy wood construction allows full customization to match existing structures, making it versatile for various property styles.
Value for Money: Positioned between basic metal sheds and premium large models, this kit offers solid value for those needing serious storage capacity. The included floor kit saves $200-300 compared to building one from scratch. However, the Florida restriction limits its market, and finish materials add $250-400 to the total cost, bringing the true investment to around $2,300.
Strengths and Weaknesses: Strengths include heavy-duty construction rated for severe weather, wide door access, complete floor system, and treated wood durability. Weaknesses are unavailability in Florida, separate purchase requirements for paint and shingles, and smaller footprint than similarly priced alternatives. Assembly requires intermediate skills and a full day of work.
Bottom Line: Excellent choice for non-Florida residents needing a durable, equipment-friendly storage solution. The weather-resistant design and wide doors justify the price for those storing bulky items or living in challenging climates.
5. Storage Shed. Build Your Own Shed. DIY Kit. The Original Fast Framer Shed Bracket Kit. Includes Brackets and Complete Set of Plans. Expandable with Multiple Kits. Made in The USA. No Angled Cuts

Overview: The Original Fast Framer Shed Bracket Kit provides a budget-friendly entry point for DIY shed construction at just $59.99. This made-in-USA kit includes 24 angle brackets, 12 base plates, and complete plans, allowing builders to create custom structures without complex miter cuts, making it accessible to beginners.
What Makes It Stand Out: The “no angled cuts required” design dramatically lowers the skill barrier for novice builders, eliminating one of the most intimidating aspects of framing. Its expandable nature lets users combine multiple kits for larger structures, while the made-in-USA pedigree appeals to domestically-focused consumers. The included cut list and instructions provide clear guidance for first-time projects without overwhelming complexity.
Value for Money: As the most economical option, this kit excels on price alone. However, it provides only basic brackets—no specialized features like the EZ Miter Template or reinforced truss design. The $10 savings versus Product 1 may cost you in build time and structural sophistication. Wood and fasteners remain separate expenses, typically adding $300-800 depending on shed size.
Strengths and Weaknesses: Strengths include unbeatable price, simplicity for beginners, American manufacturing, and expandability. Weaknesses are basic bracket design without reinforcement, lack of advanced features, minimal hardware variety, and no warranty mention. The kit is essentially hardware-only, requiring significant additional material investment.
Bottom Line: Perfect for first-time builders on tight budgets or those wanting the simplest possible approach. While lacking premium features, it delivers core functionality at an accessible price point for basic storage needs.
6. Aoxun Outdoor Resin Storage Shed with Metal Shelving Kit & Floor, 64 Cu.Ft Vertical Waterproof Storage Cabinet for Garage, Pool, Bike, Garden Tools, Patio Furniture (White)

Overview: The Aoxun Outdoor Resin Storage Shed offers a 64 cubic foot vertical storage solution designed for versatile outdoor organization. This white resin cabinet features a unique four-door system that can convert to two-door mode, making it adaptable for both daily access and large item storage. With included metal shelving and a floor kit, it arrives ready for immediate use in garages, pool areas, or patios.
What Makes It Stand Out: The innovative four-door design with connection bars sets this shed apart, allowing users to switch between configurations based on storage needs. The widened anti-toppling bottom enhances stability on uneven surfaces, while the integrated door suction system prevents accidental closure. Its high-quality resin construction provides excellent waterproofing and UV resistance, requiring only simple wiping for maintenance.
Value for Money: At $549.99, this shed sits in the mid-range category. While more expensive than basic metal units, it justifies the price through its flexible door system, included shelving, floor kit, and maintenance-free resin construction. Comparable wood sheds cost significantly more, and metal alternatives often require separate flooring purchases.
Strengths and Weaknesses: Pros: Innovative convertible door design; excellent stability features; waterproof and UV-resistant resin; included metal shelving and floor; low maintenance requirements. Cons: Additional partitions sold separately; resin may lack the structural rigidity of metal; premium price point may deter budget shoppers; 64 cu ft capacity limits larger equipment storage.
Bottom Line: Ideal for homeowners seeking a versatile, weather-resistant storage solution with flexible access options. The Aoxun shed excels in convenience and stability, making it worth the investment for those prioritizing low maintenance and innovative design over maximum capacity.
7. Yardenaler 4x8 FT Metal Outdoor Lean-to Storage Shed, Garden Tool Shed Kit with Door & Lock, Waterproof Patio Utility Tool Shed for Backyard and Garden, Gray

Overview: The Yardenaler 4x8 FT Metal Lean-to Shed provides compact, affordable storage for small spaces. Constructed from 0.012" premium galvanized steel, this gray utility shed features a sloped roof, ventilation system, and lockable door. Its space-efficient design makes it perfect for storing garden tools, bicycles, and small lawn equipment while maximizing limited backyard real estate.
What Makes It Stand Out: This shed’s lean-to design optimizes vertical space against walls or fences, making it ideal for narrow yards. The thickened galvanized steel offers superior wind resistance compared to standard metal sheds, while the included lock adds security without extra expense. Dual ventilation openings prevent moisture buildup, and the sloped roof effectively sheds rain and snow.
Value for Money: At $249.99, this represents exceptional value in the metal shed category. The price includes a lock, thickened steel construction, and weather-resistant features that competitors often charge extra for. For budget-conscious buyers needing compact storage, it’s difficult to find better features at this price point.
Strengths and Weaknesses: Pros: Extremely affordable; space-saving lean-to design; thickened steel for durability; included lock; effective ventilation and sloped roof; straightforward assembly. Cons: Limited 4x8 ft footprint restricts storage capacity; lean-to style requires wall/fence placement; shipped in two boxes that may arrive separately; door height may limit taller equipment.
Bottom Line: Perfect for homeowners with limited space and budget. The Yardenaler shed delivers surprising durability and weather protection for its price, making it an excellent entry-level storage solution for garden tools and small equipment.
8. Handy Home Products Highland 8x6 Modern Wooden Storage Shed with Floor Kit and Palram roof- Does not Include Paint

Overview: The Handy Home Products Highland shed offers a premium 8x6 foot wooden storage solution with modern aesthetics. This kit includes a complete wood floor with framing, OSB decking, and a durable Palram roof. Featuring wide double doors with transom windows and a locking T-handle, it provides ample space for mowers, bikes, and tools while allowing customization through paint (sold separately).
What Makes It Stand Out: Unlike metal or resin alternatives, this wooden shed offers authentic aesthetic appeal that can be personalized to match your property. The included floor kit eliminates additional foundation costs, while the Palram roof provides superior weather protection compared to traditional shingles. The 2x3 framing delivers solid construction for long-term durability.
Value for Money: At $1,619.00, this is a premium investment. However, the price includes flooring, roofing, and windows—components that typically cost extra. When factoring in the aesthetic value and customization potential, it competes favorably with higher-end prefab sheds that often exceed $2,000.
Strengths and Weaknesses: Pros: Attractive wooden construction; customizable with paint; included floor and Palram roof; double doors with windows; sturdy 2x3 framing. Cons: Highest price point in this comparison; not available in Florida; paint not included; requires 4-8 hour assembly with two adults; wood requires maintenance to prevent rot.
Bottom Line: Best suited for homeowners prioritizing aesthetics and customization over budget. The Highland shed justifies its premium price through quality materials and included components, making it ideal for those wanting an attractive, permanent storage solution that enhances property value.
9. Outsunny 11’ x 13’ Outdoor Storage Shed, Garden Tool Metal Shed with Foundation Kit, Double Lockable Door, Air Vents and Sloping Roof, for Backyard, Patio, Lawn, White

Overview: The Outsunny 11x13 foot metal shed delivers expansive storage capacity for extensive outdoor equipment collections. This white galvanized steel structure includes a foundation kit, double lockable doors, four ventilation slots, and a sloped roof. With interior dimensions of 130" x 146.5", it accommodates lawn mowers, pool supplies, bicycles, and large garden tools while maintaining a clean, bright appearance.
What Makes It Stand Out: The sheer size-to-price ratio distinguishes this shed, offering 143 square feet of storage at a competitive price point. Four strategically placed ventilation slots provide superior airflow compared to standard two-vent designs. The included foundation kit adds stability and can be sealed with wood boards for a complete floor system, saving significant additional expense.
Value for Money: At $453.75, this shed delivers exceptional value for its massive capacity. Costing approximately $3.17 per square foot, it undercuts most competitors by 30-40%. The inclusion of a foundation kit and comprehensive ventilation system further enhances its financial appeal for buyers needing maximum storage.
Strengths and Weaknesses: Pros: Massive 11x13 ft capacity; excellent ventilation system; included foundation kit; galvanized steel weather resistance; sloped roof prevents water accumulation; competitive pricing. Cons: Lock not included; requires three people for assembly; white finish shows dirt easily; five-hour assembly time; cannot install in strong winds.
Bottom Line: An outstanding choice for homeowners needing maximum storage capacity on a moderate budget. The Outsunny shed offers unbeatable size value, making it perfect for properties requiring extensive equipment storage without the premium cost of wood or larger metal buildings.
10. Outsunny 11’ x 13’ Outdoor Storage Shed, Garden Tool Metal Shed with Foundation Kit, Double Lockable Door, Air Vents and Sloping Roof, for Backyard, Patio, Lawn, Brown

Overview: The Outsunny 11x13 foot brown metal shed mirrors its white counterpart’s specifications while offering a more traditional aesthetic. This galvanized steel storage building provides 143 square feet of capacity with a foundation kit, double lockable doors, four ventilation slots, and a sloped roof. The brown finish blends naturally with backyard landscapes while delivering the same robust storage solution for lawn equipment, pool supplies, and garden tools.
What Makes It Stand Out: Identical to the white model in features, this version’s brown colorway appeals to buyers seeking visual integration with natural surroundings. The comprehensive ventilation system and included foundation kit remain standout features, while the sloped striped roof design effectively manages rainfall. The color choice doesn’t compromise the galvanized steel’s weather-resistant properties.
Value for Money: At $609.99, this brown version commands a $156 premium over the white model. While features remain identical, the price increase reflects color-specific manufacturing costs. Buyers must decide if the aesthetic benefit justifies the 34% price hike, though it still remains competitive against similarly sized alternatives that often exceed $800.
Strengths and Weaknesses: Pros: Same massive capacity as white model; brown color hides dirt better; excellent ventilation; foundation kit included; durable galvanized steel; effective sloped roof. Cons: Significantly more expensive than white version; lock not included; requires three-person assembly; lengthy five-hour setup; cannot install in windy conditions.
Bottom Line: Choose the brown version if aesthetic preference outweighs budget considerations. Functionally identical to the white model, it offers the same excellent storage value but at a premium. For practical buyers, the white version provides better value, while the brown suits those prioritizing backyard visual harmony.
Understanding Shed Loft Kits and Headroom Fundamentals
What Exactly Is a Shed Loft Kit?
A shed loft kit is a pre-engineered structural system designed to create a secondary storage platform within your shed’s existing framework. Unlike custom-built lofts that require detailed carpentry and engineering, these kits package together joists, brackets, hardware, and installation instructions into a modular solution. The genius lies in their standardized design, which accounts for common shed dimensions and load requirements while offering flexibility for customization. Think of it as a bridge kit for your interior space—components are pre-cut or pre-drilled to work together, eliminating guesswork and ensuring structural integrity.
Why Headroom Should Be Your Top Priority
Headroom determines whether your loft becomes functional storage or wasted potential. The International Residential Code typically mandates a minimum of 7 feet of headroom for habitable spaces, but for storage lofts, you’re really looking at a practical minimum of 3 to 4 feet at the center. Anything less, and you’re essentially creating a crawl space. The real art is balancing upper loft clearance with lower-level usability—every inch you give to the loft floor is an inch you take from the space below. Smart design means calculating your specific needs: will you be walking upright, or just sliding storage tubs? Do you need to stand while organizing, or is kneeling acceptable? These questions drive every other decision.
The Physics of Vertical Space Optimization
Understanding how roof pitch and truss design affect headroom is crucial. A 6/12 roof pitch (rising 6 inches per foot of run) creates dramatically more central headroom than a 4/12 pitch, but the usable space tapers quickly toward the eaves. Cathedral-style rafters without bottom chords offer the most headroom but require different loft support methods than trussed roofs. The key is mapping your shed’s interior profile—measure the height at the walls, at 2-foot intervals toward the center, and at the peak. This elevation map reveals where your loft can sit without compromising structural elements or creating pinch points.
Types of Shed Loft Kits for Different Headroom Needs
Fixed-Height Loft Kits
Fixed-height kits position the loft platform at a predetermined elevation, typically designed for standard 8-foot wall heights. These are the most economical and straightforward options, using pre-engineered brackets that anchor to wall studs at specific heights. The trade-off? You’re locked into that position. If your shed has non-standard dimensions or you need precise headroom optimization, fixed kits can leave you with awkward clearances. They excel in sheds with steep roof pitches where the exact loft height is less critical than overall stability.
Adjustable Height Loft Systems
Adjustable systems feature sliding brackets or multiple bolt-hole patterns that let you fine-tune the loft elevation in 2- to 4-inch increments. This flexibility is invaluable when you’re trying to squeeze out every possible inch of headroom. You can position the platform to clear windows, doors, or existing shelving while maximizing both upper and lower space. These kits cost 20-30% more than fixed-height versions but pay dividends in usability. The hardware is more complex, often using heavy-duty angle iron with reinforced gussets to maintain load capacity across different heights.
Modular Loft Platforms
Modular kits take adjustability further by allowing you to expand the platform footprint over time. They use interlocking joist sections and shared support posts, creating a building-block approach. For headroom optimization, modular systems let you create stepped or tiered lofts—higher platforms near the center for walking access, lower sections near the eaves for shallow storage. This approach mirrors how architects design split-level homes, adapting the floor to the roofline rather than forcing a flat plane where it doesn’t make sense.
Custom-Built Loft Solutions
When headroom is severely constrained or your shed has unconventional dimensions, custom solutions become necessary. This doesn’t mean building from scratch—it means ordering engineered components based on your exact measurements. Many manufacturers offer “custom kit” services where you provide interior dimensions and desired clearances, and they fabricate brackets and cut lumber to spec. This route costs more but eliminates compromise, ensuring you’re not losing inches to standardization.
Critical Measurements and Specifications
Calculating Your Available Headroom
Start with the “golden measurement”: interior peak height minus your desired lower clearance minus the thickness of your loft floor assembly. A typical 2×6 joist with plywood decking consumes 6.5 inches of vertical space—not counting hardware. If your shed peaks at 10 feet and you want 7 feet of standing room below, you’re left with just 2 feet 5.5 inches above the loft—barely enough for storage. Consider using 2×4 joists on tighter centers (12 inches instead of 16) to save 2 inches, or explore engineered lumber that’s stronger and shallower than dimensional lumber.
Understanding Load Capacity Ratings
Load capacity directly impacts headroom because stronger systems require deeper joists or more support posts. Standard loft kits are rated for 20-40 pounds per square foot (psf) live load—adequate for storage but not for workshop use. Heavy-duty kits rated for 50+ psf use engineered I-joists or LVL beams that can span greater distances with less depth. This paradox means that spending more on a high-capacity kit can actually increase your headroom by reducing the need for intermediate supports that eat into your space.
Span and Joist Spacing Considerations
Joist span tables aren’t just building code formalities—they’re headroom optimization tools. A 2×6 joist can span 8 feet at 16-inch centers for light storage, but pushing that span to 10 feet might require 2×8 joists, costing you 2 inches of headroom. The solution? Strategic post placement. Adding a single center post can halve the span, allowing shallower joists and reclaiming vertical space. Map your lower-level workflow first—place posts where they won’t interfere with workbenches or large equipment access.
Material Options and Their Impact on Headroom
Wood Framing Systems
Traditional wood kits use pressure-treated lumber or kiln-dried pine. The advantage is workability—you can trim on-site to accommodate irregularities. The downside is bulk. A standard 2×6 is actually 1.5×5.5 inches, but when you add cross-bracing and ledger boards, you lose 7-8 inches of headroom. Advanced wood kits use laminated veneer lumber (LVL) or parallel strand lumber (PSL), which provides the same strength as a 2×8 in a 2×6 profile, saving precious inches. These engineered woods cost 40-50% more but deliver unmatched headroom efficiency.
Steel Frame Loft Kits
Steel kits use light-gauge metal C-channels or box tubing, typically 1.5 to 2 inches deep, offering superior strength-to-thickness ratios. A steel loft can achieve the same load capacity as wood while consuming 30-40% less vertical space. The trade-offs include higher material cost, specialized cutting tools if modifications are needed, and thermal bridging—steel conducts cold, potentially creating condensation issues in uninsulated sheds. For maximum headroom in a climate-controlled shed, steel is the premium choice.
Hybrid Material Solutions
The smartest designs often combine materials: steel ledger brackets with wood joists, or aluminum support posts with engineered lumber beams. This approach lets you place high-strength, low-profile steel where headroom is tightest (near access points) and use economical wood where clearance is abundant. Hybrid systems require careful engineering to prevent galvanic corrosion between dissimilar metals and wood movement issues, but they offer the best headroom-to-cost ratio for complex installations.
The Hidden Space Cost of Material Thickness
Don’t overlook the finishing materials. Three-quarter-inch plywood subfloor plus carpet or rubber matting adds another inch. If you’re using the loft for finished storage, that inch matters. Some kits now offer integrated floor panels—engineered wood with built-in texture that eliminates the need for additional decking. These panels are 5/8-inch thick but rated like 3/4-inch plywood, saving another 1/8 to 1/4 inch. It sounds trivial until you’re ducking under a low rafter.
Installation Factors That Affect Headroom
DIY vs. Professional Installation
DIY installation saves money but risks headroom loss through installation errors. A ledger board installed 1 inch lower than planned due to leveling issues cascades into reduced clearance throughout. Professional installers use laser levels and story poles to ensure every component sits at the optimal elevation. They also understand how to “sister” joists to existing rafters or modify trusses without compromising structural integrity—something most homeowners shouldn’t attempt. The cost difference (typically $300-$500 for a standard 8×10 loft) often pays for itself in reclaimed headroom and peace of mind.
Tools and Skills Required
Headroom-optimized installations demand precision. You’ll need a rotary laser level to establish a perfectly horizontal reference plane across uneven shed floors and walls. A plumb bob helps transfer that line to the ceiling for accurate bracket placement. For skills, you must understand how to read load span tables and calculate reaction forces at support points. Misplacing a bracket by even 2 inches can shift loads from compression to tension, requiring additional hardware that protrudes into your headroom. Take time to dry-fit everything and measure twice—literally—before drilling any holes.
Common Installation Pitfalls
The most frequent mistake is ignoring deflection. A loft floor loaded with 300 pounds of storage will sag 1/4 to 1/2 inch over time. If you’ve planned clearances to the exact inch, that sag creates a head-banging hazard. Always build in a 1-inch safety margin above the minimum headroom. Another pitfall is over-tightening lag bolts into ledger boards, which can crush wood fibers and reduce load capacity, forcing you to add extra supports that steal space. Use a torque wrench and follow manufacturer specs religiously.
Building Codes, Permits, and Safety Compliance
When Permits Are Required
Most jurisdictions don’t require permits for storage lofts under 200 square feet, but this varies wildly. The trigger is often structural modification—if you’re cutting truss chords or adding exterior vents for loft access, you’ve crossed into permit territory. Headroom itself can be a code issue; some areas classify lofts with over 4 feet of clearance as “habitable attics,” triggering stair requirements instead of ladder access. Always check with your local building department before purchasing a kit. The cost of a permit ($50-$150) is negligible compared to the cost of tearing out non-compliant work.
Safety Railings and Access Requirements
OSHA standards for residential storage spaces require guardrails on any platform over 30 inches high where the fall distance exceeds 6 feet. But here’s the headroom twist: railings must be 36-42 inches tall, which can interfere with roof slope. The solution is integrating the railing with the roof structure—mounting posts to rafters rather than the loft edge, or using cable rail systems that maintain fall protection without solid panels that reduce visual spaciousness. For access, vertical ladders are space-efficient but code often requires angled stairways if the loft exceeds certain size thresholds, eating into your floor plan.
Fire Safety and Ventilation Codes
Lofts create concealed spaces that can trap heat and smoke. Many codes now require passive ventilation—such as gable vents or ridge vents—if the loft area exceeds 50% of the shed’s floor area. This can affect headroom if you need to duct a vent through your loft space. Smoke detectors powered by 10-year sealed batteries are mandatory in some jurisdictions for any elevated storage platform. Plan detector placement to avoid false alarms from dust while ensuring coverage. The headroom impact is minimal, but the electrical box placement needs coordination with your loft layout.
Design Strategies for Maximum Headroom
The Cathedral Ceiling Approach
If your shed uses rafters instead of trusses, you can create a cathedral-style loft by attaching the platform to the rafters themselves rather than building a separate floor system. This “hung loft” uses engineered hangers and threaded rod suspension to float the platform 2-3 feet below the peak, preserving the dramatic ceiling line. The result is 6+ feet of headroom in the center while the loft perimeter tapers to 2-3 feet—perfect for storing long items like kayaks or lumber along the edges while maintaining full standing room in the middle.
Shed Roof Pitch Optimization
For new sheds or major roof modifications, increasing pitch from 4/12 to 6/12 adds approximately 16 inches of peak height in a 12-foot-wide shed. This translates to 8+ inches of additional usable headroom after accounting for loft thickness. If you’re retrofitting, consider raising the roof ridge with a “roof lift” kit—specialty brackets that extend rafters upward. While this is a major project, it’s often cheaper than building a new shed and yields headroom gains that no interior modification can match.
Strategic Loft Placement
Not every loft needs to span the entire shed. A partial loft covering just 60% of the floor area—typically the rear wall—leaves full-height space near the door for workbenches and tall equipment. This “loft alcove” approach maximizes psychological spaciousness while delivering 70% of the storage benefit. Use the area under the loft’s highest point for a work zone, and the perimeter eave space for deep storage. This hybrid design often satisfies both headroom purists and storage maximalists.
Multi-Level Loft Configurations
For sheds with very steep pitches (8/12 or greater), consider a split-level loft. A lower platform at 4 feet height spans the outer 3 feet on each side, while a central walkway sits at 6 feet. This creates three distinct storage zones: low bins at the edges, a central corridor, and full-height space below for lawn tractors or tall cabinets. The stepped design follows the roof’s natural geometry, turning what would be awkward triangular voids into purposeful storage niches.
Load-Bearing Considerations and Structural Integrity
Understanding Live Loads vs. Dead Loads
Dead load is the weight of the loft itself—joists, decking, hardware. Live load is everything you add: storage, people, snow if the loft is near a leaky roof. A typical kit might weigh 200 pounds (dead load) but be rated for 1,200 pounds total (live load). Here’s the headroom connection: exceeding live load causes deflection, which reduces clearance. Always design for 125% of your anticipated load. If you plan to store 500 pounds of holiday decorations, spec a kit rated for 625+ pounds to maintain headroom integrity over time.
Reinforcing Existing Shed Structures
Most sheds aren’t built to support lofts. The walls may be 24-inch-on-center studs rather than 16-inch, and the floor might not handle the concentrated loads from a ladder or stair. Before installation, sister additional studs to existing ones where ledger boards will attach, spreading the load to the foundation. For the shed floor, add a 3/4-inch plywood layer under the ladder base to prevent point-loading that could cause settling and headroom misalignment. These reinforcements are invisible but critical for maintaining level clearances.
The Role of Collar Ties and Rafter Modifications
In raftered sheds, collar ties (horizontal members connecting opposing rafters) often sit at exactly the height where you want your loft. Moving them higher (or replacing them with structural ridge beams) can gain 6-12 inches of headroom. This is advanced work requiring engineering approval, but some loft kits include engineered drawings for collar tie relocation. Never remove collar ties without adding alternative bracing—the roof can spread and fail. The right kit will show you how to integrate new supports without sacrificing the space you’re trying to create.
Access Solutions That Preserve Headroom
Ladder vs. Staircase Options
Vertical ladders consume zero floor space but require climbing agility. Angled staircases need 30-40 square feet of floor area but provide safe, code-compliant access. For headroom optimization, consider a “disappearing staircase”—a steep, ship’s-ladder design that mounts to a hinge and folds flat against the wall when not in use. These hybrid solutions maintain 90% of a vertical ladder’s space efficiency while providing 70% of a staircase’s safety. The key is mounting the hinge high enough that the folded ladder doesn’t protrude into your lower-level headroom.
Fold-Down and Sliding Ladder Systems
Modern hardware allows ladders that slide on wall-mounted tracks, moving horizontally to access different loft sections. A single ladder can service a 12-foot-long loft by sliding along a header track, eliminating the need for multiple access points. When not in use, the ladder hooks vertically against the end wall, consuming only 2 inches of depth. This preserves both floor space and sight lines, making the shed feel larger while providing full loft access.
Loft Hatch and Access Point Placement
The access opening itself impacts headroom. A standard 24×36 inch hatch cut through the loft floor reduces usable storage area and creates a trip hazard. Better designs use offset hatches placed at the loft’s perimeter, where headroom is already limited. The hatch door can be hinged to lift up and latch to the rafters, becoming a safety rail when open. This dual-function design exemplifies how every component should serve multiple purposes in space-constrained environments.
Cost Factors and Budget Planning
Material Cost Breakdowns
A basic wood loft kit for an 8×10 shed runs $300-$500. Steel kits start around $600 and climb to $1,200 for heavy-duty systems. Engineered lumber kits sit in the middle at $450-$800. But the real cost driver is headroom optimization: custom-height brackets add $150-$200, and engineered drawings for permit approval run $200-$400. Budget an additional 20% for unforeseen structural reinforcement. The cheapest kit that meets your load needs is rarely the most cost-effective when you factor in installation time and long-term usability.
Hidden Costs to Watch For
Headroom-specific hidden costs include: taller ladder or staircase requirements if you maximize vertical space ($100-$300), additional lighting for the lower level if the loft blocks ceiling fixtures ($50-$150), and ventilation modifications to prevent heat stratification ($75-$200). The biggest hidden cost is remedial work—if you install a kit and discover headroom is inadequate, you’ll pay double to remove and reconfigure it. Measure obsessively and consider a cardboard mock-up before final installation.
ROI and Property Value Impact
A well-executed loft can increase functional shed space by 50-100%, effectively adding $2,000-$5,000 in property value for a cost of $500-$1,500. Headroom is the key value driver—appraisers and buyers recognize usable space versus awkward crawl space. Document your installation with photos and engineering specs; this transforms a “homeowner addition” into a “structural improvement” in valuation terms. The headroom you preserve today pays dividends when it’s time to sell.
Maintenance and Long-Term Performance
Preventing Moisture and Condensation Issues
Lofts create temperature stratification—warm air rises and condenses on the cooler roof underside. This moisture drips onto your stored items and rots wood components. The solution is continuous ventilation: ridge vents, soffit vents, and possibly a small solar-powered exhaust fan. Install a vapor barrier on the warm side (the loft floor) using 6-mil polyethylene sheeting under the decking. In humid climates, consider closed-cell spray foam insulation on the roof deck to move the dew point outside the structural cavity, though this reduces headroom by 3-4 inches.
Inspection Schedules for Loft Integrity
Headroom can change over time through settling and load creep. Inspect your loft quarterly for the first year, then annually. Check for new gaps at wall connections, sagging joists, and loose hardware. A simple test: place a 4-foot level on the loft floor. Any deviation from level indicates deflection that’s reducing clearance. Tighten lag bolts and check for wood crushing at bearing points. Catching issues early lets you add reinforcement before headroom is critically compromised.
Seasonal Adjustments and Settling
Wood lofts settle differently across seasons. Humidity causes joists to swell and lift slightly in summer, potentially reducing lower-level clearance by 1/8 inch. In winter, drier air causes shrinkage and sagging. If you live in a climate with extreme seasonal swings, consider installing adjustable post bases that allow 1/2 inch of height correction. Turnbuckles on suspension rods or threaded post anchors let you fine-tune loft elevation twice a year, maintaining optimal headroom year-round.
Common Mistakes That Reduce Effective Headroom
Underestimating Material Thickness
The number one error is forgetting that hardware adds thickness. A Simpson LUS26 joist hanger protrudes 1.5 inches below the joist bottom. If you mount these on both sides of a ledger, you’ve lost 3 inches of headroom along the entire loft edge. Use face-mount hangers (LUF26) that attach to the side of the ledger, preserving clearance. Similarly, bolt heads and washers can protrude 1/2 inch. Counterbore these into the wood or use low-profile carriage bolts. Every fraction of an inch matters when you’re working with minimal clearance.
Poor Access Planning
Installing the loft first, then realizing your ladder hits a rafter or door header is a classic blunder. Mock up your access path with tape on the floor and a cardboard cutout representing the loft opening. Walk through the motion of climbing with a heavy box. You’ll quickly discover if the route impinges on headroom or creates awkward twists. The best designs integrate access hardware into the initial kit installation, not as an afterthought.
Ignoring Building Codes
Code violations force you to add safety features that rob headroom. An inspector might require a taller guardrail after installation, which could mean rebuilding the loft edge 6 inches higher than planned. Or they could mandate a different ladder angle that protrudes further into the workspace. Getting pre-approval on your design ensures the headroom you plan is the headroom you keep. Submit detailed drawings showing clearances at all points before buying materials.
Customization and Flexibility Options
Removable vs. Permanent Loft Installations
Removable lofts use bolt-together connections without permanent fasteners into walls. This is ideal if you need seasonal flexibility—removing the loft in summer for tall projects, reinstalling in winter for storage. The trade-off is reduced load capacity and slightly lower headroom due to bulkier connection hardware. Permanent installations using lag bolts and joist hangers are stronger and sleeker but commit you to the configuration. Consider a hybrid: permanent ledger boards with removable joist hangers that slot in when needed.
Expandable Loft Systems
Some kits are designed for future expansion, with ledger brackets that accept additional joist bays later. This lets you start with a 4-foot-deep loft (preserving maximum lower-level headroom near the door) and extend it to 8 feet as storage needs grow. The key is buying a kit with extra ledger length and pre-drilling holes for future joists. This forward-thinking approach costs 15% more initially but prevents a complete rebuild later.
Integrated Storage Solutions
Maximize headroom efficiency by choosing kits with built-in storage features. Some include recessed areas for sliding tote bins, with joists spaced exactly 24 inches on center to match bin widths. Others have integrated shelving brackets that hang below the loft, using what would be dead space for small-item storage. These features reduce the need for separate shelving units that consume floor space and visual headroom.
Integrating Loft Kits with Existing Shed Designs
Retrofitting Older Sheds
Pre-1990s sheds often have 2×3 studs and undersized rafters, making them poor candidates for standard kits. The solution is a freestanding loft system that doesn’t rely on wall strength. These use four corner posts and cross-beams, creating a self-supporting structure within the shed. While this consumes more floor space, it preserves headroom by eliminating thick ledger boards on walls. The posts can be placed to avoid windows and doors, and the system can be dismantled and moved if the shed is replaced.
Matching Your Shed’s Aesthetic
A modern steel loft in a rustic barn-style shed creates visual dissonance that makes the space feel smaller. Choose materials that complement your shed’s character—rough-sawn wood kits for traditional sheds, powder-coated steel for contemporary designs. The aesthetic match improves perceived spaciousness. Paint the loft assembly to match the interior walls; a monochromatic scheme blurs boundaries and makes headroom feel more generous than it is.
Working with Non-Standard Shed Dimensions
Most kits are designed for 8, 10, or 12-foot widths. For a 9-foot shed, you’ll need to modify either the kit or the shed. The better option is often adding a false wall: build a 2×4 stud wall 6 inches from the existing wall, creating an 8-foot-6-inch interior dimension that accepts a standard kit. This sacrifices 6 inches of width but preserves headroom and simplifies installation. The cavity between walls becomes built-in shelving, so you lose no net storage.
Frequently Asked Questions
How much headroom do I actually need for a functional storage loft?
For occasional access to slide storage bins, 3 feet of clearance at the loft’s highest point is workable. For regular access where you’ll be organizing and retrieving items, aim for 4 to 5 feet. If you plan to use the loft as a workspace or frequent retrieval area, 6 feet allows most adults to stand upright comfortably. Always measure from the top of the finished loft floor to the underside of the roof sheathing, and subtract 1 inch for deflection over time.
Can I install a loft kit in a shed with trusses instead of rafters?
Yes, but with critical modifications. Standard trusses have bottom chords that are structural members—you cannot cut or remove them. You must install the loft between the chords, which typically limits headroom. Some kits are specifically designed for truss systems, using brackets that attach to the chords without modification. For better clearance, consider a “scissor truss” modification kit that replaces existing trusses with raised-chord designs, though this is a major structural project requiring engineering and permits.
Will adding a loft affect my shed’s warranty?
Most shed warranties explicitly exclude modifications, including lofts. However, many manufacturers offer their own loft kits that preserve warranty coverage when installed according to their specifications. If you’re using a third-party kit, document that it was installed without altering the shed’s original structure—no cutting of wall studs or roof members. Some warranties can be maintained by having the loft installed by a certified contractor who provides a separate workmanship warranty.
How do I calculate the load capacity I need for my storage?
Weigh a typical storage tote filled with your items—most people are surprised to find they average 40-50 pounds each. Multiply by the number of totes you plan to store, then divide by the loft’s square footage. For example, 20 totes at 45 pounds each equals 900 pounds. On an 80-square-foot loft, that’s 11.25 psf. Add a 50% safety margin for future accumulation and dynamic loads (walking, moving items), bringing you to 17 psf. Round up to the nearest standard rating: 20 psf minimum, 30 psf for peace of mind.
What’s the best way to maximize headroom in a low-pitch shed (4/12 or less)?
Focus on a shallow loft system using 2×4 joists on 12-inch centers, covered with 1/2-inch plywood. Position the loft as high as possible, even if it means reducing upper clearance to 2.5 feet—this space is only for long-term storage of flat items like lumber or seasonal decorations. Use the lower level for all active storage and workspace. Consider a pull-down loft that can be raised to the roof when not in use, using pulley systems similar to attic stair hardware.
Do I need to reinforce my shed floor before adding a loft?
Probably. The loft’s weight plus stored items concentrates load on the floor through ladder or stair footings and vertical support posts. Most shed floors are rated for 40 psf uniformly distributed but fail under point loads. Add a 2-foot square of 3/4-inch plywood under any ladder or post location to distribute weight. For heavy lofts, consider adding a second layer of plywood across the entire floor, screwing it to the original with construction adhesive. This effectively doubles floor stiffness for about $100 in materials.
How does insulation affect loft headroom?
Insulation installed between rafters reduces headroom by its thickness plus an air gap. R-19 fiberglass is 6.25 inches thick; spray foam yields R-21 in just 3.5 inches. For maximum headroom, use closed-cell spray foam applied directly to the roof sheathing. While expensive ($2-$3 per square foot), it provides the highest R-value per inch and eliminates the need for vent baffles. In moderate climates, consider insulating only the loft floor with 2-inch rigid foam, keeping the loft itself unconditioned but preserving maximum height.
Can I install electrical outlets or lighting in my loft?
Yes, but plan it before installing the loft kit. Run armored cable (BX) or conduit along rafters before the loft goes in—it’s nearly impossible to fish wire afterward without cutting access holes that weaken joists. Use low-profile LED strip lighting mounted directly to rafters to avoid losing headroom to junction boxes. Place outlets at the loft perimeter where you’ll have 12-18 inches of clearance to reach them. All work must be on a dedicated circuit with GFCI protection if the shed is damp.
What maintenance does a loft kit require?
Quarterly inspection of all bolted connections—snug but don’t overtighten. Annually, check for wood splitting around lag bolts and rust on metal hardware. Every 2-3 years, reapply water sealant to any exposed wood, especially ledger boards near walls where condensation occurs. If you notice sagging, immediately unload the loft and inspect for structural failure. Most headroom loss over time is due to accumulated loads exceeding design specs; remove items and the loft should spring back.
How do I know if my shed can support a loft before I buy a kit?
Hire a structural engineer for a site visit ($200-$400) if your shed is large or you plan heavy loads. For standard 8×10 or 10×12 sheds, perform a simple test: jump in the center of the shed floor. If it feels bouncy or you see wall movement, the structure is marginal. Check wall studs with a stud finder—if they’re 24-inch on-center, you’ll need reinforcement. Look for diagonal bracing in walls; its absence suggests a lightweight build that may not handle loft loads. When in doubt, choose a freestanding loft system that doesn’t rely on shed structure.