Modern minimalist landscaping isn’t about emptiness—it’s about intentional simplicity. Every element serves a purpose, every line has meaning. In this refined aesthetic, where concrete meets greenery and geometry dances with nature, the humble border becomes a critical design statement. Enter slate chippings edging: the unsung hero of contemporary garden design that bridges the gap between stark architectural lines and organic softness.
Unlike traditional edging materials that scream for attention, slate chippings whisper sophistication. Their natural stratification and subtle color variations create visual interest without visual chaos, making them the perfect complement to minimalist principles. Whether you’re framing a sleek pathway, defining a monochromatic planting scheme, or creating a transition zone between patio and lawn, slate chippings offer a versatility that few materials can match. This guide walks you through everything you need to know to execute this look with the precision it demands.
Top 10 Slate Chippings Edging for Modern Borders
Detailed Product Reviews
1. Emsco Group 2032HD Bedrocks Trim-Free Gray, 20 Feet – Natural Stacked Slate Design Garden Lawn Edging
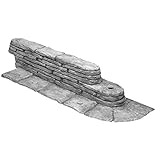
Overview: The Emsco Group 2032HD delivers 20 feet of premium landscape edging designed to eliminate the tedious chore of edge trimming. This system features a natural stacked slate aesthetic molded from durable plastic, offering homeowners a high-end look without the weight or cost of real stone. The package includes integrated stakes and requires no trench digging, making it a straightforward DIY solution for defining garden beds, pathways, and lawn borders.
What Makes It Stand Out: The patented trim-free flange is the star feature, creating a solid surface for mower wheels while preventing grass encroachment. This eliminates weekly string-trimming work. The flexible design bends around curves and accommodates 90-degree corners through T-connectors, adapting to virtually any landscape layout. Unlike rigid stone, these adjustable pieces contour effortlessly without special cutting tools.
Value for Money: At $4.40 per foot, this edging sits in the mid-to-premium range. The price is justified by the time-saving trim-free design and the realistic slate appearance that rivals natural stone. When compared to installing real stone or metal edging with professional labor, this product offers significant savings while delivering comparable aesthetic appeal.
Strengths and Weaknesses: Strengths include effortless no-dig installation, mower-friendly flange, flexible contouring, and authentic stone aesthetics. The 20-foot length suits medium to large projects without excessive waste. Weaknesses involve potential fading under intense UV exposure over several seasons, and the flange may not accommodate all mower deck heights. Plastic construction, while durable, won’t match real stone’s longevity.
Bottom Line: This edging excels for homeowners seeking a clean, professional lawn edge without perpetual maintenance. The trim-free feature alone justifies the investment, making it ideal for busy property owners who value both aesthetics and efficiency.
2. VEVOR Faux Stone Landscape Edging, No Dig Garden Edging Border, Flexible Blocks for Lawn Edging, Flower Beds, Driveway, Yards with 12 Spikes, 4 Pack 24 Bricks 16FT Kit, 46.5" Lx 3.7" W x 2.2" H, Grey
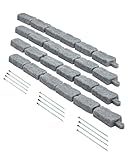
Overview: VEVOR’s 16-foot faux stone edging kit provides 24 interlocking bricks featuring remarkably realistic stone textures. Constructed through rotational molding from high-quality PE plastic, these grey blocks deliver authentic depth and dimension. Each brick measures 46.5 inches long, creating substantial coverage while remaining lightweight at just 2.2 pounds per piece. The system includes 12 spikes for secure anchoring without excavation.
What Makes It Stand Out: The rotational molding process creates superior durability and fade resistance compared to standard injection-molded alternatives. The hollowed-out bottom shell is ingeniously engineered to prevent sinking in soft soil—a common failure point with heavier edging. The modular design allows seamless transitions between straight runs and creative curves, adapting to poolsides, driveways, and intricate garden beds.
Value for Money: Priced at $71.99 for 16 feet ($4.50 per foot), this kit offers excellent value for the construction quality. The realistic aesthetics rival products costing twice as much, while the included anchoring hardware eliminates hidden expenses. For DIYers wanting stone appearance without masonry costs, this represents smart economics.
Strengths and Weaknesses: Strengths include outstanding weather resistance, lightweight handling, authentic texture, and stability on soft ground. The interlocking system enables rapid installation. Weaknesses are the limited 16-foot coverage for larger projects, and the grey color may not suit all landscape palettes. Some users might require additional spikes for extremely loose soil conditions.
Bottom Line: An exceptional choice for those prioritizing realistic stone aesthetics and long-term durability. The engineering details like the hollow base demonstrate thoughtful design, making it perfect for discerning homeowners tackling medium-scale edging projects.
3. 2032-1-1 Bedrocks Trim-Free Lawn Edging – Gray, – tural Stacked Design Bedrock Garden Edging, 10’, Slate 9 (10 peices)
Overview: This 10-foot Bedrocks edging package delivers the same premium trim-free technology as its longer counterpart in a more compact form. Featuring ten individual pieces with integrated stakes, this system targets smaller landscaping projects or serves as supplemental edging. The dual-tier stacked slate design creates dimensional visual interest, while the gray tone provides neutral contrast against garden foliage. Installation remains tool-minimal with no digging required.
What Makes It Stand Out: The enhanced flexibility allows adjustment up to 180 degrees, surpassing many competitors that only manage 90-degree bends. This freedom enables tight serpentine curves and intricate border designs without cutting. The dual-tier profile adds depth that single-plane edging lacks, creating more convincing stone simulation. The trim-free flange maintains its position as a key differentiator, eliminating tedious string trimming.
Value for Money: At $6.00 per foot, this is premium pricing reflecting the smaller package size. While costlier per foot than the 20-foot version, it reduces waste for compact gardens. The price is justified for targeted applications where purchasing excess material would be inefficient. However, budget-conscious buyers with larger needs should opt for longer bundles.
Strengths and Weaknesses: Strengths include superior flexibility for complex layouts, authentic dual-tier aesthetics, no-dig convenience, and mower-compatible flange. The 10-foot length eliminates overbuying for small spaces. Weaknesses center on the high per-foot cost and limited coverage—most projects require multiple packages. The plastic construction may show wear in high-traffic areas over time.
Bottom Line: Ideal for small-scale applications, curved designs, or finishing touches where the 20-foot version would be excessive. The exceptional flexibility makes it the best choice for artistic, non-linear landscape borders despite the premium price.
4. VEVOR Faux Stone Landscape Edging, No Dig Garden Edging Border, Flexible Blocks for Lawn Edging, Flower Beds, Driveway, Yards with 12 Spikes, 4 Pack 24 Bricks 16FT Kit, 46.9" Lx 4" W x 6" H, Brown

Overview: VEVOR’s taller brown variant stands at an impressive 6 inches high, providing superior containment for mulch, gravel, and soil compared to standard 2-3 inch edging. This 16-foot kit includes 24 bricks measuring nearly 4 feet each, delivering substantial visual presence. The brown coloration mimics natural sandstone, while rotational-molded PE construction ensures durability. At 4.4 pounds per brick, this system offers enhanced stability without becoming unmanageable.
What Makes It Stand Out: The substantial height creates a true barrier that prevents spillover and clearly defines spaces, making it ideal for driveway edges and raised beds. The hollow-bottom design prevents sinking while maintaining lightness. The interlocking mechanism remains tool-free, and the realistic texture captures natural stone variation convincingly. This profile commands attention in ways low-profile edging cannot.
Value for Money: At $109.99 for 16 feet ($6.87 per foot), this is premium pricing. However, the height advantage eliminates need for separate retaining elements in many applications. For projects requiring true containment rather than mere delineation, the cost is justified. Compared to natural stone of similar dimensions, savings are substantial.
Strengths and Weaknesses: Strengths include excellent height for containment, stable hollow-base engineering, authentic brown stone aesthetics, and weather-resistant construction. The modular system adapts to curves and corners. Weaknesses involve the highest per-foot cost in this comparison, heavier weight requiring more installation effort, and the tall profile may interfere with some mower designs.
Bottom Line: A premium solution for serious landscape definition and material containment. The height advantage makes it worth the investment for driveways, slopes, and raised beds where lower edging proves inadequate. Best suited for projects demanding both beauty and functional barrier performance.
5. Suncast Interlocking Border Edging - Stone -Like Poly Construction for Garden, Lawn, and Landscape Edging - Water Resistant Border for Containing Trees, Flower Beds and Walkways - Light Taupe, 20

Overview: Suncast provides a budget-conscious 20-foot edging solution featuring stone-like poly construction in versatile light taupe. This system employs simple interlocking sections that connect without tools, requiring only a mallet for tapping into place. The design eliminates digging entirely, making it accessible for novice DIYers. At 20 feet, it covers substantial linear distance, suitable for tree rings, basic bed borders, and walkway definition.
What Makes It Stand Out: The exceptional affordability at $2.60 per foot makes this the most economical option reviewed. The taupe-gray color blends unobtrusively with various landscape schemes. The system flexibly creates both curved tree rings and sharp 90-degree corners, offering versatility uncommon at this price point. Water-resistant poly construction withstands typical weather conditions without rotting or rusting.
Value for Money: Outstanding value defines this product. The 20-foot length under $52 represents significant savings over competitors. While aesthetics are less refined than premium options, the functionality per dollar is unmatched. For large projects or budget landscaping, this allows extensive coverage without financial strain. The included length alone makes it practical for wrapping multiple trees or defining long beds.
Strengths and Weaknesses: Strengths include unbeatable price, generous 20-foot coverage, simple tool-free installation, and versatile shaping capabilities. The poly material is lightweight and weather-resistant. Weaknesses involve less realistic stone appearance, potential durability concerns under heavy impact, lack of trim-free flange requiring separate edging maintenance, and thinner profile offers minimal containment.
Bottom Line: The smart choice for budget-focused projects where functionality trumps high-end aesthetics. Perfect for large properties, rental units, or temporary installations. While it won’t fool anyone into thinking it’s real stone, it delivers clean edges and adequate performance at a fraction of premium product costs.
6. Suncast 5 Piece Plastic Border Stone Edging with Modern Style and Natural Border Stone Appearance for Enclosing Flower Beds or Garden Plots, Brown

Overview: The Suncast 5-Piece Border Stone Edging offers a practical solution for homeowners seeking quick garden bed definition. This brown plastic edging system spans five feet total, with each 12-inch section designed to create a natural stone appearance without the weight or cost of real rock. Ideal for small flower beds or garden plots, this lightweight alternative promises easy setup and minimal maintenance while delivering a polished landscaping finish.
What Makes It Stand Out: The product’s modern styling combined with natural stone aesthetics creates an impressive visual balance. Its durable plastic construction withstands harsh weather conditions without cracking or fading, ensuring season-after-season performance. The versatile five-section design allows for straightforward linear arrangements, while the rich brown hue seamlessly integrates with most outdoor environments, creating harmonious transitions between landscaped areas.
Value for Money: At $28.99 for five linear feet, this edging costs approximately $5.80 per foot—significantly less than natural stone alternatives that can run $15-20 per foot. While the coverage is modest, the durability and zero-maintenance design justify the investment for small-scale projects. It eliminates the need for heavy lifting, professional installation, or ongoing sealing treatments required by genuine stone.
Strengths and Weaknesses: Strengths include lightweight portability, weather-resistant construction, authentic color blending, and tool-free installation. The snap-together design saves considerable time and effort. Weaknesses are the limited five-foot coverage per package, plastic material that may look less convincing upon close inspection, and restricted flexibility for creating complex curves or tight corners.
Bottom Line: This Suncast edging excels for budget-conscious gardeners tackling modest projects. While not suitable for large installations or those seeking ultra-realistic materials, it delivers reliable performance and attractive aesthetics for small bed definition. Recommended for DIY enthusiasts wanting quick, affordable results without heavy labor.
7. Landical 8 Pcs Retaining Wall Block Faux Stone Edging for Landscaping, 17 x 13 Inch Garden Border Landscape Edging Blocks Garden Plastic Fence for Mulch Flower Bed Patio Lawn Path Walkway

Overview: Landical’s eight-piece edging system revolutionizes garden borders with its innovative digging-free design. Each 17.3-inch section creates over 11.5 feet of professional-looking stone edging without requiring backbreaking excavation work. The substantial blocks stand 12.6 inches tall with 7.5 inches anchoring into the ground, providing impressive presence for flower beds, pathways, and patio borders while maintaining a naturally landscaped aesthetic.
What Makes It Stand Out: The integrated ground stake system eliminates the primary pain point of landscape edging installation—no shoveling required. Simply push each lightweight section into place for immediate results. The generous dimensions create a commanding visual barrier that effectively contains mulch and defines spaces. Weather-resistant construction withstands mowers, temperature fluctuations, and seasonal ground movement without crumbling or cracking.
Value for Money: Priced at $54.99 for 11.5 feet, this system costs approximately $4.78 per linear foot. This mid-range pricing reflects the premium convenience factor of dig-free installation. Compared to traditional paver edging requiring hours of trenching and leveling, the time savings alone justify the cost. Professional stone installation could exceed $25 per foot, making this an economical alternative.
Strengths and Weaknesses: Major strengths include effortless installation, robust weather resistance, versatile application beyond garden beds, and substantial height for effective containment. The faux stone appearance convincingly mimics natural rock. Weaknesses include a higher upfront cost than basic plastic edging, potential instability in very loose or sandy soils requiring additional anchoring, and a bulkier profile that may overwhelm smaller garden spaces.
Bottom Line: Landical delivers exceptional convenience for homeowners prioritizing easy installation over absolute authenticity. Perfect for those avoiding physical strain or seeking quick weekend project completion. While not the cheapest option, the dig-free design and durable construction make it a smart investment for medium-sized landscaping projects.
8. Suncast Interlocking Border Edging - Stone -Like Poly Construction for Garden, Lawn, and Landscape Edging - Water Resistant Border for Containing Trees, Flower Beds and Walkways - Light Taupe -Gray
Overview: Suncast’s interlocking stone-like edging provides a sophisticated taupe-gray solution for defining outdoor spaces. The poly construction delivers durability without the heft of natural stone, while the innovative slide-together design eliminates digging requirements. This versatile system adapts to both curved tree rings and sharp 90-degree corners around flower beds, offering flexibility that rigid materials cannot match for creating custom landscape layouts.
What Makes It Stand Out: The clever interlocking mechanism allows sections to simply slide together and secure with light mallet taps—no trenching necessary. This taupe-gray colorway offers a contemporary alternative to traditional brown or gray stone, complementing modern home exteriors beautifully. The weatherproof poly material withstands seasonal changes without cracking, fading, or requiring maintenance, while effectively blocking grass intrusion and containing garden materials.
Value for Money: At $30.00 per package, this edging represents solid mid-range value. While exact piece count isn’t specified in features, typical Suncast configurations provide 5-6 feet of coverage, positioning the price around $5-6 per linear foot. This cost balances affordability with quality construction, costing significantly less than professional masonry work while delivering similar visual impact and superior installation ease.
Strengths and Weaknesses: Strengths include effortless no-dig installation, flexible design accommodating curves and corners, attractive contemporary coloring, and robust weather resistance. The interlocking system ensures stable connections. Weaknesses include ambiguous quantity specifications, plastic composition that may appear less authentic than composite alternatives, and potential for shifting in frost-prone climates without deeper anchoring.
Bottom Line: This Suncast edging excels for design-conscious homeowners needing layout flexibility. Ideal for creating tree rings or angular bed designs without excavation labor. While specifications could be clearer, the performance and aesthetic versatility make it a reliable choice for moderate-sized projects where adaptability is paramount.
9. Beuta Landscape Edging | Garden Edging Border | Faux Stone Blocks for Lawn Edging, Flower Beds & Yard Edging – 4 Pack | Each Section Has 6 Blocks 48" L x 4" W x 6.5" H | 8 Spikes | Charcoal

Overview: Beuta’s premium landscape edging elevates outdoor aesthetics with exceptional stone realism and innovative engineering. The four-pack system spans 16 feet total, with each 48-inch section featuring six integrated faux stone blocks in sophisticated charcoal. The patent-pending connection system includes specialized components for starts, stops, right turns, left turns, and extensions, enabling unprecedented design customization for discerning homeowners seeking professional-grade results.
What Makes It Stand Out: The five distinct block types create limitless layout possibilities, transforming simple borders into architectural features. High-quality materials resist rust, fading, and corrosion while maintaining structural integrity through extreme weather. The 6.5-inch height provides substantial presence, and the included spikes ensure secure placement. This system mimics natural stone so convincingly that distinguishing it from real rock proves difficult from a distance.
Value for Money: At $177.00 for 16 feet, this premium edging costs $11.06 per linear foot—substantially higher than plastic alternatives but justified by superior aesthetics and flexibility. Professional stone border installation typically exceeds $20 per foot, making Beuta a cost-effective compromise for high-end results. The durability and timeless appearance ensure years of satisfaction, amortizing the initial investment.
Strengths and Weaknesses: Strengths include unparalleled realism, revolutionary flexible connection system, robust weather resistance, substantial height for effective containment, and professional finish quality. The charcoal color provides elegant neutrality. Weaknesses include premium pricing that may exceed casual gardeners’ budgets, limited 16-foot coverage per pack for large properties, and potential over-engineering for simple straight-line applications.
Bottom Line: Beuta represents the pinnacle of faux stone edging for serious landscape enthusiasts. Worth every penny for those prioritizing authenticity and design flexibility. While not necessary for basic projects, it delivers transformative results for high-visibility areas. Recommended for homeowners wanting masonry aesthetics without the weight, cost, or permanent commitment of real stone.
10. 8Pcs Landscape Edging with 24 Pieces 8-Inch Spikes | for Flower Beds, Tree Rings, Pathways | Garden Edging Border Stone 12ft Long, 3-Inch Tall,Faux Stone Edging for Landscaping (Dark Grey)

Overview: This comprehensive eight-piece edging kit delivers exceptional value with 12 feet of dark grey stone-like border and 24 anchoring spikes included. At just 3 inches tall, this low-profile solution effectively prevents grass encroachment while making lawn maintenance easier. The interlocking design configures to any shape, from circular tree rings to winding pathways, providing versatility for diverse landscaping challenges without requiring professional installation skills.
What Makes It Stand Out: The generous spike quantity ensures superior stability—three spikes per section prevent shifting better than competitors’ minimal anchoring. The complete kit approach eliminates separate hardware purchases, streamlining DIY projects. Its adaptability to any garden shape makes it ideal for creative layouts, while the low height maintains sightlines and doesn’t overwhelm smaller spaces. The dark grey finish offers contemporary appeal that complements modern hardscaping.
Value for Money: At $29.99 for 12 feet, this edging costs merely $2.50 per linear foot—the best value among comparable products. Including 24 spikes adds approximately $10-15 in hardware value, making the effective price even more attractive. This budget-friendly option undercuts most competitors by 30-50% while providing equal or superior coverage, representing exceptional economy for large-scale projects.
Strengths and Weaknesses: Strengths include unbeatable price per foot, comprehensive spike inclusion, easy DIY installation, versatile shape configuration, durable fade-resistant construction, and effective grass barrier functionality. The low-maintenance design requires only occasional rinsing. Weaknesses include the modest 3-inch height that may not contain deep mulch layers, plastic material lacking premium realism, and dark grey color that might absorb heat and fade faster in intense sun.
Bottom Line: This edging kit dominates the value category, delivering professional functionality at a fraction of typical costs. Perfect for budget-conscious homeowners covering large areas or experimenting with designs. While height limitations exist, the stability, coverage, and included hardware make it an outstanding choice for practical, large-scale landscape definition projects where economy is paramount.
Why Slate Chippings Define Modern Minimalist Edging
Slate chippings embody the minimalist ethos through their inherent properties. The material’s natural cleavage planes create flat, angular pieces that settle into stable, low-profile surfaces without the need for mortar or complex installation systems. This self-stabilizing characteristic aligns perfectly with minimalist design’s preference for honest materials that perform their function without unnecessary ornamentation.
The color palette of slate—ranging from deep charcoal and plum to muted blue-gray and earthy green—operates entirely within the sophisticated neutral spectrum that defines modern minimalist exteriors. These aren’t loud, attention-grabbing hues; they’re contemplative tones that recede visually, allowing architectural elements and carefully curated planting schemes to take center stage while providing essential structural definition.
Understanding Slate Chippings: Types and Characteristics
The Distinction Between Natural and Processed Slate
Natural slate chippings are byproducts of roofing tile and flagstone production, creating irregular shards with authentic weathered faces. These pieces retain their natural cleft texture and exhibit genuine variation in thickness and shape. Processed or manufactured slate chippings, conversely, are intentionally crushed and sometimes tumbled to achieve more uniform sizing and softened edges. For minimalist applications, natural slate often provides the subtle irregularity that prevents borders from looking overly mechanical, while processed slate offers consistency for ultra-contemporary projects where uniformity is paramount.
Color Variations and Their Design Impact
The geological origin of slate determines its coloration, and understanding these variations is crucial for design cohesion. Welsh slate tends toward deep blue-black with occasional green undertones, while Cornish slate offers warmer plum and rust accents. Brazilian slate often presents consistent charcoal tones, and Chinese slate varieties can include subtle copper flecks. In minimalist designs, monochromatic schemes benefit from single-origin slate, while more dynamic but still restrained compositions might blend two complementary varieties to create depth without complexity.
Size Grading: From Fine Dust to Chunky Pieces
Slate chippings are graded by size, typically ranging from 10mm to 40mm for edging applications. The 20mm grade represents the sweet spot for most minimalist borders—large enough to create stable coverage yet small enough to define crisp edges. Larger 40mm pieces make bold statements but can appear clunky in delicate compositions, while 10mm grades risk looking like aggregate rather than a deliberate design choice. Always specify “clean” grades that have had fines removed to prevent muddy runoff and ensure proper drainage.
The Philosophy of Minimalist Border Design
Negative Space as a Design Element
In minimalist landscaping, the border itself becomes a form of negative space—a buffer zone that separates elements while maintaining visual flow. Slate chippings excel here because their loose nature creates soft, permeable boundaries that don’t interrupt sightlines. Unlike solid edging materials that create hard stops, slate chippings allow for gradual transitions, letting grass blades or ground cover creep slightly into the edge, softening the intersection between manicured and natural.
Creating Visual Continuity
The key to successful minimalist design lies in repetition and rhythm. Slate chippings can echo the texture of architectural slate cladding or roofing, creating material continuity between house and garden. When used consistently throughout a property—edging pathways, framing patios, and delineating planting beds—they establish a visual language that ties disparate spaces together without the need for elaborate design gestures.
Key Benefits of Slate Chippings for Edging
Beyond aesthetics, slate chippings offer practical advantages that align with minimalist values of efficiency and longevity. They’re permeable, reducing stormwater runoff and preventing the puddling that plagues solid edging materials. Their weight and interlocking nature resist frost heave better than lighter gravels, maintaining clean lines through seasonal changes. Slate is also chemically inert, meaning it won’t leach minerals into soil or affect soil pH, a critical consideration for sensitive planting schemes. The material’s natural density makes it resistant to wind displacement, and its dark color absorbs solar heat, helping to suppress weed seed germination at the surface level.
Planning Your Slate Chippings Border Project
Measuring and Calculating Material Needs
Precision planning prevents the visual clutter of excess material or the patchy appearance of insufficient coverage. For edging, calculate linear meters first, then determine your desired border width—typically 15-30cm for subtle definition, up to 50cm for more substantial separation. Multiply length by width to get area, then multiply by depth (5-7cm is optimal) to calculate volume. Add 10% for compaction and settling. Remember that slate is sold by weight, not volume; a cubic meter of 20mm slate chippings weighs approximately 1.4 tonnes, but this varies by origin and moisture content.
Soil Preparation Fundamentals
Minimalist design demands perfection in preparation because there’s nowhere to hide imperfections. Excavate the border area to your desired depth plus 2cm for a geotextile membrane. The subgrade must be compacted and level—any undulations will telegraph through the slate layer, creating an uneven appearance that contradicts minimalist principles. Remove all organic material, roots, and debris that could decompose and create settlement. For clay soils, consider a 5cm sub-base of crushed stone to improve drainage and prevent the slate from sinking into mud during wet seasons.
Drainage Considerations
Slate chippings are permeable, but that doesn’t automatically solve drainage issues. Assess the natural water flow across your site. Borders should never create dams that trap water against hardscapes or planting beds. If your border runs along a slope, incorporate subtle cross-falls of 1:50 to direct water away from structures. In heavy clay areas, install perforated drainage pipes beneath the slate layer, encased in clean stone, to prevent waterlogging that can cause slate to discolor and algae to form.
Installation Techniques for Professional Results
Creating a Stable Sub-base
The secret to slate chippings that stay put lies in what’s underneath. After excavation, install a woven geotextile fabric—not the cheap spun-bonded type that tears easily. This separates the slate from soil, prevents weed growth, and stops the slate from disappearing into the ground over time. For high-traffic areas or driveways, lay a 10cm compacted Type 1 sub-base first. For simple garden edging, the geotextile alone suffices, provided the subgrade is firm and well-drained.
Edge Restraint Options
Even minimalist designs need restraint to maintain crisp lines. Hidden aluminum landscape edging, set flush with the finished slate height, provides invisible containment that won’t rust or degrade. For a completely seamless look, install a concrete haunch beneath the soil line on the lawn side, creating a subterranean barrier that grass roots can’t penetrate. Steel corten edging can also work if you want to introduce a rusted accent that complements slate’s natural tones, though this adds a visual element that may conflict with pure minimalism.
Layering for Optimal Coverage
Dumping slate in place and raking it level is a recipe for disappointment. For professional results, distribute the material in 3cm layers, lightly compacting each with a hand tamper or plate compactor (using a protective board to prevent slate fragmentation). This layering creates interlock and stability. The final layer should be screeded to a perfectly uniform depth, with edges defined by a straightedge board. Water the completed border gently to settle the slate and reveal any thin spots that need topping up.
Design Integration with Modern Landscapes
Pairing with Hardscaping Materials
Slate chippings create stunning juxtapositions with smooth concrete, creating a dialogue between natural texture and manufactured precision. When butting against porcelain pavers, maintain a precise 5mm gap filled with fine sand to prevent slate from scratching the tile edges. Against timber decking, allow the slate to slightly underlap the deck edge, creating a shadow gap that emphasizes the floating effect of modern deck construction. With exposed aggregate concrete, match the slate tone to the darkest aggregate specks for subtle harmony.
Complementing Architectural Features
Use slate chippings to extend architectural lines into the landscape. If your home features a prominent horizontal roofline, run a slate border along that same plane in the garden, creating a visual extension of the architecture. For buildings with vertical emphasis, use slate to create narrow, elongated border strips that echo those lines. The key is alignment—nothing undermines minimalist design faster than borders that don’t respect the geometry of the structures they complement.
Creating Depth Through Layering
Minimalism doesn’t mean flat or boring. Create subtle depth by using slightly lighter slate in foreground borders and darker grades in background areas. This aerial perspective technique, borrowed from Japanese garden design, makes spaces feel larger. Alternatively, use a single slate variety but vary the border width—narrower in distant views, wider in immediate spaces—to create forced perspective that draws the eye through the landscape.
Maintenance and Longevity Strategies
Preventing Weed Infiltration
Even with geotextile membranes, wind-borne seeds will eventually germinate in the slate surface. The minimalist solution isn’t chemical warfare but prevention. Apply a pre-emergent herbicide like corn gluten meal in early spring before weeds appear. For existing weeds, use a flame weeder for spot treatment—it’s precise, doesn’t disturb the slate arrangement, and avoids chemical residues. Pull weeds by hand when they’re small, taking care to remove the entire root. The goal is maintenance so subtle it’s nearly invisible.
Managing Slate Migration
Slate chippings will migrate, especially at edges and curves. Install gravel stabilisation grids beneath the slate in high-traffic transition zones—these honeycomb structures lock the slate in place while remaining hidden. For standard borders, annual raking and redistribution is sufficient. Use a spring-tine rake to gently pull slate back into place, working from the center outward. Replace any pieces that have fractured or become excessively worn, which typically only affects the top 10% of the border over a five-year period.
Seasonal Care Protocols
Spring calls for topping up thin spots and removing debris that accumulated over winter. Summer heat can cause some slate varieties to develop a powdery bloom—simply hose down the border to restore color saturation. Autumn requires diligent leaf removal; decomposing leaves stain slate and create humus where weeds establish. Use a leaf blower on low setting to avoid displacing the chippings. In winter, avoid de-icing salts that can cause flaking; instead, use fine grit sand for traction on any slate-adjacent paving.
Common Mistakes to Avoid
The most egregious error is using slate chippings as a mulch within planting beds while also using them as edging—this creates visual confusion and undermines the border’s definition. Another frequent mistake is inadequate edge restraint, resulting in slate spilling onto lawns and paths, creating a messy appearance that contradicts minimalist principles. Avoid mixing slate with other aggregates; the purity of material is essential to the aesthetic. Never install slate directly over soil without a membrane—within two seasons, you’ll lose a third of your material to sinking and contamination. Finally, resist the urge to “brighten” slate with sealers or coatings; the natural matte finish is integral to its understated appeal.
Environmental and Safety Considerations
Sourcing Sustainable Slate
True sustainability in slate means understanding its journey. Welsh and Spanish slates are extracted from long-established quarries with strict environmental controls and are transported by sea, which has lower carbon impact than road transport. Ask suppliers for their slate’s origin and extraction certifications. Reclaimed slate from demolished buildings offers the lowest environmental impact and provides authentic patina that new slate lacks, though sourcing consistent quantities can be challenging. Avoid slate from unregulated quarries where extraction damages ecosystems and worker safety is compromised.
Slip Resistance Factors
While slate chippings themselves provide excellent traction due to their angular nature, they can create slip hazards when spilling onto hard surfaces. Ensure edge restraints are adequate to contain the material. On slopes steeper than 1:10, consider mixing the slate with a small percentage (10%) of coarse grit sand to increase interlock and stability underfoot. Dark slate can become hot enough to cause discomfort in bare feet during summer—if the border borders a pool or barefoot area, specify lighter-colored slate or provide shade structures.
Cost Analysis and Budget Planning
Slate chippings represent a mid-range edging solution, typically costing more than basic gravel but less than brick or stone pavers. Material costs vary significantly by origin—locally sourced slate might run £80-120 per tonne, while premium Welsh slate can reach £200 per tonne. For a standard 20cm wide border at 6cm depth, you’ll need approximately 140kg per linear meter. Installation costs for professional work range from £15-25 per meter for simple borders to £40+ per meter for complex curves with hidden edging. DIY installation saves labor costs but requires tool rental—compactors, laser levels, and proper cutting equipment for edge restraints. Factor in a 5% annual replacement cost for maintenance and topping up.
Creative Applications Beyond Simple Edging
Dry Creek Bed Illusions
Transform functional drainage swales into design features by lining them with graduated slate sizes—larger pieces at the center, smaller toward the edges. This creates the illusion of a dry streambed, adding narrative depth to minimalist compositions without introducing new materials. The key is maintaining a consistent slate variety throughout, allowing size variation alone to create the effect.
Textural Transitions
Use slate chippings to mediate between conflicting textures. Where rough stone walls meet smooth concrete paths, a 30cm slate border acts as a visual decompression zone, allowing the eye to transition between surfaces. This application is particularly effective in courtyard gardens where material changes are abrupt and need softening without introducing organic shapes that would conflict with the minimalist geometry.
Professional vs. DIY Installation: Making the Right Choice
The decision hinges on scale and precision requirements. Small, straight borders under 10 meters are manageable DIY projects if you have basic landscaping skills and access to a plate compactor. The challenge increases exponentially with curves, elevation changes, or integration with existing hardscaping. Professional installers bring laser leveling, experience with hidden edge restraint systems, and the ability to achieve the flawless finish that minimalism demands. They also understand sub-base requirements for different soil conditions—a critical factor that DIYers often underestimate. Consider your tolerance for imperfection; in minimalist design, every flaw is magnified. If you’re a perfectionist, hire a professional. If you appreciate the subtle variations that come with handcraft, DIY can yield beautiful, personal results.
Frequently Asked Questions
How deep should slate chippings be for edging to prevent sinking? A consistent depth of 6-7cm after compaction is ideal. This provides enough mass to resist displacement while remaining shallow enough to avoid looking like a gravel path. Always install a geotextile membrane beneath to prevent sinking into the subsoil.
Will slate chippings damage my lawn mower if they spill onto grass? Potentially, yes. Even small pieces can become projectiles or dull blades. This is why proper edge restraint is non-negotiable. Install a physical barrier at least 2cm above the slate level on the lawn side, and maintain a 5cm gap between the slate edge and your mowing strip.
How do I stop weeds growing through my slate border permanently? Permanence is unrealistic, but long-term control is achievable. The combination of a quality geotextile membrane, pre-emergent herbicide application in spring, and annual spot treatment with a flame weeder will keep weeds at bay for years. Avoid pulling large established weeds, as this can tear the membrane.
Can I use slate chippings on a sloping site without them washing away? Yes, but you must install gravel stabilisation grids beneath the slate on slopes exceeding 1:10. These honeycomb structures lock the material in place while remaining invisible. Also, ensure the sub-base is perfectly compacted and consider incorporating subtle cross-drains to prevent water from gaining velocity.
What’s the difference between slate chippings and slate mulch? The distinction is functional, not material. Slate chippings for edging are typically 20-40mm, clean-graded with fines removed, creating stable, walkable surfaces. Slate mulch uses smaller 10-20mm pieces, often with fines included, designed to suppress weeds in planting beds. Using mulch-grade slate for edging results in poor stability and a muddy appearance when wet.
Do slate chippings fade or change color over time? Quality slate is remarkably colorfast, but some surface weathering occurs. Dark slates may develop a subtle patina, appearing slightly lighter as surface oxidation occurs. This is a natural process that many designers embrace. Avoid cheap slate with artificial color coatings, which can fade unevenly and create a patchy appearance.
How do I calculate how much slate I need for a curved border? Measure the centerline of your curve using a flexible tape measure or by laying a rope along the intended path and measuring its length. Calculate area as length × width, then volume as area × depth (0.06m). Add 15% for curves versus 10% for straight runs, as cutting and fitting around curves creates more waste.
Is slate safe for use around pets and children? Generally yes, but consider the size. Pieces smaller than 20mm can pose a choking hazard for small children and may get stuck in pet paws. Opt for 20-40mm grades in family areas. Slate is non-toxic and doesn’t heat up as much as river rock, but dark varieties can still become hot enough to cause discomfort on bare feet in direct summer sun.
Can I install slate chippings edging in winter? It’s not ideal. Frozen ground prevents proper compaction, and wet conditions make achieving level surfaces nearly impossible. If you must install in winter, wait for a dry spell when the subgrade is firm, not frozen or waterlogged. Cover the completed border with a tarp if rain is forecast to prevent the slate from becoming saturated before it settles.
How often should I top up or replace slate chippings? With proper installation, expect to add 10-15% new material every 3-4 years to compensate for settlement and minor migration. Complete replacement is rarely necessary unless the slate has become contaminated with soil or organic matter. Annual raking and redistribution typically maintains the border’s appearance indefinitely, making slate one of the most cost-effective long-term edging solutions.