There’s nothing quite like the satisfaction of peeking into your cold frame on a frosty March morning to see hundreds of tiny green seedlings thriving despite the winter chill. But if you’re still balancing trays on the ground or stacking them precariously on cinder blocks, you’re missing out on one of the most transformative upgrades for season-extension gardening. A well-designed seed starting rack doesn’t just organize your cold frame—it revolutionizes how you grow, turning cramped quarters into a vertical garden powerhouse while dramatically improving plant health and germination rates.
The right rack system acts as the backbone of your cold frame operation, creating microclimates that nurture delicate seedlings from their first true leaves through the hardening-off process. Whether you’re a market gardener scaling up production or a backyard enthusiast maximizing limited space, understanding the nuances of rack design, materials, and integration with your cold frame environment separates successful season-extension from frustrating experiments. This comprehensive guide walks you through everything you need to know to select or build the perfect seed starting rack system for your specific growing goals.
Top 10 Seed Starting Racks for Cold Frames
Detailed Product Reviews
1. RooTrimmer 5-Tier Seed Starter Trays Plant Stand, with Bottom-Watering Design– Reinforced Thickened Shelf for Small Pots, Balcony/Indoor Seed Starting & Greenhouse, Black

Overview: The RooTrimmer 5-Tier Seed Starter Trays Plant Stand offers a sleek, vertical solution for indoor gardeners working with limited space. This black powder-coated steel unit features a smart bottom-watering reservoir system that eliminates daily watering chores while promoting healthier root development. Measuring compactly for balconies, countertops, or small apartments, it accommodates multiple seed trays across five reinforced shelves designed specifically for starting seeds and nurturing small plants.
What Makes It Stand Out: The integrated bottom-watering design distinguishes this stand from basic shelving units. Rather than top-watering that can disturb delicate seeds, the reservoir ensures consistent moisture distribution through capillary action. The thickened frame provides exceptional stability without bulk, and the all-black aesthetic blends seamlessly into modern home decor. Its vertical orientation maximizes growing capacity in minimal square footage, making it ideal for urban dwellers.
Value for Money: At $35.99, this stand sits in the sweet spot between flimsy wire racks and expensive greenhouse systems. The self-watering feature alone justifies the price, saving countless hours of maintenance. Comparable stands without moisture control typically cost $25-30, while adding a separate watering system could run an additional $15-20. The durable construction ensures multiple growing seasons, delivering excellent ROI for serious seed starters.
Strengths and Weaknesses: Strengths include the innovative self-watering reservoir, sturdy thickened steel construction, space-efficient vertical design, and straightforward assembly. The smooth black finish resists rust and cleans easily. Weaknesses include lack of adjustable shelf heights, no included seed trays, and limited protection from ambient temperature fluctuations. The open design also means higher humidity control is manual.
Bottom Line: Perfect for apartment gardeners and seed-starting enthusiasts seeking a low-maintenance, space-saving solution. The self-watering system and durable build make it a worthwhile investment for consistent germination success.
2. Indoor Greenhouse with Grow Light, Ohuhu 4-Tier Mini Green House for Winter - Full Spectrum Greenhouses for Seed Starting Small Portable Green Houses Waterproof PVC Cover & Adjustable Shelves

Overview: The Ohuhu 4-Tier Mini Greenhouse revolutionizes year-round indoor gardening with its integrated full-spectrum grow light system. This 27.2" x 19.9" x 61.8" unit creates a controlled micro-environment perfect for winter seed starting and extending growing seasons. The waterproof PVC cover maintains 70-80% humidity while the energy-efficient LED panel delivers sunlight-simulating wavelengths from 400-750 nm, supporting plants from germination through fruiting.
What Makes It Stand Out: The intelligent lighting system sets this greenhouse apart. With 11 brightness levels (10-100%) and programmable 4/8/12-hour timers, it automates optimal light cycles for various plant species. The soft white illumination allows easy monitoring without disturbing plant rhythms. Combined with adjustable shelves supporting 22 lbs each and compact footprint, it transforms any living room, balcony, or patio into a productive growing space regardless of external conditions.
Value for Money: At $129.99, this represents mid-range value for a complete growing system. Comparable standalone grow lights cost $40-60, while basic 4-tier greenhouses run $50-80. The integration of both, plus smart controls, creates a cohesive solution that eliminates compatibility guesswork. For serious gardeners battling short winter days, the energy-efficient LEDs pay for themselves through successful seed starts that would otherwise require expensive nursery purchases.
Strengths and Weaknesses: Strengths include the versatile full-spectrum lighting with smart timer, robust steel frame, waterproof PVC cover, adjustable shelving, and tool-free assembly. The system supports substantial weight capacity and creates ideal humidity. Weaknesses include the higher price point, PVC’s shorter lifespan compared to polycarbonate, potential light leakage affecting home ambiance, and limited ventilation control beyond zipper adjustments.
Bottom Line: An excellent all-in-one solution for winter gardening enthusiasts. The smart lighting and humidity control justify the investment for those serious about year-round propagation and food security.
3. RooTrimmer 5-Tier Seed Stand with 5 Trays, Seed Starting Rack Propagation Rack Kit for Stackable Seedling Tray Seedling Staging Table for Indoor Outdoor Growing(Green)
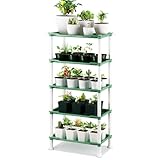
Overview: The RooTrimmer 5-Tier Seed Stand delivers a complete seed-starting solution with included trays in a vibrant green plastic framework. Measuring 37.6" tall with an 18.1" x 11.6" footprint, this lightweight yet sturdy unit provides five levels of growing space for germination trays or small pots. The waterproof, corrosion-resistant construction suits both indoor and outdoor use, while the modular design allows tier removal for customized configurations.
What Makes It Stand Out: This kit includes five matching trays, eliminating the separate purchase hassle and ensuring perfect fit. The plastic construction offers surprising durability while remaining effortlessly portable for seasonal transitions between indoor starts and outdoor hardening. Its versatility extends beyond gardening—the unit functions as a storage organizer for toys, books, or kitchen items when not in seed-starting mode, maximizing household utility.
Value for Money: Priced at $32.98, this represents exceptional value as a complete starter system. Individual seed trays cost $3-5 each, so included trays alone offset nearly half the price. Comparable plastic shelving units without trays run $25-35. The multi-functionality as a home organizer provides additional value, making it essentially free if repurposed during off-seasons. For budget-conscious gardeners, this delivers professional propagation capabilities without financial strain.
Strengths and Weaknesses: Strengths include the included trays, lightweight portability, waterproof construction, multi-purpose functionality, and effortless assembly without tools. The green color blends naturally in garden settings. Weaknesses include lower weight capacity than metal alternatives, less stability in strong winds when used outdoors, no built-in watering system, and plastic’s susceptibility to UV degradation over time. Shelf heights are also fixed.
Bottom Line: Ideal for beginners and budget-minded gardeners wanting a ready-to-use propagation station. The included trays and versatile design make it a practical, cost-effective choice for seasonal seed starting.
4. Abimars 5-Tier Greenhouse with Caster Wheel, Each Shelf Height Adjustable Metal Plant Shelf with PVC Cover for Seed Starting Trays, Seedling Pots, Plant Pots, 13x29x73inch

Overview: The Abimars 5-Tier Greenhouse combines heavy-duty metal construction with mobility and environmental control for serious indoor and outdoor growers. At 13" x 29" x 73", this robust unit features welded steel shelves supporting 250 lbs total, adjustable in one-inch increments for maximum flexibility. The thick PVC cover creates a protective microclimate with 70-80% humidity, while four locking casters enable effortless relocation between indoor spaces and patio areas.
What Makes It Stand Out: The welded steel construction provides unparalleled stability compared to bolt-together alternatives, eliminating wobble and shelf collapse concerns. The caster system with height-adjusting nuts accommodates uneven surfaces while protecting floors from scratches. Double-zipper doors offer precise ventilation control, and removable plastic shelf liners prevent water drips while providing a stable base for various pot sizes. This professional-grade mobility meets serious growing capacity.
Value for Money: At $128.99, this greenhouse sits at the premium end of consumer-grade units. Comparable stationary metal shelving costs $60-80, while quality caster sets add $20-30. The thick PVC cover and welded construction justify the price premium over bolt-together models that loosen over time. For gardeners requiring frequent repositioning or dealing with uneven terrain, the mobility features deliver significant practical value that cheaper alternatives cannot match.
Strengths and Weaknesses: Strengths include exceptional welded steel stability, impressive weight capacity, smooth-rolling casters with locks, adjustable shelf heights, thick humidity-retaining PVC cover, and straightforward assembly. The shelf liners and double-zipper design demonstrate thoughtful engineering. Weaknesses include the higher price point, PVC’s limited insulation compared to polycarbonate, potential caster failure on rough outdoor terrain, and larger footprint requiring more space.
Bottom Line: Perfect for dedicated gardeners needing a mobile, heavy-duty growing station. The welded construction and premium casters justify the investment for those prioritizing stability and flexibility in their propagation setup.
5. Abimars 5-Tier Mini Greenhouse with Caster Wheels, Each Shelf Height Adjustable Metal Plant Shelf with PVC Cover for Seed Starting Trays, Seedling Pots, Plant Pots, 11x16x57inch

Overview: The Abimars 5-Tier Mini Greenhouse packs professional features into a compact, mobile unit perfect for small-space gardening. Measuring 11" x 16" x 57", this scaled-down version maintains the brand’s signature welded steel construction and adjustable shelving while supporting 175 lbs total. The thick PVC cover creates an ideal humid microclimate for seed starting, and four locking polyurethane casters provide smooth mobility across indoor floors without scratching surfaces.
What Makes It Stand Out: This mini greenhouse delivers premium features at an accessible price point. The welded steel frame eliminates assembly-induced wobble common in budget units, while one-inch adjustable shelf increments accommodate everything from seed trays to taller seedlings. The caster system with height-adjusting nuts ensures stability on uneven floors—a feature rarely seen in sub-$100 greenhouses. Double-zipper ventilation and removable shelf liners demonstrate attention to practical growing needs.
Value for Money: At $75.99, this represents outstanding mid-range value. Comparable welded steel shelving alone costs $50-70, while adding a quality PVC cover and caster system typically pushes prices over $100. The 175 lb capacity exceeds most plastic alternatives while remaining affordable for hobbyists. For apartment dwellers and casual gardeners, this delivers professional-grade construction and mobility without the premium price tag of larger units.
Strengths and Weaknesses: Strengths include compact footprint, welded steel stability, smooth-rolling casters, adjustable shelves, thick PVC cover with good humidity retention, and easy one-person assembly. The included shelf liners prevent mess. Weaknesses include smaller dimensions limiting tray sizes, lower weight capacity than its larger sibling, PVC’s vulnerability to tearing at zipper points, and limited ventilation options beyond door zippers.
Bottom Line: An excellent choice for space-conscious gardeners wanting premium mobility and durability. The welded construction and caster system make it a smart investment for small-scale, year-round propagation.
6. Abimars 5-Tier Greenhouse with Caster Wheel, Each Shelf Height Adjustable Metal Plant Shelf with PVC Cover for Seed Starting Trays, Seedling Pots, Plant Pots, 21x49x80inch

Overview: The Abimars 5-Tier Greenhouse is a robust indoor/outdoor gardening solution measuring 21x49x80 inches. Constructed entirely from metal with welded support legs and shelves, this unit promises exceptional durability for serious plant enthusiasts. The greenhouse features adjustable shelving, a protective PVC cover, and integrated casters for mobility.
What Makes It Stand Out: This greenhouse’s welded metal construction sets it apart from flimsier alternatives, supporting up to 300 pounds across its five tiers. Each shelf adjusts in one-inch increments without tools, accommodating everything from seedling trays to mature plants. The removable plastic shelf liners prevent water drips and debris fall-through. Four polyurethane casters with locking mechanisms and height-adjusting nuts ensure smooth mobility across any floor surface while eliminating wobble on uneven ground.
Value for Money: At $239.99, this greenhouse commands a premium price, but the investment is justified by its commercial-grade metal construction and versatility. Comparable plastic-frame greenhouses cost $100-150 less but lack the longevity and weight capacity. For gardeners seeking a permanent, movable solution that won’t buckle under heavy loads, this represents excellent long-term value.
Strengths and Weaknesses: Strengths include exceptional stability, flexible configuration, smooth mobility, and protective floor-friendly casters. The thicker PVC cover maintains 70-80% humidity effectively. Weaknesses involve the premium price point, potential UV degradation of the PVC cover over time, and its substantial footprint that may overwhelm small spaces. The cover’s longevity in direct sunlight remains unproven.
Bottom Line: The Abimars greenhouse is ideal for dedicated gardeners needing a heavy-duty, mobile growing station. While expensive, its welded metal frame and thoughtful design features justify the cost for those prioritizing durability and flexibility over budget constraints.
7. Zenport SH3212A+BTP Garden Raised Bed and Cold Frame Greenhouse Cloche for Easy Access Protected Gardening
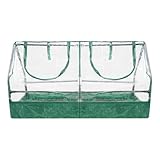
Overview: The Zenport SH3212A+BTP combines a raised bed and cold frame greenhouse into one compact unit measuring 47 inches long by 23-5/8 inches wide by 23-5/8 inches high. This dual-purpose solution features a sturdy green steel frame and waterproof transparent plastic cover, designed for protected gardening on decks, patios, or balconies.
What Makes It Stand Out: This product’s integrated design eliminates the need to purchase separate raised beds and covers, offering instant protection for plants. The zipped roll-up panel provides exceptional access and precise ventilation control, allowing gardeners to easily adjust humidity and temperature without removing the entire cover. Its compact footprint makes it perfect for urban gardeners with limited space.
Value for Money: Priced at $66.26, this hybrid system delivers remarkable affordability. Purchasing a separate raised bed and cold frame would typically cost $80-120. The steel frame provides better durability than all-plastic alternatives in this price range, making it an economical entry point for protected gardening.
Strengths and Weaknesses: Strengths include its versatile dual-function design, easy-access zippered panel, straightforward assembly, and space-efficient dimensions. The steel frame offers decent stability. Weaknesses are the limited growing height (under 24 inches), potential plastic cover deterioration from UV exposure, and modest size that restricts larger plants. The cover’s attachment mechanism may be less durable than permanent greenhouse panels.
Bottom Line: The Zenport cloche is an excellent budget-friendly solution for small-space gardeners wanting both elevation and protection. While limited in size and material longevity, its clever dual-purpose design and accessible price make it a smart starter option for patio gardening.
8. ANSIKE Soil Heating Cable 49 Ft Electric Soil Warming Cable Greenhouse Plant Soil Heater Cable Keep Soil Warm for Soil, Garden, Cold Frame

Overview: The ANSIKE 49-foot soil heating cable is an electric warming system designed to maintain optimal soil temperatures for seed germination and plant growth. Featuring a built-in thermostat that automatically regulates at 131°F, this waterproof cable is constructed from nickel alloy with a silicone rubber protective layer for safe, reliable operation.
What Makes It Stand Out: The integrated thermostat eliminates guesswork, automatically activating when soil temperature drops below 131°F and shutting off when exceeded. This self-regulating feature prevents overheating while ensuring consistent warmth. The 49-foot length covers substantial growing areas, making it suitable for large seedling trays, raised beds, or cold frames. The bright color coating enhances visibility during installation and maintenance.
Value for Money: At $36.99, this heating cable offers excellent value for its length and smart features. Manual heating mats with similar coverage cost $40-60, while professional-grade cables without thermostats run $30-45. The built-in temperature control adds significant convenience and safety, preventing energy waste and seed damage from temperature fluctuations.
Strengths and Weaknesses: Strengths include the automatic thermostat, durable waterproof construction, generous length, and versatile application for both indoor and outdoor use. The 131°F target temperature is ideal for most seeds. Weaknesses involve the fixed temperature setting (not adjustable), which may be too warm for some cool-season crops. Installation requires careful burial under 3-4 inches of soil, and operating costs can accumulate during extended use.
Bottom Line: This ANSIKE cable is a top choice for gardeners starting large quantities of seeds. The self-regulating thermostat and durable construction justify the price, though the fixed temperature limits flexibility. Perfect for those prioritizing convenience and consistent results over customizable settings.
9. ANSIKE Soil Heating Cable 25 Ft Electric Soil Warming Cable Greenhouse Plant Soil Heater Cable Keep Soil Warm for Soil, Garden, Cold Frame
Overview: The ANSIKE 25-foot soil heating cable provides targeted warmth for seed germination and plant growth in smaller gardening spaces. Like its longer counterpart, it features a built-in thermostat that maintains soil at 131°F, constructed from nickel alloy with a silicone rubber waterproof coating for safe, durable operation.
What Makes It Stand Out: This compact version delivers the same self-regulating thermostat technology as the 49-foot model, automatically cycling on and off to maintain optimal germination temperature. The shorter length is perfect for small cold frames, single raised beds, or indoor seed starting stations. Its bright-colored, high-visibility coating ensures safe handling and easy repositioning between growing seasons.
Value for Money: Priced at $32.99, this cable is only $4 less than the 49-foot version, making the longer model a better value per foot. However, for gardeners with modest needs, this eliminates the waste and complexity of managing excess cable. Compared to 25-foot heating mats at $25-35, the built-in thermostat provides superior temperature control and energy efficiency.
Strengths and Weaknesses: Strengths include the automatic thermostat, waterproof construction, compact size for small spaces, and straightforward installation. The fixed 131°F temperature works well for warm-season crops. Weaknesses mirror the longer version: non-adjustable temperature may suit only some plants, and the minimal price difference makes the 49-foot model more economical for future expansion. Burial depth requirements limit flexibility for container gardening.
Bottom Line: This 25-foot cable suits small-scale gardeners with limited space needs. While functional and well-built, the marginal price savings over the 49-foot version make it hard to recommend unless space constraints are absolute. Consider your future expansion plans before purchasing.
Understanding Seed Starting Racks for Cold Frames
Seed starting racks for cold frames are specialized shelving systems engineered to withstand humid, fluctuating conditions while maximizing the vertical growing space within your protected structure. Unlike indoor grow racks, these units must contend with temperature swings from 25°F to 80°F, condensation, and potential snow load on the cold frame lid above. They’re designed to hold standard 1020 seed trays at optimal heights for light exposure and air circulation, creating tiered microenvironments that can be adjusted throughout the season.
The fundamental purpose extends beyond simple organization. These racks create a three-dimensional growing space that leverages the greenhouse effect within your cold frame, ensuring every seedling receives adequate light while maintaining the critical airflow that prevents damping-off disease. Think of them as the scaffolding that supports your entire early-season propagation strategy.
Why Your Cold Frame Needs a Dedicated Seed Starting Rack
Maximizing Vertical Growing Space
A typical 4×8 foot cold frame offers 32 square feet of floor space, but a three-tier rack system triples that to 96 square feet of growing area without expanding the footprint. This vertical multiplication is crucial for gardeners working with limited space or those scaling up seedling production for market gardens. The key is strategic tier spacing that accommodates mature seedling height while ensuring lower shelves still receive sufficient light and warmth.
Improving Air Circulation and Reducing Disease
Elevating trays off the cold frame floor creates a chimney effect, allowing warm air to rise naturally between shelves while cooler air circulates underneath. This constant movement reduces the stagnant humidity pockets where fungal diseases thrive. Racks with open-grid shelving amplify this effect, cutting damping-off incidents by up to 60% compared to trays sitting directly on soil or solid surfaces.
Key Materials and Construction Quality
Wood vs. Metal Frame Options
Wooden racks offer natural insulation and can be built with rot-resistant cedar or pressure-treated lumber rated for ground contact. However, they require annual maintenance and can harbor mold in constant humidity. Metal frames—typically powder-coated steel or aluminum—provide superior durability and cleanability. Look for galvanized steel with a minimum 12-gauge thickness for vertical posts to prevent buckling under tray weight.
Weather-Resistant Coatings and Treatments
The freeze-thaw cycle inside cold frames is brutal on finishes. Powder coating should exceed 3 mils thickness and pass a 1,000-hour salt spray test. For DIY wooden racks, apply three coats of marine-grade spar urethane, focusing on end grains where moisture penetrates. Avoid standard spray paints that crack within one season; instead, invest in epoxy-based coatings designed for greenhouse applications.
Shelf Material Considerations
Wire mesh shelving with 1×2 inch openings provides ideal air circulation but can allow small pots to tip. Solid slatted shelves (¾-inch spacing) offer more stability while maintaining airflow. For maximum versatility, consider removable shelf panels that can be swapped based on your current crop needs. Always ensure materials are rated for at least 50 pounds per square foot to handle saturated soil weight.
Size and Capacity Planning
Measuring Your Cold Frame Interior
Never assume your cold frame dimensions—measure the interior width at both the base and lid opening, as angled walls create narrower top clearance. Account for lid hardware, vents, and any interior bracing that reduces usable space. Leave a minimum 3-inch clearance on all sides for air movement and your hands to maneuver trays.
Calculating Tray Capacity
Standard 1020 trays measure 11×22 inches. A 48-inch wide shelf accommodates four trays side-by-side with minimal wasted space. Calculate total capacity by multiplying trays per shelf by number of shelves, then subtract 15% for handling space. A three-tier rack in a 4×8 cold frame typically holds 36-44 trays—enough for 2,000-3,000 seedlings depending on cell size.
Growth Height Clearance
Plan for seedling height plus 4 inches for air circulation. Tomatoes and peppers need 8-10 inches of vertical growth space before transplanting, while brassicas require 6-8 inches. The bottom shelf should sit 6 inches above the cold frame base to avoid ground chill, while the top shelf must clear the closed lid by at least 4 inches to prevent heat scorch.
Adjustability and Flexibility Features
Adjustable Shelf Heights
Look for rack systems with pin or bolt adjustments every 2 inches rather than fixed shelves. This allows you to start with closely spaced shelves for germination (4-6 inches apart), then expand spacing as seedlings grow. Some premium systems offer telescoping vertical posts that accommodate different cold frame heights if you upgrade structures later.
Removable and Reconfigurable Components
The ability to remove middle shelves entirely creates space for tall crops like grafted tomatoes or overwintering perennials. Quick-release brackets let you transition from dense seedling production to hardening off larger plants without buying separate equipment. This flexibility essentially gives you two rack systems in one.
Modular Design Benefits
Modular racks that assemble in sections allow you to start with a single tier and expand as your operation grows. They also make replacement of damaged components economical—swap out one shelf instead of replacing the entire unit. For market gardeners, modular systems enable custom configurations for different crop cycles throughout the season.
Ventilation and Airflow Management
Open vs. Solid Shelf Designs
Solid shelves block 40-60% of natural air movement, creating temperature stratification where the top tier can be 15°F warmer than the bottom. Open-grid designs maintain within 5°F across all tiers when combined with proper venting. If using solid shelves, drill 1-inch ventilation holes every 6 inches along the perimeter to encourage vertical airflow.
Spacing for Natural Air Movement
Maintain a minimum 2-inch gap between tray edges and rack sides. This creates air channels that connect all shelf levels. For racks deeper than 18 inches, consider a center support that doubles as a vent spine—perforated tube that draws air from bottom to top. This is especially critical in humid climates where stagnant air causes fungal outbreaks within 48 hours.
Integration with Cold Frame Venting
Position your rack so it doesn’t block automatic vent openers or manual vent paths. The rack should sit 6 inches back from the vent side of the cold frame, creating a plenum where hot air can escape. Some advanced designs incorporate baffles that direct vent airflow across all shelf surfaces rather than just the top tier.
Light Penetration and Distribution
Wire Mesh vs. Slatted Shelves
Wire mesh blocks approximately 8-12% of incoming light, while ¾-inch slats block 15-20% depending on orientation. Position slats north-south to minimize shadow casting on lower shelves. For starting light-dependent seeds like lettuce and celery, wire mesh provides the most even distribution. For sturdier seedlings like brassicas, slats offer better pot stability with acceptable light loss.
Reflective Surfaces and Materials
White powder coating reflects 75-80% of light, brightening lower shelves naturally. Avoid dark colors that absorb heat and create hot spots. Some gardeners line shelf undersides with Mylar reflective film, boosting lower-shelf light levels by 15-20%. This is particularly effective for bottom shelves in deep cold frames where light penetration drops to 40% of ambient.
Avoiding Shaded Areas
The cold frame lid framing creates permanent shadows. Map these shadow patterns at 10 AM, 2 PM, and 5 PM during your growing season. Position racks to place the most shade-tolerant crops (onions, leeks) in these zones, or use adjustable shelves to raise trays above shadow lines as seedlings develop. Remember that winter sun angles are lower—shadows shift dramatically from December to March.
Temperature Control and Heat Distribution
Thermal Mass Considerations
Metal racks act as thermal mass, absorbing heat during the day and releasing it slowly at night. This moderates temperature swings by 5-8°F. Place dark-colored water jugs on bottom shelves to increase thermal mass without blocking light to upper tiers. Wooden racks provide less thermal mass but better insulation from cold ground temperatures.
Spacing for Even Heat Flow
Heat rises and concentrates at the top of closed cold frames. Space shelves to create thermal layers: bottom shelf for cool-season crops (lettuce, spinach) that prefer 55-65°F, middle shelf for moderate crops (broccoli, cabbage), and top shelf for heat lovers (tomatoes, peppers) that can handle 75-85°F. This natural stratification lets you grow multiple crop types simultaneously.
Bottom Heat Compatibility
If using seedling heat mats, ensure shelf materials conduct heat effectively. Wire mesh allows 95% of mat heat to reach trays, while slatted shelves reduce efficiency to 70-75%. Elevate mats ½ inch above shelves using spacers to prevent overheating and allow moisture drainage. Never place insulation between heat mats and trays—it creates hot spots that cook delicate roots.
Durability and Weather Resistance
Rust and Corrosion Prevention
Even powder-coated steel will eventually rust at weld points and scratches. Apply a dab of cold galvanizing compound to any exposed metal immediately. For coastal gardeners, marine-grade 316 stainless steel offers 10+ year lifespans despite the 40% cost premium. Aluminum racks won’t rust but must be thicker gauge to match steel strength—look for 1/8-inch minimum thickness.
UV Degradation Protection
Polycarbonate and plastic components become brittle after 2-3 seasons of intense UV exposure. Choose UV-stabilized plastics rated for greenhouse use (look for “UV8” or higher rating). For wooden racks, the south-facing surfaces need reapplication of UV-blocking finish every 12 months. Consider removable fabric shade panels for summer storage to extend rack life by 50%.
Weight Load Capacity
Wet seed-starting mix weighs 45-50 pounds per cubic foot. A fully loaded 1020 tray (72 cells) weighs 8-10 pounds. Multiply by tray capacity, then add a 25% safety margin for snow load on the cold frame lid transferring weight to the rack. A three-tier rack holding 40 trays needs minimum 400-pound capacity, but rating it for 500 pounds ensures peace of mind during heavy spring snows.
Installation and Setup Best Practices
Leveling and Stability
Cold frame floors are rarely perfectly level. Use adjustable foot pads on rack legs to achieve within 1/8-inch tolerance across the entire unit. An unlevel rack causes water to pool in tray corners, leading to uneven germination and algae growth. For earth-floor cold frames, sink concrete pavers under each foot to prevent settling. Check level monthly as freeze-thaw cycles shift the base.
Anchoring and Securing Methods
High winds can lift cold frame lids and topple unsecured racks. Anchor the rack to the cold frame base using L-brackets at two points minimum. For freestanding units, drive 18-inch rebar stakes through the bottom shelf corners into the ground. In earthquake-prone areas, use flexible seismic wire to secure the top of the rack to the cold frame framing, allowing movement without tipping.
Assembly Tips for Tight Spaces
Most rack assembly requires 2-3 feet of clearance on all sides—space you don’t have inside an assembled cold frame. Build the rack outside, then partially disassemble into 2-3 large sections that fit through the cold frame door or lid opening. Use bolt-together construction rather than rivets or welds for field-adjustable assembly. Keep a telescoping magnet handy to retrieve dropped hardware from between shelves.
Maintenance and Cleaning Protocols
Seasonal Deep Cleaning
At season’s end, remove all shelves and wash with a 10% bleach solution, rinsing thoroughly. For metal racks, follow with a rust inhibitor spray on all welds and joints. Wooden racks need sanding of any rough spots and resealing with linseed oil. This annual ritual prevents disease carryover and extends rack life by 3-5 years. Never pressure wash—water forced into crevices accelerates rust and rot.
Sanitizing Between Plantings
Between successive crop cycles, spray shelves with hydrogen peroxide-based sanitizer (no rinse required) and let air dry for 30 minutes. Keep a dedicated spray bottle and scrub brush in your cold frame toolkit. This 10-minute task prevents cross-contamination between brassicas, nightshades, and alliums, which have different susceptibility to damping-off pathogens.
Rust Spot Treatment
At the first sign of rust, wire brush the area to bare metal, apply rust converter, then touch up with cold galvanizing spray. Catching rust early prevents structural weakening. Inspect monthly during use, paying close attention to weld points and scratches from tray edges. A 15-minute monthly inspection prevents catastrophic failure during peak seedling season.
Cost Analysis and Budget Planning
Entry-Level vs. Premium Options
Budget wire shelving units ($50-100) last 2-3 seasons before rusting out. Mid-range greenhouse-specific racks ($200-400) offer 5-7 year lifespans with replaceable components. Premium stainless steel systems ($600-1,000) provide 10+ years of service and maintain resale value. Calculate cost per tray space per year: a $300 rack holding 40 trays for 5 years costs $1.50 per tray space annually.
Long-Term Value Considerations
A quality rack reduces seedling loss by 20-30% through better air circulation and temperature control. If you grow 1,000 seedlings annually, saving just 200 plants at $3 each justifies a $600 rack system in one season. Factor in your time—premium racks assemble in 30 minutes versus 3 hours for flimsy units that require modification. The initial investment pays dividends in plant health and gardener sanity.
DIY Cost Breakdown
Building a wooden rack from cedar costs $80-120 in materials but requires 4-6 hours of skilled labor. Metal conduit racks run $60-90 but need specialty tools (pipe bender, reamer). Factor in your time at $25/hour, and DIY often costs more than pre-made units unless you enjoy the process. The real DIY advantage is customization for odd-sized cold frames or specific crop needs.
DIY vs. Pre-Made Rack Solutions
Skills and Tools Required for DIY
Wooden rack construction requires basic carpentry skills: cutting to length, drilling pilot holes, and driving screws. A miter saw, drill, and level are essential. Metal conduit builds demand more advanced skills: accurate bending, threading, and welding or bolting connections. PVC racks are beginner-friendly but lack durability. Be honest about your skill level—a wobbly DIY rack that collapses mid-season costs more than a pre-made unit.
Time Investment Comparison
Pre-made racks typically assemble in 20-45 minutes with basic tools. DIY projects consume 4-8 hours plus shopping time. For time-strapped gardeners, the premium for pre-made is worthwhile. However, DIY allows you to build during off-season when time is abundant, spreading the cost and effort over winter months. Consider building one DIY rack as a learning project while using pre-made units for critical production needs.
Customization Advantages
DIY shines when your cold frame has unusual dimensions or you need specialized features like integrated potting surfaces, sink stations, or hanging rod assemblies for grow lights. Pre-made units offer limited modifications—usually just shelf height adjustments. If you propagate unusual crops with unique spacing needs, DIY customization pays off quickly in efficiency and plant quality.
Integration with Cold Frame Design
Freestanding vs. Built-In Units
Freestanding racks offer mobility—roll them out on heavy-duty casters for summer storage or repositioning. Built-in racks maximize space efficiency and stability but commit you to a permanent configuration. For most gardeners, semi-permanent installation (bolted but removable) provides the best balance. Consider your cold frame’s purpose: if it doubles as winter storage, freestanding is essential.
Working with Hinged Lids
Rack height must accommodate the lid’s swing arc. Measure the lid’s lowest point when open at 45 degrees—this is your maximum rack height. Place the rack 4-6 inches back from the hinge side to allow lid props and automatic openers to function. Some innovative designs incorporate lid props into the rack structure itself, eliminating separate hardware that can fail in wind.
Water Drainage Considerations
Seedling trays drain constantly, and that water needs somewhere to go. Built-in racks should include a slight slope (1/8 inch per foot) toward a collection gutter that drains outside the cold frame. Freestanding units need trays or sloped surfaces beneath to prevent muddy conditions that breed fungus gnats. Elevate the entire rack 2 inches using concrete pavers or adjustable feet to create a drying airspace underneath.
Seasonal Use and Storage Strategies
Transitioning to Hardening Off
A quality rack system doubles as a hardening-off station. Simply remove shelves to create taller spaces, or wheel the entire unit outside to a shaded area. The same racks that held seedling trays in February can support 4-inch pots in April. This dual-purpose functionality eliminates the need for separate hardening-off infrastructure, saving money and storage space.
Summer Storage Solutions
Disassemble metal racks and store indoors to extend lifespan by 50%. Wooden racks can remain in place if protected with breathable covers that prevent UV degradation while allowing airflow. For coastal areas, apply a light coat of WD-40 to metal components before summer storage to prevent salt air corrosion. Store shelves vertically to prevent warping and make fall setup faster.
Off-Season Maintenance
Use the summer downtime to inventory hardware, touch up paint, and inspect for damage. Order replacement parts in July when greenhouse suppliers run sales. Create a setup checklist while the season is fresh in your mind—note which shelf heights worked best for specific crops. This proactive approach transforms fall setup from a frustrating puzzle into a 30-minute routine.
Frequently Asked Questions
How many tiers should my seed starting rack have for a standard cold frame?
Most 4×8 foot cold frames accommodate three tiers optimally. This provides 12-18 inches between shelves, enough for most seedlings while maintaining accessibility. Four tiers fit only in cold frames with 24+ inch height at the center and block too much light to lower shelves. Two tiers waste vertical space unless you’re growing exceptionally tall seedlings. Three tiers balance capacity, light distribution, and ease of use for 90% of gardeners.
Can I use regular household wire shelving in my cold frame?
Standard chrome wire shelving rusts within one season in cold frame humidity. While the price is tempting, the lack of weather-resistant coating and lower weight capacity (typically 200 pounds total) makes them a poor investment. If you must use household shelving, apply two coats of automotive undercoating spray to all surfaces, including hidden weld points, and expect to replace it within 2-3 years.
What’s the ideal distance between shelves for starting tomatoes and peppers?
Start with 6-inch spacing for germination, then increase to 10-12 inches once seedlings develop their first true leaves. This accommodates the 8-10 inch height of transplant-ready nightshades while leaving air space above. If growing under supplemental lights, add 4 inches to accommodate fixture height. Adjustable racks let you start with tight spacing in February and expand as plants grow, maximizing early-season capacity.
Should I anchor my rack to the cold frame base or leave it movable?
Anchor it. A fully loaded rack can weigh 300+ pounds, but the top-heavy nature makes it prone to tipping when you slide trays in and out. Use two L-brackets on the back legs, allowing you to unbolt it if needed. This prevents the rack from shifting and blocking vents or tipping onto the glass during strong winds. The small loss in mobility is outweighed by safety and stability benefits.
How do I prevent my rack from blocking light to lower shelves?
Choose open-grid shelving over solid slats, and position the rack so the lowest shelf is no more than 12 inches above the cold frame base. Paint the rack white to reflect light, and avoid storing supplies underneath that create permanent shadows. In deep cold frames, angle the rack slightly (5 degrees) toward the sun to improve lower-shelf illumination. Monitor growth—if lower seedlings are leggy, they need more light.
Is it better to build a rack from wood or metal for cold frame use?
Metal wins for longevity and disease prevention. Powder-coated steel racks last 7-10 years with minimal maintenance, while even cedar rots in 5-7 years under constant moisture. Metal cleans easily and doesn’t harbor pathogens in grain cracks. Wood’s advantage is insulation—soil temperatures on wooden shelves stay 3-5°F warmer during cold snaps, which can be critical for heat-loving crops. Choose metal for low maintenance, wood if you need every degree of warmth.
Can I integrate heating mats into my rack design?
Absolutely, but design matters. Wire mesh shelves allow heat mat cords to pass through easily and provide excellent heat transfer. Use zip ties to secure cords to rack legs, keeping them away from water. Elevate mats ½ inch above shelves using small blocks to prevent overheating and allow drainage. Never cover more than 60% of any shelf with heat mats—leave space for air circulation around unheated trays of cool-season crops.
How much weight can a typical seed starting rack hold?
Quality racks rate for 50-75 pounds per shelf, but calculate based on your specific setup. A 1020 tray with 72 cells and wet soil weighs 8-10 pounds. Four trays per shelf = 40 pounds, well within limits. However, snow load adds stress—if your cold frame lid leaks snow onto the top shelf, that can add 20+ pounds per square foot. Always derate published capacity by 25% for cold frame conditions and dynamic loading from sliding trays.
What’s the best way to clean and sanitize racks between plantings?
Remove all shelves and spray with a 10% bleach solution, scrubbing joints and corners with a stiff brush. Rinse thoroughly and let dry completely. For metal racks, follow with a rust inhibitor spray. Between successive crops, use hydrogen peroxide sanitizer (no rinse) for speed. Never use pressure washers—they drive water into welds and wood grain. Keep a dedicated cleaning kit in your cold frame to make sanitizing a quick routine task.
Should I remove my rack during summer when the cold frame is unused?
Yes, if possible. Disassembling metal racks and storing them indoors extends lifespan dramatically. If removal isn’t feasible, protect the rack with a breathable cover that blocks UV but prevents moisture buildup. Apply a light coat of oil to metal components and elevate wooden feet off damp ground. Summer storage prevents premature degradation and makes fall setup faster since you’ll inspect and repair components during the off-season.