Transforming a compact backyard into a thriving garden oasis might seem impossible when you’re short on square footage, but lean-to greenhouses offer an elegant solution that defies space limitations. These versatile structures capitalize on existing walls, creating a microclimate where tomatoes ripen earlier, seedlings get a head start, and tropical plants survive harsh winters—all without consuming precious garden real estate. Unlike freestanding models that demand substantial clearance on all sides, lean-to designs hug your home, garage, or garden wall, turning otherwise unused vertical space into a productive growing sanctuary.
The beauty of a lean-to greenhouse lies in its marriage of efficiency and accessibility. By sharing a wall with your existing structure, you gain thermal benefits that reduce heating costs while creating a seamless transition between indoor and outdoor living. Whether you’re a seasoned horticulturist looking to extend your growing season or a beginner seeking a controlled environment for delicate plants, understanding the nuances of these space-saving structures will help you make an investment that pays dividends for decades. This comprehensive guide walks you through everything from structural considerations to climate control strategies, ensuring your small backyard yields maximum growing potential.
Top 10 Lean-To Greenhouses for Small Backyards
Detailed Product Reviews
1. Outsunny Lean-to Mini Greenhouse with 3 Tier Shelves, Portable Green House with 2 Roll-up Doors, Garden Plant Grow Hot House for Indoor Outdoor, 56.3"x18.1"x59.4", Clear

Overview: The Outsunny Lean-to Mini Greenhouse delivers a compact, budget-friendly solution for gardeners with limited space. Measuring 56.3" wide and 59.4" tall, this three-tier portable greenhouse provides 33 pounds of shelf capacity per level, making it ideal for seedlings, herbs, and small potted plants. Its lean-to design maximizes corner spaces against walls while providing essential wind shelter for delicate plants.
What Makes It Stand Out: The reinforced PE cover features a grid pattern and hemmed edges that resist tearing while allowing 85% sunlight transmission. Dual roll-up doors with securing straps provide excellent ventilation control and easy access from either side. The extended bottom edge can be buried for stability, and the powder-coated steel frame ensures rust resistance. With six wire shelves included, it offers surprising storage capacity for its 18-inch depth.
Value for Money: At $52.99, this greenhouse delivers exceptional value for casual gardeners and beginners. It costs significantly less than permanent structures while providing essential plant protection. Compared to similar mini greenhouses, the reinforced cover and dual-door design justify the modest premium over bare-bones models that lack these durability features.
Strengths and Weaknesses: Strengths include affordable pricing, excellent portability, good light transmission, and dual-access doors. The reinforced cover edges prevent common tearing issues. Weaknesses are the limited 33-pound shelf capacity, susceptibility to strong winds without proper anchoring, and the PE cover’s shorter lifespan compared to polycarbonate. The narrow depth restricts larger plants and limits versatility.
Bottom Line: Perfect for apartment balconies, small patios, or beginner gardeners. This greenhouse offers reliable plant protection and excellent ventilation at an accessible price point, provided you secure it properly and respect the weight limits.
2. U-MAX 6x10 Ft Wood Greenhouse for Outdoors with Openable Window & Lockable Door, Heavy Duty Lean to Walk in Greenhouse with Polycarbonate Panel for Outside, Garden and Backyard

Overview: The U-MAX 6x10 Wood Greenhouse represents a premium, full-scale gardening solution for serious enthusiasts. This 58-square-foot walk-in structure combines robust wood construction with polycarbonate panels, creating a versatile space that functions as greenhouse, potting shed, and outdoor café area. The hydraulic-supported front window opens to 90 degrees for maximum ventilation and climate control.
What Makes It Stand Out: The reinforced wooden frame offers superior durability and aesthetic appeal compared to metal alternatives. Three panoramic windows with hydraulic supports provide exceptional airflow control. The innovative foldable shelf doubles as a 40-pound capacity potting bench or coffee bar. Its 3-in-1 design adapts to gardening, storage, and leisure activities, while the lockable door secures valuable tools and plants from theft or pests.
Value for Money: At $629.99, this is a significant investment, but justified by the 58 ft² space, premium materials, and multifunctionality. Comparable polycarbonate greenhouses of this size typically cost $400-500 without wood framing or the convertible shelf feature. The versatility as a garden structure and leisure space adds considerable value that cheaper models cannot match.
Strengths and Weaknesses: Strengths include exceptional durability, spacious interior, superior ventilation, lockable security, and attractive wood aesthetics. The foldable shelf is genuinely innovative. Weaknesses are the high price point, complex assembly requiring multiple boxes, substantial space requirements, and ongoing wood maintenance needs. Wind resistance may be limited without additional anchoring, and the weight demands a solid foundation.
Bottom Line: Ideal for dedicated gardeners with adequate space and budget. This greenhouse transcends typical plant protection, offering a permanent, attractive garden structure that justifies its premium price through versatility and durability. The 3-in-1 functionality makes it a backyard centerpiece rather than just a utility structure.
3. Happygrill Walk-in Greenhouse with 3-Tier Flower Rack, Weatherproof PE Cover & Roll-up Zipper Doors, Lean-to Greenhouse for Garden, Backyard, Balcony
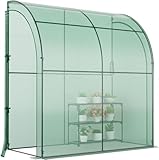
Overview: The Happygrill Walk-in Greenhouse positions itself as a wind-resistant, weatherproof solution for challenging climates. This lean-to design features a robust powder-coated metal frame with comprehensive anchoring systems, including eight wall mounts, four ground stakes, and wind ropes. The PE cover provides tear-resistant protection while maintaining heat retention for optimal plant growth in exposed locations.
What Makes It Stand Out: This greenhouse’s exceptional stability package sets it apart, specifically engineered for high-wind conditions that destroy lesser models. The curved front prevents rain and snow accumulation, a thoughtful design detail often missing in budget models. The lean-to configuration maximizes limited space on balconies, porches, or against garden walls. Dual roll-up zipper doors facilitate airflow control and easy access from multiple angles.
Value for Money: Priced at $69.99, it offers excellent mid-range value. The comprehensive anchoring hardware alone would cost $20-30 separately. While more expensive than basic mini greenhouses, the enhanced stability and weather-resistant features justify the premium for gardeners in exposed locations. It bridges the gap between flimsy portables and permanent installations.
Strengths and Weaknesses: Strengths include outstanding wind resistance, complete mounting hardware, thoughtful curved design, and tool-free assembly. The weatherproof PE cover offers good protection. Weaknesses include unspecified shelf weight capacity, potentially shorter cover lifespan than polycarbonate, and the 3-tier design may limit taller plants. Assembly instructions may be unclear despite tool-free claims, and the narrow depth restricts larger specimens.
Bottom Line: An excellent choice for windy locations or exposed balconies. The extensive stabilization features provide peace of mind where other portable greenhouses would fail, making it worth the modest price increase over basic models. It’s particularly valuable for renters who cannot build permanent structures but need serious wind resistance.
4. Outsunny Lean-to Greenhouse with 3 Tier Shelves, 56.7" x 18.9" x 59.8" Portable Small Greenhouse with PE Cover, 2 Roll-Up Zippered Doors, for Indoor Outdoor Garden Backyard Balcony, Green

Overview: The Outsunny Lean-to Greenhouse offers an ultra-affordable entry point into protected gardening. Essentially a budget variant of similar models, this 56.7-inch wide greenhouse features three wire shelves and a 140 GSM UV-resistant PE cover. The lean-to design conserves space while providing essential plant protection for seedlings and small container plants in tight urban environments.
What Makes It Stand Out: At $46.99, it’s among the most affordable greenhouses with dual roll-up doors and a reinforced cover. The black hemmed edging prevents tearing at stress points, extending cover life beyond typical budget models. The powder-coated steel frame resists rust, and side bags can be filled with sand or stones for additional stability. The 85% sunlight transmission rating matches more expensive models.
Value for Money: This represents exceptional value for absolute beginners or those testing greenhouse gardening. It’s $6 cheaper than similar Outsunny models but with comparable features. However, the reduced 18-pound shelf capacity is a notable trade-off that may limit usability as plants mature. For seasonal seed starting, it’s unbeatable; for long-term growth, capacity constraints become problematic.
Strengths and Weaknesses: Strengths include unbeatable price, dual-door ventilation, UV-resistant cover, and included stability options. The lightweight design enables easy relocation and storage. Weaknesses are the low 18-pound weight capacity, less robust frame compared to premium models, and PE cover’s limited durability versus polycarbonate. The narrow depth restricts plant size and the assembly can be fiddly despite simplicity.
Bottom Line: Best for budget-conscious beginners or temporary seasonal use. While weight capacity limitations require careful loading, it provides essential greenhouse functions at a price point that’s hard to beat for learning the basics. Consider upgrading if you plan to grow heavy plants or need year-round durability.
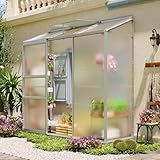
5. Outsunny 6’ x 4’ Aluminum Lean-to Greenhouse Polycarbonate Walk-in Garden Greenhouse with Adjustable Roof Vent, Rain Gutter and Sliding Door for Winter, Clear

Overview: The Outsunny 6’ x 4’ Aluminum Greenhouse bridges the gap between portable models and permanent structures. This walk-in greenhouse features a durable aluminum alloy frame with polycarbonate panels, offering 26 square feet of growing space. The lean-to design saves space while providing year-round plant protection with professional features like an adjustable roof vent and integrated rain gutter for serious hobbyists.
What Makes It Stand Out: The aluminum construction provides rust-proof durability without the maintenance demands of wood. Snap-in polycarbonate panels offer superior UV protection and heat retention compared to PE covers. The five-level adjustable vent and sliding door provide precise climate control. The integrated rain gutter system demonstrates thoughtful design for water management and collection, a feature rarely seen in this price range.
Value for Money: At $215, it occupies a sweet spot between flimsy portable models and premium wood structures. Polycarbonate panel greenhouses typically start at $300, making this an excellent value. The aluminum frame ensures longevity without wood’s upkeep costs, justifying the investment over cheaper PE models that require frequent replacement.
Strengths and Weaknesses: Strengths include durable aluminum construction, professional polycarbonate panels, effective ventilation system, rain gutter integration, and walk-in accessibility. The galvanized steel base adds stability. Weaknesses include moderate size limitations, assembly complexity requiring patience, and wind resistance rated only to level 4. Polycarbonate panels may yellow over time with UV exposure, and the sliding door track requires maintenance.
Bottom Line: An outstanding choice for serious gardeners seeking durability without premium wood prices. The professional features and quality materials make this a long-term investment that outperforms portable models while remaining affordable. It’s ideal for those ready to commit to greenhouse gardening but not prepared for four-figure expenses.
6. Showellgard 6x2ft Lean-to Polycarbonate Greenhouse, Small Walk-in Greenhouse, with Adjustable Roof Vent, Rain Gutter and Sliding Door, Outdoor Green House for Terrace, Backyard Sliver
Overview: The Showellgard 6x2ft Lean-to Polycarbonate Greenhouse delivers premium protection in a compact footprint. This walk-in greenhouse features 4mm twin-wall polycarbonate roof panels and crystal-clear PC walls that block harmful UV rays while creating optimal growing conditions. Engineered for durability, it combines a rust-resistant aluminum frame with a reinforced steel base anchored by four corner posts. With a 56 mph wind rating and 15 psf snow load capacity, it’s built to withstand challenging weather conditions.
What Makes It Stand Out: The thoughtful integration of professional-grade materials sets this greenhouse apart. The twin-wall polycarbonate provides superior insulation compared to single-layer alternatives, while the built-in gutter system efficiently manages rainwater collection and drainage. An adjustable roof vent and sliding door create effective air circulation, preventing overheating and humidity buildup. The reinforced steel base with soil-anchorable posts ensures structural integrity without requiring a permanent foundation.
Value for Money: At $269.99, this greenhouse positions itself as a mid-range polycarbonate option that outperforms cheaper PE-covered models while remaining significantly more affordable than glass alternatives. The durable construction translates to years of reliable service, making it a smart long-term investment for serious gardeners who need a compact yet robust growing solution.
Strengths and Weaknesses: Strengths include exceptional weather resistance, UV-blocking polycarbonate panels, integrated ventilation and gutter systems, and a sturdy aluminum/steel frame. The sliding door offers convenient access. Weaknesses include its relatively small 6x2ft growing area and the two-package delivery system that may complicate assembly timing. Installation requires careful attention to leveling and anchoring.
Bottom Line: Perfect for dedicated gardeners seeking a durable, all-season greenhouse in a space-saving design. The Showellgard delivers professional features that justify its price premium over budget options, making it ideal for small backyards, terraces, or urban gardening setups where reliability matters.
7. Ohuhu Tomato Greenhouse for Outdoors: Portable Lean to Green House Heavy Duty with Roll-Up Zippered Door, Tall Plastic Greenhouses for Outside Plants Growing Shed Tent for Backyard, 6.6x2.5x5.6 FT

Overview: The Ohuhu Tomato Greenhouse offers an affordable entry into protected growing with its 6.6x2.5x5.6ft lean-to design. This portable greenhouse features a 130g/m² white translucent PE mesh cloth that transmits nourishing light while retaining heat and moisture. The structure uses 16mm powder-coated steel tubes connected by PP plastic joints, creating a lightweight yet functional frame. Seven top rods specifically address snow and water accumulation concerns, while reinforced connection rods add stability to high-stress areas.
What Makes It Stand Out: This greenhouse excels in accessibility and wind resistance. The roll-up zippered door provides easy access, while two mesh windows allow customizable ventilation. The included stakes and windproof ropes enable secure anchoring, and the tall 5.6ft height accommodates climbing plants like tomatoes perfectly. Its portability means you can relocate or store it seasonally without permanent commitment.
Value for Money: At $83.99, this represents exceptional value for gardeners testing greenhouse growing. It’s a fraction of polycarbonate greenhouse costs while delivering essential protection. While the PE cover won’t match polycarbonate longevity, the price point allows replacement every few seasons while still remaining economical compared to permanent structures.
Strengths and Weaknesses: Strengths include unbeatable affordability, easy assembly/disassembly, tall vertical space for vining crops, effective ventilation options, and comprehensive anchoring system. The reinforced areas show attention to detail. Weaknesses involve the PE cover’s limited lifespan (typically 1-3 seasons), reduced insulation compared to polycarbonate, and vulnerability to extreme weather. It requires strategic placement against walls or fences for best stability.
Bottom Line: Ideal for budget-conscious gardeners and beginners seeking seasonal plant protection. The Ohuhu Tomato Greenhouse delivers impressive functionality for its price, making it perfect for extending growing seasons without permanent installation or significant financial investment.
8. Outsunny 8’ x 4’ Lean-to Polycarbonate Greenhouse, Walk-in Hobby Green House with Sliding Door, 5-Level Roof Vent, Rain Gutter, Garden Plant Hot House with Aluminum Frame and Foundation, Black

Overview: The Outsunny 8’ x 4’ Lean-to Polycarbonate Greenhouse provides hobbyists with expanded growing space and premium features. This walk-in greenhouse utilizes insulating twin-wall polycarbonate panels that transmit 90% of sunlight while blocking UV damage and maintaining stable temperatures. The powder-coated aluminum frame resists rust and corrosion, while the lean-to design allows propping against existing structures for extra support. The included foundation features ground stakes for secure installation.
What Makes It Stand Out: The five-angle adjustable roof vent offers superior humidity control compared to single-position vents, allowing precise microclimate management. The built-in rain gutter system enables natural water collection for sustainable irrigation. A sliding door saves space while providing convenient access. At nearly 8 feet long and over 7 feet high, it accommodates larger plants and gardeners comfortably.
Value for Money: Priced at $285.99, this greenhouse competes directly with the Showellgard while offering 33% more floor space. The inclusion of a foundation kit and advanced ventilation system adds value. For polycarbonate construction with these specifications, it represents a fair mid-market price point that balances quality and affordability.
Strengths and Weaknesses: Strengths include generous interior dimensions, excellent light transmission, superior ventilation control, integrated gutter system, and sturdy aluminum construction. The lean-to design maximizes space efficiency. Weaknesses include the requirement for 2-3 people during assembly and the need for a supporting wall or fence. The price may stretch casual gardeners’ budgets, and polycarbonate panels can scratch over time.
Bottom Line: An excellent choice for serious hobbyists wanting more growing area without jumping to premium greenhouse prices. The Outsunny 8x4 delivers professional-grade ventilation and durability features that justify its cost, making it perfect for dedicated gardeners ready to invest in a long-term growing solution.
9. Outsunny 10’ x 5’ x 7’ Lean to Greenhouse, Walk-in Green House, Plant Nursery with 2 Roll-up Doors and Windows, PE Cover and 3 Wire Shelves, Green

Overview: The Outsunny 10’ x 5’ x 7’ Lean-to Greenhouse maximizes growing space for minimal investment. This walk-in greenhouse features a galvanized steel frame with a protective polyethylene cover, offering substantial dimensions at an entry-level price. The design includes three tiers of shelving with six wire panels, providing immediate organization for seedlings and potted plants. Multiple access points include two roll-up doors and screened windows for ventilation control.
What Makes It Stand Out: No other greenhouse matches this size-to-price ratio. The 10-foot length and 7-foot height create impressive volume for under $70. The integrated shelving system eliminates additional purchase costs and setup time. The lean-to configuration efficiently uses vertical wall space while providing walk-in accessibility. Guy ropes and ground stakes enhance stability in windy conditions.
Value for Money: At $67.88, this is the market’s value champion. You receive a 50-square-foot growing space with shelving for less than the cost of a dinner out. While the PE cover limits longevity, the frame can be recovered with new material, extending the investment. For budget-focused gardeners needing maximum capacity, alternatives cannot compete on pure space-per-dollar metrics.
Strengths and Weaknesses: Strengths include unbeatable price, generous dimensions, included shelving, multiple doors for access, and lightweight portability. The galvanized steel frame resists chipping. Weaknesses involve the PE cover’s vulnerability to tearing and UV degradation, limited snow load capacity, and modest 22-pound-per-shelf weight limit. Assembly instructions may challenge some users, and extreme weather requires additional anchoring.
Bottom Line: Perfect for gardeners prioritizing space and affordability over long-term durability. The Outsunny 10x5 excels as a starter greenhouse or seasonal extension, offering room to experiment and grow. Accept the cover’s limitations and you’ll find exceptional utility for the price.
10. Ohuhu Tomato Greenhouse for Outdoors: Portable Lean to Green House Heavy Duty with Roll-Up Zippered Door, Tall Plastic Greenhouses for Outside Plants Growing Shed Tent for Backyard Transparent

Overview: The Ohuhu Tomato Greenhouse in transparent design offers the same functional structure as its white counterpart but maximizes light transmission. Measuring 6.6x2.5x5.6ft, this lean-to greenhouse features reinforced PE mesh cloth that provides ultimate plant protection while allowing full sunlight penetration. The 16mm thickened tubes and PP plastic joints create a sturdy frame, with reinforced side, back, and doorway areas addressing common stress points. Seven top rods prevent water and snow accumulation.
What Makes It Stand Out: The transparent cover distinguishes this model, delivering maximum photosynthetic light compared to translucent alternatives. This benefits fruiting plants like tomatoes and flowering species that crave intense light. The comprehensive reinforcement package—including stakes, windproof ropes, and strengthened connection points—demonstrates thoughtful engineering for a portable structure. Easy assembly and disassembly support seasonal use or relocation.
Value for Money: At $79.99, this transparent version costs slightly less than the white model while offering superior light transmission. It maintains the same durable construction and accessories, representing excellent value for gardeners needing bright growing conditions. The price point allows affordable experimentation with greenhouse growing before committing to permanent polycarbonate structures.
Strengths and Weaknesses: Strengths include exceptional light penetration, affordable pricing, portable design, tall vertical growing space, and robust anchoring system. The reinforced stress areas enhance durability. Weaknesses mirror other PE greenhouses: limited lifespan compared to polycarbonate, potential overheating in summer due to transparency, reduced insulation in winter, and vulnerability to extreme weather. Requires strategic placement and possibly shade cloth in hot climates.
Bottom Line: An outstanding budget option for light-hungry plants and sunny locations. The transparent Ohuhu Tomato Greenhouse delivers maximum brightness and solid construction at an attractive price, making it ideal for gardeners focused on fruit and flower production who accept seasonal cover replacement as part of the ownership experience.
Why a Lean-To Greenhouse is Perfect for Small Backyards
Lean-to greenhouses fundamentally change the equation for space-constrained gardeners. By utilizing an existing vertical structure as one wall, these designs eliminate roughly 25% of the material costs and construction complexity while providing superior thermal mass. The shared wall acts as a heat sink, absorbing warmth during the day and radiating it back at night, creating a more stable environment than freestanding alternatives. This thermal coupling can reduce winter heating requirements by up to 35%, making year-round growing economically viable even in cooler climates.
The accessibility factor cannot be overstated. Positioned against your home, a lean-to greenhouse becomes an extension of your living space, allowing you to check on plants during breakfast or tend to seedlings without braving inclement weather. This proximity encourages more consistent care and observation, leading to healthier plants and earlier pest detection. For urban and suburban gardeners battling homeowners association restrictions, lean-to models often face fewer regulatory hurdles since they’re considered ancillary structures rather than independent buildings.
Space Efficiency Benefits
Every square foot matters in a compact yard, and lean-to designs maximize growing area relative to footprint. The rectangular layout allows for deeper benches along the house wall and narrower staging near the glazing, creating an ergonomic workflow that minimizes wasted aisle space. You can typically achieve 40% more usable bench space compared to a freestanding greenhouse of equivalent floor area because you eliminate the need for access paths on all sides.
Thermal Advantages
The shared wall provides more than just structural support—it creates a thermal battery that moderates temperature swings. Brick, stone, or concrete walls absorb solar energy during daylight hours and release it slowly after sunset, reducing the risk of frost damage during shoulder seasons. This passive temperature regulation means less reliance on electric heaters, translating to lower operating costs and a smaller carbon footprint for your gardening operation.
Aesthetic Integration
Modern lean-to greenhouses can be designed to complement your home’s architecture rather than compete with it. Matching roof pitches, complementary trim colors, and consistent materials create a cohesive look that enhances property value. Many homeowners find that a well-integrated greenhouse becomes a architectural feature, softening harsh wall lines and adding visual interest to otherwise bland exterior surfaces.
Critical Pre-Purchase Considerations
Before investing in a lean-to greenhouse, thorough site assessment prevents costly mistakes and ensures optimal growing conditions. The orientation and condition of your supporting wall dictates everything from light exposure to structural requirements, making this preliminary homework phase non-negotiable. A rushed decision based on aesthetics alone often results in poor plant performance and frustrating maintenance issues down the road.
Evaluating Your Wall Structure
Not all walls are created equal when it comes to supporting a greenhouse. The host wall must withstand not only the weight of the greenhouse structure but also wind loads and potential snow accumulation. Masonry walls (brick, block, or stone) provide the most robust foundation, while wood-framed walls require careful assessment of stud spacing and sheathing integrity. Have a structural engineer evaluate any wall showing signs of deterioration, moisture damage, or inadequate framing, as the added stress of a greenhouse can exacerbate existing weaknesses.
Sunlight Exposure Analysis
Track sun patterns across your proposed location throughout different seasons. Ideally, the glazing should face within 20 degrees of true south in the Northern Hemisphere for maximum winter light capture. Use a solar pathfinder or simple smartphone apps to map shadows cast by neighboring buildings, trees, and your own roof overhang. Remember that winter sun angles are dramatically lower—what appears sunny in July may be shaded from November through February, severely limiting winter growing potential.
Microclimate Assessment
Your wall creates unique microclimatic conditions that affect plant growth. South-facing walls reflect additional light and heat but can scorch tender seedlings during summer. East-facing walls capture gentle morning sun while avoiding harsh afternoon heat, making them ideal for orchids and African violets. West-facing orientations demand superior ventilation to combat afternoon heat buildup. Consider installing temporary sensors to monitor temperature fluctuations, humidity levels, and light intensity before committing to a permanent structure.
Decoding Frame Materials
The skeleton of your greenhouse determines its longevity, maintenance requirements, and aesthetic appeal. Each material brings distinct advantages and trade-offs that must be weighed against your climate, budget, and gardening goals. Understanding these differences helps you select a frame that will withstand decades of use without becoming a maintenance nightmare.
Aluminum Frames
Lightweight yet strong, aluminum frames resist corrosion and require virtually no maintenance beyond occasional cleaning. The material’s natural expansion and contraction with temperature changes is minimal, maintaining seal integrity over time. However, aluminum conducts heat rapidly, creating cold zones along frame members during winter. Look for thermally broken aluminum profiles that incorporate a polymer barrier to reduce heat transfer, or plan to insulate crops away from direct contact with frame elements.
Wood Frames
Traditional wood frames offer unmatched natural beauty and superior insulation properties compared to metal alternatives. Cedar and redwood contain natural oils that resist rot and insect damage without chemical treatments, while pressure-treated lumber provides budget-friendly durability. The downside? Wood requires regular maintenance—staining or painting every 3-5 years—to prevent moisture infiltration and UV degradation. In humid climates, wood frames can harbor mold and mildew, potentially affecting plant health if not properly ventilated.
Galvanized Steel Options
For maximum strength in regions with heavy snow loads or high winds, galvanized steel frames provide industrial-grade durability. The zinc coating prevents rust, though scratches and cuts must be touched up promptly to maintain protection. Steel’s thermal conductivity is even higher than aluminum, making it less suitable for cold-climate winter growing unless paired with exceptional insulation strategies. The material’s rigidity allows for wider spans between supports, creating more unobstructed growing space.
PVC and Composite Materials
Budget-conscious gardeners often consider PVC frames for their low cost and ease of assembly. While suitable for temporary or seasonal structures, PVC degrades under UV exposure, becoming brittle and yellowed within 5-7 years. Composite materials combining wood fibers and recycled plastics offer a middle ground—better UV resistance than PVC with improved insulation over metal—but lack the proven longevity of traditional materials for permanent installations.
Glazing Explained: Beyond Just Glass
The transparent covering of your greenhouse—its glazing—directly impacts light transmission, insulation value, durability, and cost. Modern options extend far beyond traditional horticultural glass, each with specific performance characteristics that affect your plants’ growing environment and your long-term satisfaction.
Tempered Glass
Nothing matches glass for optical clarity and longevity. Tempered safety glass, required by most building codes for overhead applications, breaks into small granular chunks rather than dangerous shards. Single-pane glass offers poor insulation (R-value around 0.9), making it suitable only for mild climates or seasonal use. Double-pane insulated glass units (IGUs) improve thermal performance to R-2 or better but add significant weight and cost. Consider low-E coatings to reduce summer heat gain, though these can filter out portions of the light spectrum beneficial to plant growth.
Polycarbonate Panels
Twin-wall polycarbonate has become the default choice for serious hobby greenhouse growers, offering an excellent balance of light diffusion, insulation, and impact resistance. The 6mm twin-wall configuration provides an R-value of approximately 1.7, while 10mm triple-wall reaches R-2.5—comparable to double-pane glass at a fraction of the weight. The cellular structure diffuses light, preventing hot spots and shadows while reducing the risk of leaf scorch. Quality panels include UV inhibitors on the outer layer, preventing yellowing and maintaining light transmission for 15+ years.
Polyethylene Film
For budget installations or temporary seasonal extensions, 6-mil UV-stabilized polyethylene film offers the lowest cost per square foot. Modern films last 4-5 years before requiring replacement and can be layered to create dead air spaces that improve insulation. The material’s flexibility allows for curved roof designs that shed snow and wind loads efficiently. However, polyethylene scratches easily, attracts dust, and provides minimal security compared to rigid glazing options.
Acrylic Alternatives
Acrylic (plexiglass) panels transmit more light than glass while weighing half as much, making them suitable for DIY installations where weight is a concern. The material resists UV degradation better than standard polycarbonate but scratches more easily and carries a higher price point. Cast acrylic offers superior optical clarity over extruded versions but can become brittle in extreme cold, potentially cracking under impact from hail or falling branches.
Foundation Fundamentals
A lean-to greenhouse’s foundation must manage moisture, prevent frost heave, and create a stable base while accommodating the unique stresses of an attached structure. The wrong foundation leads to cracked glazing, stuck doors, and compromised seals that defeat the greenhouse’s climate control capabilities.
Attached vs. Independent Foundations
Some lean-to designs rely entirely on the host wall for support, using a simple perimeter foundation that carries only the outer wall load. Others require a full slab that ties into the existing structure’s foundation. The decision depends on your greenhouse size, local frost depth, and soil conditions. Independent foundations allow for minor differential settling without stressing the host wall but require careful waterproofing to prevent moisture infiltration into your home.
Drainage Requirements
Water management begins at ground level. Install perimeter drainage that directs water away from both the greenhouse and your home’s foundation. A 2% slope away from structures is the minimum; 4% is better for heavy clay soils. French drains or curtain drains may be necessary in waterlogged sites. Inside the greenhouse, floor drains or perimeter channels capture irrigation runoff and condensation, preventing slippery surfaces and root rot issues.
Frost Heave Protection
In cold climates, foundations must extend below the local frost line to prevent seasonal movement that shatters glazing and warps frames. This typically means 30-48 inches of depth in northern regions. Alternatively, a floating slab design with reinforced edges can work for smaller greenhouses in moderate freeze zones. Insulate foundation perimeters with 2-inch rigid foam board extending 24 inches horizontally to reduce frost penetration and improve energy efficiency.
Ventilation Systems That Actually Work
Proper ventilation prevents the greenhouse from becoming an oven during summer and manages humidity that fosters fungal diseases. Lean-to designs face unique challenges since they lack the cross-ventilation opportunities of freestanding structures, making strategic vent placement absolutely critical for plant health.
Passive Ventilation Design
The most reliable ventilation combines high and low vents to create natural convection currents. Place intake vents along the lower portion of the front wall or ends, with exhaust vents at the highest point of the roof. A general rule: total vent area should equal at least 20% of the greenhouse floor area for effective passive cooling. Automated vent openers using wax cylinders or bimetallic springs respond to temperature changes without electricity, opening vents when temperatures exceed your set point.
Automated Vent Openers
Solar-powered vent openers offer set-it-and-forget-it convenience, gradually opening as temperatures rise. Look for models with adjustable opening ranges (60-75°F) and corrosion-resistant hardware. Install multiple smaller vents rather than one large opening to prevent sudden temperature drops during cool evenings. For larger greenhouses, consider staged ventilation where different vents open at progressively higher temperatures to fine-tune climate control.
Manual vs. Powered Systems
While manual vents cost less initially, they require consistent monitoring and twice-daily adjustments during variable weather. Exhaust fans with thermostatic controls provide reliable ventilation but consume electricity and create noise. A hybrid approach often works best: passive vents for baseline air exchange supplemented by a small exhaust fan for extreme heat events. Position fans to draw air across the greenhouse rather than directly through it, creating gentle circulation that avoids wind stress on plants.
Climate Control for Year-Round Growing
A greenhouse without climate control is just a season extender. To achieve true four-season productivity, you must manage temperature, humidity, and air circulation with precision. Lean-to designs benefit from the thermal mass of the shared wall but also face challenges from heat transfer into the main structure.
Insulation Strategies
Line the shared wall with reflective insulation or rigid foam board to prevent heat loss into your home during winter and reduce heat gain during summer. For the greenhouse itself, bubble wrap or specialized greenhouse insulation can be installed on interior surfaces during winter months, improving R-values by 30-40% while still allowing 85% light transmission. Remove insulation in spring to maximize light for vigorous growth. Seal all gaps around the foundation and where the greenhouse meets the house with silicone caulk or foam backer rod.
Heating Options
Electric fan heaters provide clean, controllable warmth but increase operating costs significantly. Propane or natural gas heaters deliver more BTUs per dollar but require ventilation to prevent ethylene buildup, which damages plants. For sustainable heating, consider hydronic systems circulating warm water through bench tubing or perimeter pipes. These gentle, radiant heat sources maintain root zone temperatures—the most critical factor for plant health—while keeping air temperatures moderate. Soil heating cables under benches offer another efficient option, consuming less energy than heating the entire air volume.
Cooling Mechanisms
Beyond ventilation, evaporative coolers (swamp coolers) work exceptionally well in dry climates, dropping temperatures by 15-20°F while increasing beneficial humidity. In humid regions, shade cloths become essential—install exterior-mounted versions to prevent heat from entering rather than trying to remove it after absorption. Misting systems with fine nozzles create evaporative cooling without soaking plants, but require clean water to prevent nozzle clogging and mineral deposits on leaves.
Access and Ergonomics: Doors and Layout
The best greenhouse is one you’ll actually use, and that depends on convenient access and comfortable working conditions. Poor door placement or inadequate headroom turns greenhouse chores into a literal pain in the neck, reducing the frequency of care and ultimately, plant success.
Door Placement and Size
Position doors to avoid interfering with existing pathways and to create logical workflow patterns. A 32-inch minimum width accommodates wheelbarrows and garden carts; 36 inches is better for comfortable two-way traffic. Consider Dutch doors that allow ventilation while keeping animals out. If space allows, install doors at both ends to create through-draft ventilation and emergency exits. Ensure door thresholds are weather-sealed but low-profile to prevent tripping when carrying heavy trays.
Threshold Considerations
The transition between house and greenhouse needs careful waterproofing and insulation. Install a sloped threshold that directs water away from the door, with a minimum 4-inch step up to prevent water infiltration during heavy rains. For wheelchair accessibility, create a gently sloping ramp with non-slip surface and drainage channels. Thermal breaks in the threshold prevent condensation and reduce heat transfer between structures.
Interior Pathway Planning
Design pathways that allow you to reach every plant without stepping on soil or contorting your body. A central aisle 24-30 inches wide accommodates most gardeners; taller individuals may prefer 36 inches for comfortable movement. Place frequently accessed items—pruners, fertilizers, watering wands—near the door in weatherproof storage. Position propagation areas close to the house for daily monitoring, while hardier crops can occupy more remote corners.
Water Management Solutions
Water is both life-giving and destructive in a greenhouse environment. Proper irrigation delivery and drainage removal prevents root diseases, mineral buildup, and structural deterioration. Lean-to designs offer opportunities to tie into existing household water systems but also risk water damage to your home if not properly executed.
Irrigation Integration
Tap into a nearby outdoor faucet with a frost-free hydrant, or run a dedicated line from your home’s plumbing for year-round access. Install a pressure regulator (greenhouse systems typically need 20-30 PSI) and a backflow preventer to protect your potable water supply. Drip irrigation on timers delivers consistent moisture directly to root zones while keeping foliage dry, reducing fungal issues. For seed starting and delicate plants, misting systems provide gentle hydration without soil compaction.
Drainage Systems
Grade the interior floor with a minimum 1:50 slope toward floor drains or perimeter channels. Connect these to a dry well or storm drainage system, never to your home’s foundation drainage. Install catch basins with removable grates to collect debris and prevent clogs. In climates where freezing is a concern, slope pipes with adequate fall and install cleanouts for winterizing with compressed air.
Humidity Control
Excessive humidity leads to condensation dripping from glazing, creating wet conditions perfect for botrytis and powdery mildew. Proper ventilation is the primary defense, but dehumidifiers may be necessary in tightly sealed winter greenhouses. Circulation fans running continuously prevent stagnant air pockets and even out temperature stratification. Monitor humidity with a digital hygrometer, aiming for 50-70% relative humidity during the day, slightly higher at night for most crops.
Interior Layout and Space Optimization
A well-planned interior transforms a cramped lean-to into a productive growing space that feels larger than its dimensions suggest. Vertical thinking and modular systems allow you to evolve the layout as your gardening interests change.
Bench Configurations
Standard bench height of 30-32 inches suits most standing gardeners; adjustable legs accommodate wheelchair users or seated work. Slatted bench tops improve drainage and air circulation compared to solid surfaces. Position main benches 24 inches deep for easy reach from one side, or 48 inches for central access from both sides. Stagger bench heights—taller benches for orchids and display plants, lower ones for seed starting—to create visual interest and maximize light penetration to rear plants.
Vertical Growing Systems
Wall-mounted vertical planters on the shared wall utilize space that would otherwise be wasted. Install sturdy brackets every 16 inches to support hanging baskets, trellises, or pocket planters. Overhead hanging rails support vining crops like tomatoes and cucumbers, training them upward rather than outward. Rolling bench systems allow you to compress aisle space, creating a single movable access path that serves multiple bench rows.
Storage Solutions
Incorporate storage into every available nook. Under-bench areas house larger tools, potting soil, and empty containers in weatherproof bins. Wall-mounted pegboards organize hand tools within easy reach. Ceiling-mounted racks store shade cloths, frost blankets, and seasonal equipment overhead. A small lockable cabinet near the door secures fertilizers, pesticides, and sharp tools away from children and pets.
Lighting Considerations: Natural and Supplemental
Light is the limiting factor for plant growth, especially in lean-to designs where the shared wall blocks half the potential sunlight. Strategic planning ensures your crops receive adequate illumination throughout the year.
Natural Light Optimization
Clean glazing monthly—dust and algae can reduce light transmission by 15-20%. Paint the interior of the shared wall bright white or install reflective Mylar to bounce light back onto plants. Prune overhanging trees and shrubs seasonally to maximize winter sun exposure. Avoid using shade paints or interior shade cloths except during the most intense summer periods, as they reduce light when days are already shortest.
Supplemental Grow Lights
LED grow lights have revolutionized greenhouse lighting, consuming 60% less electricity than older HID systems while producing minimal heat. Install lights on adjustable pulleys to maintain optimal distance from plant canopies—typically 12-24 inches for LEDs. Focus supplemental lighting on propagation areas and winter production zones rather than trying to illuminate the entire space. Use timers to extend day length to 14-16 hours for vegetative growth, but allow plants a dark period for respiration.
Shading Solutions
Summer overheating demands effective shading, but permanent shading reduces winter light when it’s most needed. Exterior shade cloths mounted on rollers allow seasonal adjustment; 30-50% density suits most applications. Internal shading reflects heat back out before it’s absorbed by interior surfaces. Consider deciduous vines on exterior trellises—grapevines or kiwi provide dense summer shade but drop leaves to admit winter sun.
Budget Breakdown: What to Expect
Understanding the true cost of ownership helps you plan appropriately and avoid sticker shock. While lean-to greenhouses cost less than freestanding models of equivalent size, quality still demands investment.
Entry-Level Investments
Basic aluminum-frame kits with polycarbonate glazing start around $800-1,500 for a 6x8 foot footprint. These typically include minimal ventilation and no foundation materials. Plan to spend an additional 30-50% on site preparation, foundation, and basic accessories like benches and a heater. Entry-level systems realistically cost $2,000-3,000 fully operational, with a 5-7 year lifespan before major component replacement.
Mid-Range Options
Quality kits with enhanced features—automated vents, better hardware, and improved glazing—range from $2,500-5,000 for 8x12 foot models. These often include integrated gutters, stronger frames, and better sealing systems. Total installed cost typically reaches $4,000-7,000 including foundation and basic climate control. This price point offers the best value for serious hobbyists, providing 15-20 years of service with proper maintenance.
Premium Features Worth Considering
Custom-built lean-to greenhouses with tempered glass, integrated heating and cooling, and professional installation can exceed $10,000 for modest sizes. While expensive, these systems include features like self-tinting glass, computerized climate controls, and structural engineering for extreme weather. The investment makes sense for gardeners in harsh climates or those growing high-value crops where crop loss from equipment failure would be costly.
Installation Insights
The decision between DIY assembly and professional installation impacts not only cost but also long-term performance and warranty coverage. Honest assessment of your skills and available time prevents mid-project disasters.
DIY Feasibility Assessment
If you’re comfortable with basic carpentry, have a helper for lifting glazing panels, and can dedicate 2-3 full weekends, many kit greenhouses are manageable DIY projects. Read the manual thoroughly before purchase—some manufacturers provide excellent instructions while others offer cryptic diagrams. Check online forums for real-world installation experiences with specific brands. You’ll need basic tools: drill, level, square, caulking gun, and safety equipment for working at height.
Professional Installation Benefits
Certified installers bring experience that prevents common mistakes like improper sealing, inadequate ventilation placement, and structural shortcuts. Most offer warranties on their workmanship, and many manufacturers extend product warranties when installed by approved contractors. Professional installation typically adds 30-50% to kit costs but ensures the structure meets local building codes and performs as designed. This route makes sense for larger structures or when integrating with complex home systems like electrical and water.
Common Pitfalls to Avoid
Failing to level the foundation properly is the number one installation error, leading to twisted frames and leaking seals. Over-tightening fasteners can crack glazing and strip threads in aluminum extrusions. Neglecting to install flashing where the greenhouse meets the house wall invites water infiltration and rot. Always install a vapor barrier between the foundation and soil to prevent moisture wicking upward. Leave expansion gaps where glazing meets frame members to accommodate thermal movement.
Maintenance and Care Schedule
Regular maintenance extends greenhouse life from years to decades while ensuring optimal growing conditions. Create a seasonal checklist to stay on top of tasks before they become problems.
Seasonal Cleaning Protocols
Wash glazing inside and out each spring and fall using a soft brush and mild soap—never pressure washers, which can force water into seals and damage glazing. Clean gutters and downspouts monthly during leaf drop season. Disinfect all surfaces, benches, and tools with a 10% bleach solution or horticultural disinfectant between growing seasons to eliminate pathogens. Remove algae from polycarbonate panels using specialized cleaners that won’t damage UV coatings.
Frame and Glazing Inspection
Annually inspect all fasteners, tightening any that have loosened through thermal cycling. Check glazing seals for cracks or shrinkage, replacing deteriorated gaskets before leaks develop. Examine frame members for corrosion, especially at ground level where moisture accumulates. Touch up any scratches on painted or coated surfaces immediately to prevent rust spread. For wood frames, probe with an awl to detect hidden rot, paying special attention to end grain and joints.
Seal and Gasket Replacement
Rubber seals typically last 5-7 years before losing elasticity. Replace them proactively rather than waiting for leaks to appear. When replacing seals, clean the channels thoroughly and apply silicone lubricant to help new gaskets seat properly. Inspect the seal where the greenhouse meets your house wall annually, recaulking any gaps with high-quality exterior-grade silicone. Check door weatherstripping each season, replacing compressed or torn sections to maintain airtight closure.
Regulatory Considerations
Navigating permits and regulations before construction prevents costly teardowns and neighbor disputes. Lean-to greenhouses often fall into gray areas of building codes, requiring proactive research.
Building Permits
Most jurisdictions require permits for structures over 100-120 square feet or taller than 8 feet. Even if your greenhouse falls under permit thresholds, utility connections (electrical, water, gas) always require permits and inspections. Contact your local building department with detailed plans showing dimensions, materials, and foundation details. Some areas classify lean-to greenhouses as “temporary structures,” exempting them from certain requirements, but this classification rarely applies if you pour a concrete foundation.
HOA Restrictions
Homeowners associations often have specific rules about exterior structures, even those attached to the home. Review your CC&Rs for size limitations, height restrictions, and aesthetic requirements. Many HOAs require approval of plans before construction begins. Present professional renderings showing how the greenhouse complements your home’s architecture. Emphasize property value increase and neighborhood beautification rather than functional aspects when seeking approval.
Property Line Requirements
Even though lean-to greenhouses attach to your home, they must still comply with setback requirements from side and rear property lines. These typically range from 3-10 feet but vary widely by jurisdiction. The shared wall may exempt you from some front yard setbacks, but never assume—verify with your zoning department. If your property is subject to easements (utility, drainage, access), the greenhouse cannot encroach into these areas regardless of other allowances.
Frequently Asked Questions
How much does a lean-to greenhouse for a small backyard typically cost?
A quality lean-to greenhouse kit for a small backyard (6x8 to 8x10 feet) ranges from $1,500 to $4,000 depending on materials and features. When you factor in foundation, site preparation, and essential accessories like benches and a basic heater, total investment typically falls between $3,000 and $6,000. Custom-built models with premium glazing and integrated systems can exceed $8,000. Operating costs add $20-50 monthly for heating during winter months, depending on your climate and target temperature.
What size lean-to greenhouse is best for a beginner with limited space?
An 8x6 foot footprint offers the sweet spot for beginners—large enough for serious growing but small enough to manage easily. This size accommodates two 24-inch deep benches along the length with a 24-inch center aisle, providing approximately 60 square feet of growing surface. You can start 200-300 seedlings, grow salad greens year-round, and overwinter a dozen potted plants. The compact volume is also easier and less expensive to heat and cool, making climate control more forgiving as you learn.
Can I install a lean-to greenhouse on any exterior wall of my house?
Not all walls are suitable. The ideal wall faces within 20 degrees of true south (in the Northern Hemisphere) and receives full sun from fall through spring. East-facing walls work for cool-season crops and shade-loving plants, while west-facing orientations require superior ventilation to handle afternoon heat. North-facing walls are generally unsuitable unless you’re only growing shade-tolerant plants like ferns and orchids. The wall must also be structurally sound, free of moisture issues, and have adequate foundation capacity to support the added load.
Do I need a building permit for a small lean-to greenhouse attached to my house?
Requirements vary dramatically by location. Many jurisdictions require permits for any structure over 100-120 square feet, regardless of attachment. Others exempt lean-to designs under specific size thresholds. Utility connections (electrical, water) almost always require permits and inspections. Contact your local building department before purchasing—provide dimensions, materials list, and foundation details. HOAs may have separate approval processes. It’s far cheaper to get proper permits than to be forced to remove a non-compliant structure later.
How do I prevent my lean-to greenhouse from overheating in summer?
Start with adequate ventilation—total vent area should equal at least 20% of floor space. Install exterior shade cloth (30-50% density) on rollers for adjustable coverage. Use evaporative coolers in dry climates or exhaust fans in humid regions. Whitewash the exterior glazing in late spring, removing it in fall. Keep doors open during the day and consider installing automatic vent openers that respond to temperature. Plant vining crops on exterior trellises to provide living shade that naturally drops leaves in winter when you need maximum light.
What’s the best glazing material for a beginner’s lean-to greenhouse?
Twin-wall polycarbonate (6mm) offers the best balance for beginners. It’s lightweight, nearly unbreakable, provides good insulation (R-1.7), and diffuses light to prevent plant stress. The material is easier to install than glass and requires minimal maintenance beyond periodic cleaning. While more expensive than polyethylene film, it lasts 15+ years versus 4-5 for film, making it more economical long-term. Avoid single-pane glass due to poor insulation and acrylic due to scratching and brittleness in cold weather.
Can I grow vegetables year-round in a lean-to greenhouse in a cold climate?
Yes, with proper planning and heating. Focus on cold-hardy crops like kale, spinach, lettuce, and carrots for winter production—these tolerate temperatures just above freezing. For warm-season crops like tomatoes and peppers, you’ll need to maintain minimum temperatures of 55-60°F, requiring supplemental heating from November through March. Insulate with bubble wrap at night, use row covers within the greenhouse for extra protection, and grow in raised beds or containers that warm faster than ground soil. Expect heating costs of $30-60 monthly during the coldest months.
How do I attach a lean-to greenhouse to my house without causing water damage?
Install step flashing under the house siding and over the greenhouse roof panels, creating a water-tight overlap. Apply a bead of high-quality exterior silicone sealant where structures meet, but never rely on sealant alone—it’s a backup, not primary protection. Create a gap between the greenhouse and house wall filled with backer rod and caulk to accommodate movement. Install a drip edge above the connection point to channel water away. Inspect the seal annually and re-caulk at the first sign of cracking or separation.
What’s the difference between a lean-to greenhouse and a conservatory?
While both attach to homes and contain plants, conservatories are integrated living spaces with finished interiors, HVAC tied into the home system, and furniture for human occupancy. They’re built to residential construction standards with insulation, drywall, and often comply with building codes as additions rather than outbuildings. Lean-to greenhouses are utilitarian growing structures with unfinished interiors, independent climate control, and agricultural-grade construction. Conservatories cost 5-10 times more and are designed for human comfort first, plant growth second.
How long does a quality lean-to greenhouse typically last?
With proper maintenance, a quality aluminum-frame greenhouse with polycarbonate glazing lasts 20-25 years. Wood frames require more maintenance but can last 30+ years if kept painted and sealed. Glass glazing is essentially permanent but seals and gaskets need replacement every 7-10 years. Polycarbonate panels typically last 15-20 years before UV degradation reduces light transmission. The foundation and structural elements often outlast the glazing, allowing for cost-effective refurbishment by replacing panels and seals while retaining the frame.