Gardening enthusiasts are discovering that bigger isn’t always better when it comes to greenhouse growing. As urban gardening surges and backyard space becomes premium real estate, mini greenhouses have emerged as the smart solution for cultivating thriving plants in compact areas. But here’s what separates exceptional models from basic shelters: zippered screen windows. This seemingly simple feature transforms a passive plant container into an interactive growing environment where you control airflow, humidity, and pest exposure with precision.
Unlike traditional mini greenhouses that trap heat and moisture behind static panels, models equipped with zippered mesh openings give you surgical control over your microclimate. You can welcome pollinators during flowering, lock out aphids during vulnerable growth stages, and prevent your seedlings from cooking on unexpectedly sunny spring days. Whether you’re starting seeds in a city apartment balcony or extending the growing season on a suburban patio, understanding how to evaluate and utilize these ventilation systems will determine your gardening success.
Top 10 Mini Greenhouses with Zippered Screen Windows
Detailed Product Reviews
1. Quictent Premium Greenhouse with Screen Window, Portable Fast-up Plant Greenhouses for Outdoors with Heavy Duty Pop-up Fiberglass Frame Durable Waterproof Cover, 98.4x49.2x52.8 Inch, Green
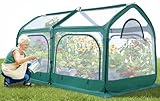
Overview: The Quictent Premium Greenhouse delivers instant gratification for gardeners seeking a spacious, tool-free setup. Measuring 98.4x49.2x52.8 inches, this pop-up structure offers nearly twice the height of standard mini-greenhouses, accommodating raised beds and taller plants with ease.
What Makes It Stand Out: Its patented pop-up design (Patent No. 214430561) springs into shape in seconds using durable fiberglass poles—no tools required. The heavy-duty 600D Oxford fabric with 18mil thickened PVC cover provides UV protection and waterproofing tested to last over three years. Four roll-up doors and zippered mesh windows enable precise airflow control for year-round growing.
Value for Money: At $113.98, this greenhouse sits in the mid-to-premium range. The price is justified by its superior materials, instant setup convenience, and extended 3-year durability claim. Comparable pop-up models with similar dimensions typically cost $130-150, making this a smart investment for serious gardeners.
Strengths and Weaknesses: Pros: Instant tool-free assembly; durable, weather-resistant materials; excellent ventilation options; spacious interior; portable with carry bag. Cons: Fiberglass poles may flex in strong winds; higher price point than basic models; limited to 52.8-inch height may not suit all plants.
Bottom Line: Ideal for gardeners prioritizing convenience and durability, the Quictent Premium Greenhouse excels as a versatile, all-season growing solution that balances quick setup with long-term performance.
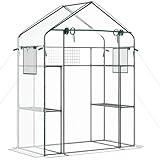
2. WORKPRO Greenhouse, 56” x 56” x 77” Heavy Duty Walk in Greenhouses for Outdoors with Screen Windows, Thicken PE Cover, 3 Tier 8 Shelves Portable Green House Kit for Patio, Backyard and Porch

Overview: The WORKPRO Walk-In Greenhouse offers an impressive 56x56x77-inch footprint with eight integrated shelves, creating a vertical gardening powerhouse. This heavy-duty structure provides ample room for seedlings, herbs, and vegetables while maintaining a manageable size for patios and backyards.
What Makes It Stand Out: Eight wired shelves across three tiers maximize growing capacity, each supporting up to 29 pounds. The 140g/㎡ thickened PE cover with reinforcement grid outperforms standard PVC, while powder-coated metal frames and corner straps ensure stability. Mesh windows and a roll-up door provide excellent ventilation control.
Value for Money: Priced at $80.99, this greenhouse delivers exceptional value. The combination of walk-in height, extensive shelving, and robust construction typically commands $100-120 in competing products. It’s an economical choice for gardeners needing organized, high-capacity growing space.
Strengths and Weaknesses: Pros: Walk-in design with excellent headroom; eight sturdy shelves; superior ventilation; reinforced PE cover; good stability features. Cons: Requires assembly (though tool-free); white cover may show dirt; shelves could sag under maximum weight; anchors needed for wind resistance.
Bottom Line: Perfect for dedicated gardeners seeking maximum growing capacity in a compact footprint, the WORKPRO greenhouse offers outstanding organization and value for serious seed starting and plant cultivation.
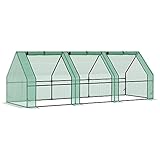
3. Outsunny 6’ x 3’ x 3’ Mini Greenhouse with Zippered Doors & Roll-up Windows, Portable Plant Hot House with Durable PE Cover, Water Resistant, UV Protected for Outdoor Flowers, Vegetables, Green

Overview: The Outsunny 6x3x3 ft Mini Greenhouse provides an affordable entry point into protected growing. This compact, portable structure offers essential plant protection without complexity, making it ideal for balconies, small patios, or beginner gardeners testing greenhouse gardening for the first time.
What Makes It Stand Out: At $39.22, it’s the most budget-friendly option with a surprisingly robust 2-layer 140 GSM PE cover featuring a reinforcement grid. The updated design includes full side doors that roll up completely, creating better access and ventilation than typical flap-style openings. Tool-free assembly ensures setup in minutes.
Value for Money: This is exceptional value for money. No other greenhouse in this price range offers the same combination of size, reinforced cover, and thoughtful design. It’s a low-risk investment for new gardeners or as a seasonal extension for existing gardens.
Strengths and Weaknesses: Pros: Extremely affordable; reinforced PE cover; easy no-tool assembly; compact footprint; full-width roll-up doors. Cons: Smaller growing space; basic steel frame may rust over time; limited ventilation options; not suitable for tall plants; shorter lifespan than premium models.
Bottom Line: An excellent starter greenhouse that punches above its weight class, the Outsunny Mini is perfect for budget-conscious gardeners or those with limited space wanting reliable plant protection.
4. 6 x 3 x 3 ft Raised Garden Bed with Cover 3 in 1 Multifunctional - 2 Large Zipper Mesh Screen Windows Mini Greenhouse Outdoor - Galvanized Metal Garden Beds for Gardening, Vegetables, Herbs, Flowers

Overview: This innovative 3-in-1 kit combines a raised garden bed with a protective greenhouse cover, offering unmatched versatility for serious gardeners. Measuring 6x3x3 feet with 36 cubic feet of soil capacity, it integrates ground-level planting with overhead protection in one cohesive system that adapts to seasonal needs.
What Makes It Stand Out: The multifunctional design allows use as an open raised bed, covered greenhouse, or both simultaneously. Heavy-duty galvanized steel construction with 0.6mm thickness and wave-shaped panels provides exceptional durability against rust and weather. Two large mesh windows enable precise airflow control while keeping pests out effectively.
Value for Money: At $62.00, this hybrid solution costs less than purchasing separate raised bed and greenhouse components. Galvanized steel beds alone often cost $50-70, making the included cover an excellent bonus. It’s a cost-effective choice for gardeners wanting integrated growing systems.
Strengths and Weaknesses: Pros: Versatile 3-in-1 functionality; sturdy galvanized steel; large planting volume; excellent pest protection; good ventilation control. Cons: Soil weight makes it non-portable; assembly more complex than pop-up models; 3-foot height limits tall plants; may require additional anchoring.
Bottom Line: Ideal for gardeners seeking a permanent, multi-functional growing solution, this raised bed greenhouse combo maximizes space efficiency and growing flexibility in a single, well-priced package.
5. Happygrill Mini Greenhouse, Walk-in Greenhouse w/PE Cover, 4 Wind Ropes & Ground Stakes, Roll-up Zipper Door, Double-Layer Screen Windows, Portable Small Greenhouses for Outdoors, 6.6 x 2.5 x 5.6 FT

Overview: The Happygrill Mini Greenhouse offers a balanced 6.6x2.5x5.6 ft footprint with thoughtful wind-resistant features for exposed locations. This mid-size walk-in greenhouse provides reliable year-round protection for plants while addressing common stability concerns that plague many portable models in challenging weather conditions.
What Makes It Stand Out: Four wind ropes and ground stakes, combined with overlong covers designed to hold stones, create exceptional wind resistance rarely seen at this price. The sloping top prevents water accumulation and promotes superior drainage. Rustproof PE-coated metal tubes with reinforced connectors ensure durability in harsh weather while maintaining portability.
Value for Money: At $69.99, this greenhouse positions itself as a mid-range option with premium stability features. The windproof design and sloping roof typically appear in $90+ models, making it an excellent value for exposed or windy locations where standard greenhouses might fail.
Strengths and Weaknesses: Pros: Superior wind resistance; sloping top for drainage; decent walk-in height; reinforced frame; good ventilation with two windows. Cons: Assembly required; PE cover less durable than PVC; mid-grade materials; limited warranty information; narrower width restricts layout options.
Bottom Line: A smart choice for gardeners in windy or rainy climates, the Happygrill greenhouse prioritizes stability and weather resistance at a price point that undercuts many comparable weatherproof models.
6. Outsunny Outdoor Walk-in Mini Greenhouse with Mesh Door & Windows, Small Portable Garden Green House with 3 Tiers 6 Shelves, Trellis, & Plant Labels
Overview: The Outsunny Outdoor Walk-in Mini Greenhouse offers serious growing potential in a compact footprint. Measuring 56" W x 28.75" D x 76.75" H, this portable structure provides three tiers with six shelves for organizing herbs, vegetables, and flowers. The walk-in design lets you tend plants comfortably without contorting around tight spaces.
What Makes It Stand Out: The integrated trellis panel on the back wall sets this apart from basic shelf greenhouses, supporting climbing vines and offering hanging options. The roll-up double-layered door and mesh-lined windows provide customizable ventilation while keeping pests out. Included plant labels help maintain organization across multiple varieties.
Value for Money: At $44.99, this greenhouse delivers exceptional utility for its price point. Walk-in models typically command $60-80, making this an accessible entry point for dedicated hobbyists. The combination of shelving, trellis, and ventilation features rivals more expensive alternatives.
Strengths and Weaknesses: Strengths include the spacious walk-in design, six sturdy shelves, versatile trellis system, and effective mesh ventilation. The sloped top prevents water pooling. Weaknesses involve stability in high winds requiring proper staking and soil burial, potential cover wear over time, and assembly requiring two people. The 22" shelf spacing may limit taller plants.
Bottom Line: Ideal for gardeners with limited space who need organized, accessible growing area. The Outsunny balances affordability with functionality, making it perfect for extending growing seasons and protecting plants from harsh weather.
7. Quictent Mini Greenhouse, Portable Quick-Setup Small Tabletop Waterproof UV Protected PE Cover Shelter for Outdoors/Indoors W/ Raised Base for Garden Plant Seed Starting, 8 Stake, 95"x36"x36", Green

Overview: The Quictent Mini Greenhouse is a versatile tabletop solution measuring 95"x36"x36" that transitions seamlessly between indoor and outdoor environments. Designed for seed starting and small plant cultivation, its compact footprint fits on patios, balconies, or even garage workbenches with minimal space requirements.
What Makes It Stand Out: The 10-15 minute quick-setup design with intuitive pole connectors eliminates frustration. The raised base elevates plants above ground moisture and pests. Most impressive is Quictent’s warranty: lifetime parts replacement plus 180-day coverage for main components, providing unmatched long-term support and peace of mind.
Value for Money: Priced at $52.23, this sits at the premium end for mini greenhouses. However, the transferable warranty and dual-use capability justify the cost. Comparable models without warranty coverage run $35-45, making the extra investment worthwhile for serious starters seeking reliability.
Strengths and Weaknesses: Strengths include rapid assembly, indoor/outdoor flexibility, waterproof UV-protected PE cover with 80% light transmission, and exceptional warranty coverage. The removable top cover manages excess rainwater. Weaknesses include limited capacity for mature plants, non-walk-in design requiring reaching, and potential instability in strong winds without proper staking.
Bottom Line: Perfect for beginners and urban gardeners prioritizing seed starting. The Quictent’s warranty and quick setup make it a low-risk, high-convenience choice for those wanting reliable plant propagation without permanent installation.
8. Greatbuddy Portable Mini Greenhouse, 3×3×9Ft, High-Density PE Plant Cover with 3 Roll-up Zipper Windows, Perfect for Outdoor Plant Growing

Overview: The Greatbuddy Portable Mini Greenhouse delivers impressive vertical space at 3x3x9 feet, accommodating tall plants and hanging baskets. Its high-density PE cover and heavy-duty steel frame create a weather-resistant shelter for gardens, backyards, and patios seeking to extend growing seasons effectively.
What Makes It Stand Out: The nine-foot height significantly exceeds standard mini greenhouses, enabling tomato vines and small fruit trees. Three large roll-up zipper windows provide superior airflow control and easy access for watering. The tool-free assembly and lightweight portability allow seasonal repositioning as sunlight patterns change throughout the year.
Value for Money: At $48.99, this greenhouse offers substantial growing volume for the price. Similar-sized structures typically cost $60-75. The vertical design maximizes utility in minimal ground space, delivering strong value for gardeners needing height rather than width for their crops.
Strengths and Weaknesses: Strengths include exceptional height for vertical growing, three large ventilation windows, sturdy steel frame with coated connectors, and straightforward assembly. The extended cover length allows stone-weighted stability. Weaknesses involve potential wind vulnerability due to height, limited horizontal space for multiple rows, and unclear cover GSM rating raising durability questions for multi-year use.
Bottom Line: Excellent for gardeners growing vining or tall plants in confined areas. The Greatbuddy’s vertical emphasis and ventilation make it ideal for tomatoes, beans, and tropical specimens needing protected height without permanent construction.
9. Outsunny 9’ x 3’ x 3’ Mini Greenhouse with Zippered Doors & Roll-up Windows, Portable Plant Hot House with Durable PE Cover, Water Resistant, UV Protected for Outdoor Flowers, Vegetables, Green
Overview: The Outsunny 9’ x 3’ x 3’ Mini Greenhouse provides generous horizontal growing space at a budget-friendly price point. This portable hot house features a durable 140 GSM PE cover with reinforcement grid, offering UV protection while transmitting 85% sunlight for healthy plant development.
What Makes It Stand Out: The updated design opens side doors entirely, rolling up with ties to create exceptional ventilation and access. No-tool assembly makes setup accessible for anyone within minutes. The ability to bury the cover edge in soil creates a superior seal against drafts and pests that many portable models lack.
Value for Money: At $34.97, this is the most economical option reviewed. Comparable greenhouses start at $45, making this 20-30% cheaper. The 140 GSM cover thickness matches premium models, delivering unexpected quality for the price and making it an exceptional entry-level value.
Strengths and Weaknesses: Strengths include unbeatable affordability, large accessible doors, tool-free assembly, reinforced PE cover, and effective soil-burial sealing. The 85% light transmission supports healthy growth. Weaknesses include a potentially weaker frame than heavy-duty models, limited height for tall plants, and fewer ventilation windows than competitors. Durability in extreme weather remains uncertain without additional anchoring.
Bottom Line: Ideal for budget-conscious beginners or seasonal gardeners. The Outsunny offers essential greenhouse protection without financial commitment, perfect for experimenting with extended growing seasons or protecting starter plants from spring frost.
10. Grezone Walk-in Greenhouse Upgraded Green House with Dual Zippered Screen Doors & 6 Screen Windows Heavy Duty Plastic Plant Warm House with Reinforced Frame (10x7x7 FT)

Overview: The Grezone Walk-in Greenhouse is a substantial 10x7x7 foot tunnel greenhouse built for serious gardeners seeking year-round growing capability. Its premium galvanized steel frame with reinforced diagonal bars creates a durable structure that withstands harsh weather including rain, wind, frost, and snow without buckling.
What Makes It Stand Out: The dual zippered doors—a mesh screen door for hot-day ventilation and a PE cover door for cold-weather insulation—provide unmatched year-round climate control. Six exhaust vents enable superior cross-ventilation throughout the tunnel. The reinforced 140g/m2 PE grid cover offers UV 80+ protection, lasting over a year compared to standard covers that degrade in 3-6 months.
Value for Money: At $85.99, this is the premium option but justifies the cost through exceptional size and durability. Similar tunnel greenhouses cost $120-150. The extended cover lifespan and robust frame make this a long-term investment rather than a seasonal expense, saving replacement costs.
Strengths and Weaknesses: Strengths include massive growing space, heavy-duty rust-resistant frame, dual-door versatility, superior ventilation with six vents, and durable odorless PE cover. The reinforced structure handles snow loads and strong winds. Weaknesses include higher upfront cost, requiring substantial yard space, and complex assembly needing multiple people. Portability is limited once installed.
Bottom Line: Best for committed gardeners needing substantial protected growing space year-round. The Grezone’s durability and size make it a worthwhile investment for serious food production or extensive ornamental collections that require reliable, permanent-feel protection.
Why Zippered Screen Windows Transform Mini Greenhouse Gardening
The integration of zippered screen windows represents a fundamental shift in how we approach small-scale protected growing. These dual-function portals serve as both ventilation gates and insect barriers, solving two of the most persistent challenges in compact greenhouse management.
The Ventilation and Protection Balance
Static ventilation holes might offer basic airflow, but they can’t adapt to changing weather or plant needs. Zippered screens provide dynamic control—you can partially open them for gentle air exchange during cool mornings, fully unzip them during scorching afternoons, and seal them completely before an unexpected cold snap. This adaptability prevents the temperature spikes that often plague mini greenhouses, where interior temperatures can soar 20-40°F above ambient conditions within hours of direct sun exposure.
The mesh component acts as a biological filter. Standard insect screening blocks most common pests while allowing beneficial insects like bees and predatory wasps to enter if the mesh size is strategically selected. This creates a semi-protected ecosystem rather than an isolated bubble, promoting natural pollination and pest control cycles that static designs simply cannot support.
How Screen Windows Impact Microclimate Control
Microclimate management extends beyond temperature regulation. Humidity levels directly influence disease pressure, seed germination rates, and plant transpiration. With zippered screens, you can fine-tune moisture levels by adjusting opening size and quantity. During propagation, keeping screens partially open maintains 70-80% humidity while preventing condensation buildup that leads to damping-off disease. For mature plants, wider openings drop humidity to 50-60%, discouraging fungal pathogens like powdery mildew.
The psychological benefit matters too. Gardeners who can easily check their plants without fully opening the greenhouse are more likely to monitor conditions daily, catching problems early. A quick zip check beats wrestling with Velcro flaps or unscrewing panels, making consistent observation effortless.
Decoding Mini Greenhouse Specifications
Before evaluating specific features, you need a framework for understanding how manufacturers categorize and describe these structures. The terminology can be misleading if you don’t know what to look for.
Size Categories and Capacity Planning
Mini greenhouses typically fall into three tiers. “Compact” models under 4 square feet suit balcony railings and hold roughly 6-8 standard seed trays. “Mid-size” units ranging 4-12 square feet dominate the market, accommodating 12-20 trays or several potted plants. “Large mini” greenhouses exceeding 12 square feet approach walk-in size but remain portable, handling small fruiting plants like dwarf tomatoes or peppers.
Always calculate your actual planting area needs by considering mature plant sizes, not just seedling counts. A greenhouse that looks spacious with starter trays will become overcrowded when those tomatoes reach 18 inches tall. Factor in vertical space too—many models offer 3-4 shelf tiers, but air must circulate between them. A good rule: fill only 70% of advertised capacity for optimal airflow.
Frame Materials: From Lightweight to Heavy-Duty
Frame material dictates weight, durability, and price. Powder-coated steel frames offer the best strength-to-cost ratio, resisting rust for 3-5 years with proper care. Aluminum frames weigh 30-40% less and won’t corrode, but they flex more in wind and cost 20-30% more. Fiberglass-reinforced plastic provides decent stability at low weight, though UV degradation can cause brittleness after 2-3 seasons.
Avoid raw steel unless it’s galvanized inside and out—rust begins where tubes connect, hidden from view until failure. Check connection points; plastic corner joints reduce metal-on-metal contact but can crack under stress. Quality frames use reinforced sleeves at stress points where shelves attach.
Covering Materials: Polyethylene vs. PVC vs. Polycarbonate
Cover material affects light transmission, insulation, and longevity. Reinforced polyethylene (PE) dominates the mini greenhouse market—look for “UV-stabilized” or “UV-treated” labels indicating additives that prevent breakdown. Thickness matters: 4-6 mil PE lasts 1-2 seasons, while 8-10 mil can survive 3-4 years. PE transmits 85-90% of light but offers minimal insulation (R-value around 0.9).
PVC covers are clearer (90-92% light transmission) and more flexible in cold weather, but they yellow faster and contain plasticizers that may off-gas in high heat. Polycarbonate panels—usually twin-wall in mini greenhouses—provide superior insulation (R-value 1.7) and last 5+ years, but they add weight and cost. For screen windows, ensure the mesh attaches to the cover with reinforced stitching or heat welding, not just adhesive that fails in sun.
Critical Features That Define Quality
The difference between a greenhouse that lasts one season and one that serves you for five years lies in the details of construction and component quality.
Zipper Mechanics: Gauge, Teeth Design, and Weatherproofing
Zippers fail before any other component. Evaluate zipper gauge—the number indicates tooth size, with #5 being standard and #8 offering heavy-duty durability. Coil zippers (spiral teeth) flex better around curves but separate under heavy stress; toothed zippers (Vislon-style) resist separation but are stiffer. For greenhouse applications, toothed #5 or #8 zippers with double-stitched fabric flaps behind them provide the best compromise.
Weatherproofing features include rubberized or TPU-coated zipper tape that prevents water wicking through fabric edges. The zipper pull should be oversized for gloved hands and made of non-corrosive material like nylon or coated metal. Test the zipper action—it should glide smoothly without catching fabric. A sticky zipper new out of the box indicates poor quality that will only worsen with dirt and UV exposure.
Mesh Specifications: Understanding No-See-Um vs. Standard Screening
Not all screens protect equally. Standard fiberglass window screen (18x16 mesh) blocks flies, beetles, and larger insects but allows thrips and some aphids through. “No-see-um” mesh (20x20 or finer) blocks these tiny pests but reduces airflow by 15-20% and may impede very small pollinators.
For vegetable gardening, 18x16 mesh offers the best balance. If whiteflies or thrips plague your area, consider 20x20 mesh for vulnerable crops like cucumbers. The mesh should be fiberglass or polyester—avoid metal screens that rust and tear covers. Check how the mesh attaches to the zipper; a 1-inch reinforced border prevents tearing at the seam.
Ventilation Placement: Strategic Airflow Patterns
Window location determines effectiveness. Roof-mounted vents release rising hot air but don’t promote cross-ventilation. Side-mounted windows at multiple heights create convection currents—cool air enters low vents while hot air exits high ones. The best designs position at least one vent near the base and another at the top of each side.
Consider prevailing winds in your area. If winds consistently come from the west, a west-facing lower vent paired with an east-facing upper vent harnesses natural airflow. Some premium models include windows on all four sides, giving you complete control regardless of wind direction.
UV Stabilization and Material Longevity
UV radiation destroys plastics through photodegradation, causing brittleness and discoloration. Quality covers contain UV inhibitors added during manufacturing—look for “UV-stabilized” not just “UV-resistant” (which means little). The best polyethylene covers include a 1-2% carbon black additive or hindered amine light stabilizers (HALS) that absorb UV radiation.
Ask about the cover’s “UV rating” in kilowatt-hours per square meter (kWh/m²). A rating above 120 kWh/m² indicates 3+ year lifespan in full sun. Covers without this specification typically last one season. Remember, screen windows receive the same UV exposure—mesh should be UV-treated or it will fray and tear within months.
Structural Stability Features
A greenhouse is only as stable as its footprint and anchoring system. Quality units include ground stakes or sandbag anchors specifically designed for the frame—not generic tent stakes. Look for guy-out points (fabric loops) at the upper corners for wind bracing. The base should have a weighted option; some designs accept PVC pipes filled with sand slipped into the frame.
Shelf design impacts stability too. Wire-grid shelves allow air and water passage but must lock securely into the frame. Solid shelves create microclimates underneath but add wind resistance. The best compromise is perforated shelves with 50-60% open area, reinforced with center supports that prevent sagging under 20+ pounds of soil and plants.
Smart Placement Strategies
Even the finest mini greenhouse will underperform if poorly situated. Strategic placement maximizes solar gain while minimizing environmental stress.
Maximizing Solar Gain While Preventing Overheating
Aim for southern exposure in the Northern Hemisphere, but consider seasonal sun angles. A location receiving full sun from March through September may be shaded in winter when the sun sits lower. Observe your site at 10 AM, noon, and 3 PM across different seasons before committing.
Use deciduous trees to your advantage—planting east of a tree provides morning sun and afternoon shade during summer, while winter’s leafless branches allow full light penetration. Avoid placing directly against dark walls that radiate heat, but a light-colored wall on the north side can reflect beneficial light. Remember, mini greenhouses overheat faster than large ones due to their small thermal mass—afternoon shade in summer is often more valuable than maximum light.
Wind Protection and Stability
Wind is a mini greenhouse’s greatest enemy. A 20 mph wind can exert 10-15 pounds of force per square foot on the cover, lifting lightweight units and stressing zippers. Position your greenhouse on the leeward side of fences, hedges, or buildings, but not so close that turbulence forms. A windbreak should be 5-7 times its height away from the greenhouse.
If open placement is unavoidable, orient the narrowest side into prevailing winds to reduce drag. Use all provided anchoring points plus additional sandbags or concrete blocks on the base frame. For balconies, secure to railings with adjustable straps—never rely on weight alone in elevated locations. Some gardeners create windbreak walls using clear polycarbonate panels upwind of their greenhouse, reducing wind speed by 50% while maintaining light.
Functional Workflow and Daily Access
You’ll interact with your greenhouse daily, so place it within a 30-second walk from your door. This proximity encourages consistent monitoring and watering. Ensure the door and zippered windows open fully without hitting walls or railings—measure the swing radius before assembly.
Consider water source proximity; carrying watering cans long distances gets old fast. If using a hose, ensure it reaches without kinking. For balconies, place near a corner where you can access two sides, not flush against a wall where only the front is reachable. Leave 2-3 feet of clearance around the unit for cleaning, repairs, and emergency access during storms.
Seasonal Operation Guide
Each season demands different ventilation and protection strategies. Mastering these transitions turns your mini greenhouse into a year-round production tool.
Spring: Seed Starting Success
Spring’s fluctuating temperatures require vigilant venting. On sunny days above 50°F, open upper zippered windows 50% to prevent temperatures from exceeding 85°F, which inhibits germination in many species. Keep lower vents closed to maintain humidity around 75% for optimal seedling development.
Night temperatures below 40°F demand complete closure. Use a remote thermometer with alerts to monitor interior temps—spring’s variable weather can surprise you. As seedlings harden off, gradually increase window opening duration by 30 minutes daily over a week before transplanting. This acclimates them to outdoor conditions while still providing wind protection.
Summer: Heat Stress Prevention
Summer operation focuses on heat evacuation. Open all zippered windows 100% when temperatures exceed 70°F, creating cross-ventilation that keeps interiors within 10°F of ambient. On days above 90°F, provide external shade using 30-40% shade cloth draped over the greenhouse—this reduces interior temperatures by 15-20°F while maintaining airflow.
Watch for “greenhouse effect” even with windows open; clear covers trap infrared radiation. Consider removing the cover entirely during heatwaves, using just the frame with shade cloth overhead. Water in early morning only—wet soil during hot afternoons creates steam that cooks roots. Some gardeners place frozen water bottles inside during extreme heat, using them as temporary thermal mass.
Fall: Extending Your Growing Season
Fall is where mini greenhouses shine. Keep windows open during warm Indian summer days to harden off late crops, then close them completely as nights dip below 50°F. This can extend tomato and pepper production by 4-6 weeks in most climates.
Monitor humidity closely—cool nights and warm days create condensation that promotes botrytis (gray mold). Open upper vents for 30 minutes each morning to purge moisture, even if it means losing some heat. For leafy greens, keep windows cracked 10-20% continuously to prevent overheating during sunny autumn days while maintaining frost protection at night.
Winter: Protection and Limitations
Mini greenhouses provide limited winter insulation but valuable wind and moisture protection. In USDA zones 7-9, they can overwinter hardy herbs and greens with careful management. Keep windows sealed unless temperatures exceed 60°F—heat loss happens rapidly in small volumes.
Add thermal mass using water jugs painted black; they absorb daytime heat and release it at night, moderating temperature swings by 5-8°F. In colder zones, consider double-covering: place a layer of 6-mil PE inside the frame, creating a 2-inch dead air space that doubles insulation value. Check zippers weekly in winter—cold makes them brittle, and ice can seize them shut. A silicone zipper lubricant prevents this.
Maintenance for Maximum Lifespan
Consistent maintenance extends your greenhouse’s life from 1-2 seasons to 5+ years, protecting your investment and keeping plants healthier.
Routine Cleaning Protocols
Clean the cover every 4-6 weeks during active use. Use a soft brush and mild soap solution; harsh chemicals degrade UV inhibitors. Pay special attention to screen windows—dust and pollen clog mesh, reducing airflow by up to 30%. Remove screens if possible and rinse with a gentle spray; if fixed, brush vertically to avoid pushing debris into the greenhouse.
Clean the frame with a damp cloth to remove salts and plant residues that corrode metal. For powder-coated steel, apply a car wax product twice yearly to the frame (never on the cover)—this fills microscopic cracks in the coating, preventing rust. Aluminum frames benefit from an aluminum polish that maintains the protective oxide layer.
Zipper Maintenance and Troubleshooting
Zippers require monthly attention. Use a dry silicone spray or beeswax-based zipper lubricant on teeth and slider—avoid oil-based products that attract dirt. Work the zipper fully open and closed three times after application to distribute the lubricant.
If a zipper separates behind the slider (common with coil zippers), the slider has worn out. Gently squeeze the slider’s top and bottom with pliers to tighten it—test on a scrap fabric first. For stuck zippers, never force them; apply lubricant and work back and forth in small increments. If teeth are missing, replace the zipper entirely—a repair patch rarely holds in greenhouse conditions.
When to Replace Covers and Screens
Replace the main cover when you notice significant yellowing, brittleness (crackling when flexed), or visible UV degradation like chalking. Small tears can be patched with greenhouse repair tape (UV-stabilized), but patches are temporary solutions. If tears exceed 6 inches or cluster around stress points, full replacement is more cost-effective than constant repairs.
Replace screen mesh when you can see visible fraying, holes larger than 1/16 inch, or when it no longer springs back after gentle pressure. Mesh degradation happens faster than cover wear because it’s thinner. Keep replacement mesh on hand—it’s inexpensive and allows quick swaps between seasons if you want to change mesh density.
Off-Season Storage Best Practices
Disassemble and store your greenhouse during extended non-use periods. Clean and thoroughly dry all components—moisture trapped in tubes causes rust and mildew. Store the cover loosely rolled, not folded, to prevent crease damage; place it in a sealed plastic bin with desiccant packets to prevent moisture absorption.
Store frames in a dry location; garages are ideal, but if outdoor storage is necessary, wrap the frame in a tarp elevated off the ground. Remove and store zippers partially open to prevent coil memory—zippers left closed for months can develop weak spots. Label all parts during disassembly; a photo sequence of the assembly process saves hours next season.
Avoiding Common Pitfalls
Even experienced gardeners make mistakes with mini greenhouses. Recognizing these errors before they impact your plants saves frustration and crop loss.
Overcrowding and Its Consequences
The most frequent error is treating advertised capacity as realistic. A greenhouse rated for “20 seed trays” may technically fit them, but leaves no room for air circulation. Overcrowding raises humidity, blocks light, and creates pest highways as leaves touch between plants.
Follow the 70% rule: never exceed 70% of stated capacity. For mature plants, ensure 6-8 inches between foliage. Use vertical space wisely—train vining plants up trellises rather than letting them sprawl. Remember, screen windows can’t compensate for zero airflow between dense plant canopies.
Ventilation Mistakes That Harm Plants
Two extremes plague mini greenhouse users: leaving windows closed too long, and opening them too wide during cool periods. The first causes heat stress and disease; the second chills plants and wastes heat energy. Use a thermometer that records highs and lows to understand your greenhouse’s daily temperature range.
Never open windows during rain unless you have overhang protection—water pooling on shelves creates root rot conditions. Conversely, don’t wait until you feel heat to vent; by then, plants have already experienced stress. Open windows proactively when forecasts predict sun, even if morning temperatures are cool.
Ignoring Microclimate Monitoring
Relying on ambient weather reports fails because mini greenhouses create their own weather. A 70°F sunny day can push interior temperatures to 110°F in 30 minutes without ventilation. Invest in a wireless thermometer/hygrometer with alerts set to your crop’s optimal ranges.
Place the sensor at plant level, not near the roof where temperatures skew high. For serious growers, a small data logger recording temperature every 15 minutes reveals patterns invisible to spot checks. This data helps you fine-tune window timing—perhaps you need to open at 9 AM instead of 10 AM, or close vents earlier on short winter days.
Frequently Asked Questions
What makes zippered screen windows better than fixed vents?
Zippered windows provide adjustable ventilation that fixed vents cannot match. While a fixed vent might offer constant 10% airflow, a zippered window lets you modulate from 0% to 100% based on daily conditions. This prevents both overheating and excessive cooling. Additionally, the integrated mesh blocks pests during ventilation—fixed vents require separate screening that often gaps or tears. The ability to fully close windows during storms or cold snaps offers protection that permanently open vents compromise.
Can mini greenhouses with screen windows withstand strong winds?
With proper anchoring, quality mini greenhouses handle 25-30 mph sustained winds and gusts to 40 mph. The key is using all anchor points—ground stakes, sandbags, and guy lines—and orienting the narrow side into prevailing winds. Screen windows must be fully zipped closed during wind events; open mesh acts like a sail, multiplying wind force on the frame. In hurricane-prone areas, disassemble and store the greenhouse before storm season. For balconies, secure to railings at three points minimum using ratchet straps, not bungee cords that stretch.
How do I prevent mold and mildew in humid conditions?
Mold thrives where humidity exceeds 85% and air is stagnant. Open upper zippered windows 20-30% during humid periods to create continuous gentle airflow. Water only in morning hours, allowing surfaces to dry before evening. Space plants so leaves don’t touch, and remove lower foliage to improve circulation. Apply a preventive organic fungicide like potassium bicarbonate every 10-14 days during humid weather. If condensation drips from the cover, humidity is too high—increase ventilation immediately. A small fan (even a computer fan powered by a solar panel) dramatically improves air movement in stagnant corners.
What plants work best in these greenhouses?
Mini greenhouses excel with heat-loving transplants (tomatoes, peppers, eggplants) in spring, extending their season by 4-6 weeks. They’re perfect for tender herbs (basil, cilantro) that bolt in heat—open windows moderate summer temperatures. Leafy greens (lettuce, spinach, kale) grow through winter in zones 7-9 with proper insulation. Avoid large, vining plants like indeterminate tomatoes unless you have a 6+ foot tall model. Root vegetables don’t benefit from greenhouse conditions and often overheat. Focus on above-ground crops that appreciate protected, controlled environments.
How often should I open the zippered windows?
Open windows whenever temperatures inside exceed your crop’s optimal range by 5°F. For most seedlings, this means opening when interior temps hit 80°F. In spring, this might require opening by 10 AM on sunny days; in summer, windows should be open by 8 AM. Close windows when ambient temperatures drop below 50°F or when wind speeds exceed 15 mph. During stable, mild weather (60-75°F), leave upper windows cracked 10-20% continuously for fresh air exchange. The key is proactive adjustment based on forecasts, not reactive opening after problems appear.
Can I use these greenhouses year-round in cold climates?
In USDA zones 6 and below, mini greenhouses alone cannot sustain plants through winter—they lack sufficient insulation for sub-freezing nights. However, they serve as excellent season extenders, protecting crops through first frosts and warming soil 2-3 weeks early in spring. For true winter growing in cold climates, place the mini greenhouse inside a larger unheated structure like a garage or sun porch, where it provides wind protection and concentrates available light. Alternatively, use it as a “cold frame” over in-ground beds, removing the cover during deep winter and replacing it in late winter for early spring crops.
What’s the difference between various mesh sizes?
Standard 18x16 mesh (18 strands per inch one way, 16 the other) blocks flies, moths, and beetles but allows thrips and some aphids. No-see-um mesh (20x20 or 20x30) blocks insects as small as 0.5mm, including whiteflies and most aphids, but reduces airflow by 15-20%. Pollinator mesh (7x6) allows bees and beneficial wasps through while blocking larger pests—ideal for flowering crops. For general vegetable growing, 18x16 offers the best compromise. If specific pests plague your area, match mesh to their size: 20x20 for whitefly regions, 16x14 (slightly larger) for areas needing maximum airflow with moderate pest pressure.
How do I repair a broken zipper on my greenhouse?
For separated teeth, try squeezing the slider gently with pliers to tighten it—this works 60% of the time. If teeth are missing, cut out the damaged section and install a replacement zipper slider to create a new stopping point, effectively shortening the zipper. For tears where mesh meets zipper, use greenhouse repair tape on both sides, then hand-sew through the tape for strength. Complete zipper replacement requires sewing skills; consider taking it to an upholstery shop. As a temporary fix, overlap the torn edges and use binder clips to seal the opening, though this compromises pest protection.
Are these structures suitable for balcony gardening?
Absolutely—mini greenhouses with screen windows are ideal for balconies, provided weight limits are respected. Most mid-size units weigh 15-25 pounds empty and 50-75 pounds when loaded with plants and wet soil, well within most balcony ratings. The key is securing them to railings at multiple points using adjustable straps, not just placing them on the floor. Position away from building walls that block light, and consider your neighbors—angled windows can direct water runoff onto lower balconies. Check lease agreements; some require portable structures only, which these satisfy. The screen windows are crucial on balconies to prevent pests from neighboring plants while allowing some pollination.
How do I weigh down a portable mini greenhouse effectively?
Effective anchoring uses multiple methods simultaneously. Fill the base frame’s integrated pockets with sand—most designs hold 20-30 pounds per side. Add sandbags on the interior floor, placing them in corners where they don’t interfere with plants. Use the provided ground stakes at all four corners, angled away from the greenhouse at 45 degrees for maximum hold. For hard surfaces, use ratchet straps secured to heavy planters or railing posts. In windy areas, add 5-gallon water jugs hung from the frame’s upper corners—they sway and absorb wind energy. Never rely on just one method; redundancy ensures your greenhouse stays put during unexpected gusts.