Growing tomatoes that reach for the sky isn’t just a matter of planting and hoping for the best—it’s an architectural endeavor. When you’re cultivating indeterminate varieties that can easily surpass six feet, your greenhouse becomes more than a season extender; it transforms into a vertical ecosystem where every design choice impacts your harvest. The right walk-in greenhouse with properly positioned roof vents can mean the difference between bushels of flawless, vine-ripened fruit and a tangled mess of disease-prone plants gasping for airflow.
As we look toward 2026’s growing season, the greenhouse market continues evolving with smarter ventilation systems, stronger materials, and designs specifically engineered for serious tomato enthusiasts. Whether you’re a backyard homesteader scaling up production or a market gardener maximizing every square foot, understanding the nuanced relationship between vertical growing space and strategic roof ventilation will fundamentally change your success rate. Let’s explore what makes a greenhouse truly worthy of your tallest, most productive tomato plants.
Top 10 Walk-In Greenhouses for Tall Tomato Plants
Detailed Product Reviews
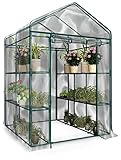
1. VEVOR Walk-in Green House, 55.5 x 29.3 x 80.7 inch, Portable Greenhouse with Shelves, High Strength PE Cover with Roll-up Zipper Door and Steel Frame, Set Up in Minutes, for Planting and Storage

Overview: The VEVOR Walk-in Green House offers an affordable entry into protected gardening, measuring 55.5 x 29.3 x 80.7 inches. This portable structure features a steel frame with rust-proof tubes and a waterproof PE cover providing level 6 UV protection. With tool-free assembly and a weight capacity of 33 pounds per shelf, it targets budget-conscious gardeners seeking basic functionality for indoor or outdoor use.
What Makes It Stand Out: The greenhouse distinguishes itself through its impressive 33-pound shelf capacity—substantially higher than many competitors at this price point. The level 6 UV protection prevents leaf burn while maintaining high light transmittance. Its tool-free assembly system allows solo setup in minutes, and the roll-up zipper door provides convenient access and ventilation control without complex hardware.
Value for Money: At $42.29, this represents exceptional value for a walk-in greenhouse. Comparable models typically start at $60-80, making this ideal for beginners testing their interest or gardeners with limited budgets. The durable frame and UV-resistant cover deliver features usually found in pricier units, maximizing return on minimal investment.
Strengths and Weaknesses: Strengths include the high weight capacity, superior UV protection, easy assembly, and indoor/outdoor versatility. The narrow 29.3-inch width limits plant arrangement options, and the PE cover may degrade faster than PVC alternatives. No dedicated ventilation windows mean relying solely on the door for airflow, which could limit climate control in extreme conditions.
Bottom Line: An excellent starter greenhouse that punches above its weight class. Perfect for apartment balconies, small patios, or gardeners wanting to experiment without significant investment. While not built for extreme weather, it provides reliable protection for seasonal growing.
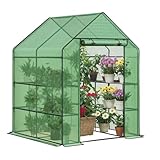
2. Home-Complete 514537FXW Walk-in Greenhouse-Indoor Outdoor with 8 Sturdy Shelves-Grow Plants, Seedlings, Herbs, or Flowers in Any Season-Gardening Rack, Green
Overview: The Home-Complete Walk-in Greenhouse provides a square-footprint solution for indoor and outdoor gardening, measuring 56.3 x 56.3 x 76.7 inches. With eight sturdy shelves and a clear PVC cover, this kit includes stakes and guy lines for enhanced stability. The steel frame construction supports versatile growing environments from backyards to basements, extending growing seasons for various plants.
What Makes It Stand Out: Its square design maximizes growing space efficiency compared to rectangular models. The inclusion of eight shelves with securing zip ties prevents tipping—a thoughtful safety feature. Most notably, it comes with stakes and guy lines for added stability, accessories often sold separately with competitors. This attention to stability makes it more reliable in light winds than basic pop-up models.
Value for Money: Priced at $67.98, this greenhouse sits in the sweet spot between budget and premium options. The square footprint offers 25% more floor area than comparably priced rectangular models, while the included stabilization kit adds $15-20 in value. It’s a smart investment for committed beginners who want room to expand without immediate replacement.
Strengths and Weaknesses: Strengths include the efficient square layout, eight-shelf capacity, included stability accessories, and versatile placement options. The 76.7-inch height may feel cramped for taller users, and the PVC cover is prone to yellowing over time with UV exposure. Shelf weight capacity isn’t specified, potentially limiting heavy plant arrangements.
Bottom Line: A well-rounded mid-range greenhouse perfect for gardeners ready to get serious. The square design and included accessories make it more functional than basic models, offering room to grow without breaking the bank.
3. Bstrip Walk In Greenhouse, Indoor Greenhouse with Grow Lights, Mini Indoor Greenhouse with Roll-Up Zipper Entry Door and PVC Cover, Dimmable 2FT 120W Plant Light with Timer (56.3"W X 56.3"L X 76.8"H )

Overview: The Bstrip Walk-In Greenhouse revolutionizes indoor growing with integrated LED technology, measuring 56.3 x 56.3 x 76.8 inches. This premium kit includes 16 grid racks and a sophisticated 120W full-spectrum grow light system with timer and dimming controls. The transparent PVC cover and walk-in door create a complete controlled environment for year-round cultivation of herbs, vegetables, and flowers.
What Makes It Stand Out: Twelve full-spectrum LED bars delivering 400-780nm wavelengths mimic natural sunlight across three growth modes (seedling, growing, blooming). The seven-level dimming (15-100%) and 3/6/12-hour timer provide professional-grade light management. The 16-grid rack system offers unparalleled organization flexibility, effectively doubling the storage options of standard eight-shelf models.
Value for Money: At $199.99, this commands a premium but justifies it through $100-150 worth of integrated grow lights alone. For serious indoor gardeners, purchasing a comparable greenhouse and separate light system would cost significantly more. It eliminates compatibility guesswork while delivering automated, optimized growing conditions that maximize plant health and yields.
Strengths and Weaknesses: Strengths include the comprehensive lighting system, customizable spectrums, timer automation, and extensive rack configuration. The high price may overwhelm casual users, and the PVC cover lacks the durability of PE alternatives. Power consumption and initial complexity require commitment, and the integrated electronics demand careful moisture management.
Bottom Line: An all-in-one solution for dedicated indoor gardeners seeking year-round harvests. The intelligent lighting system transforms this from a simple shelter into a productive growing machine, making it worth every penny for serious enthusiasts.
4. Greengro Greenhouse, 28 x 57 x 76’’ Greenhouses for Outdoors, Small Plant Green House with Screen Windows, 3 Tiers 4 Shelves, Durable PE Cover, Plastic Portable Walk in Greenhouses for Outside Indoor

Overview: The Greengro Greenhouse offers a compact, wind-resistant growing solution at 28 x 57 x 76 inches. Featuring four shelves across three tiers, this model prioritizes weather protection with a thick PE cover rated to withstand 45 mph winds. Screen windows provide crucial ventilation control, making it suitable for varied climates and both indoor/outdoor applications on patios, decks, or balconies.
What Makes It Stand Out: The integrated screen windows are a standout feature rarely found in this price class, allowing airflow without exposing plants to pests. The PE cover’s high-tensile grid construction with double-stranded edge binding delivers serious wind resistance. At 6.4 feet tall, it accommodates medium-sized plants comfortably while the 16mm thick base adds foundation stability.
Value for Money: At $59.99, this greenhouse offers excellent value for gardeners in windy regions. The ventilation system and wind-rated construction provide features typically seen in $80-100 models. While shelf count is lower than competitors, the quality of construction and climate control capabilities compensate, making it a smart choice for challenging environments.
Strengths and Weaknesses: Strengths include superior ventilation, impressive wind resistance, durable PE cover, and tool-free assembly. The narrow 28-inch depth limits capacity, and the 22-pound shelf capacity is modest compared to heavier-duty options. Four shelves provide less growing area than eight-shelf competitors at similar prices, potentially restricting plant volume.
Bottom Line: Ideal for gardeners prioritizing climate control and durability over maximum capacity. The screen windows make it perfect for hot climates or humid indoor spaces, while wind resistance ensures outdoor reliability. A smart choice for quality over quantity.
5. Porayhut Pop Up Greenhouse Tent,Portable X-Large Walk-in Flower House ,Indoor Outdoor Gardening Plant Sunshine Room with PE Mesh Cloth Cover for Protecting Plant from Cold Frost & Birds

Overview: The Porayhut Pop-Up Greenhouse Tent redefines portability with its instant-setup design, measuring 48 x 48 x 63.7 inches. Weighing just 8.8 pounds and folding to a compact 24 x 24 x 2.75 inches, this X-large tent uses 600D Oxford and double-layer PE mesh for thermal insulation. The arched roof prevents snow accumulation, while side screen windows enable ventilation for protecting plants from cold, frost, and birds.
What Makes It Stand Out: The pop-up mechanism allows deployment in seconds without assembly—perfect for renters or seasonal gardeners. Its pack-down size makes storage effortless, essentially collapsing to a laptop-sized package. The 600D Oxford fabric offers better insulation than standard PE covers, and the arched roof design demonstrates thoughtful engineering for weather resistance in a portable format.
Value for Money: At $79.99, you pay a premium for convenience rather than capacity. While more expensive than basic tube-frame greenhouses, the instant setup and portability justify the cost for specific users. It’s comparable to high-end camping gear in its construction and price-to-convenience ratio, making sense for those who value flexibility above all.
Strengths and Weaknesses: Strengths include instant setup, exceptional portability, lightweight design, and good insulation. The 63.7-inch height limits tall plants, and the pop-up structure lacks the stability of permanent frames for extreme weather. Capacity is modest compared to similarly priced traditional greenhouses, and long-term durability may be questionable in harsh conditions.
Bottom Line: The ultimate solution for temporary or mobile gardening needs. Perfect for renters, seasonal protection, or experimental growing. While not a permanent structure, its convenience factor is unmatched, making it invaluable for the right user who values flexibility over maximum growing space.
6. Heyfurni Walk in Greenhouse with Shelves,Walk-in Plant Green House with Durable Green PE Cover, 3 Tiers 6 Shelves Stands with Ground Pegs & Ropes for Stability, 56"x28"x76"

Overview: The Heyfurni greenhouse offers a compact, budget-friendly solution for gardeners with limited space. Measuring 56"x28"x76" with six wired shelves, this walk-in structure provides protected growing space for seedlings and small plants. The green PE cover features a zippered roll-up door and two velcro side windows for ventilation control.
What Makes It Stand Out: Its narrow 28-inch depth distinguishes it from square competitors, making it ideal for tight balconies or narrow patios. The included ground pegs and ropes provide essential wind stabilization often missing in budget models. The PE cover is designed to keep small animals out while allowing observation of plant progress.
Value for Money: At $44.79, this is the most affordable option in the lineup. It delivers essential greenhouse functions—weather protection, ventilation, and shelving—without premium features. For beginners or casual gardeners, it offers a low-risk entry point into protected growing.
Strengths and Weaknesses:
- Pros: Compact footprint fits small spaces; included anchoring system; easy access with roll-up door; affordable price point; lightweight and portable
- Cons: Only 17 lbs per shelf capacity limits heavier plants; narrow depth restricts growing space; just six shelves provide less storage; assembly may require mallet for tight joints
Bottom Line: Perfect for apartment dwellers or beginners with minimal space requirements who want basic plant protection without a significant investment.
7. Walk-in Greenhouse, 56 x 56 x 77 Inch Outdoor Plant Green House with 3 Tiers 12 Shelves, Heavy Duty Steel Frame & Thicken PE Cover, Portable Greenhouses for Balcony Patio Deck Gardening Clear

Overview: This square greenhouse maximizes growing capacity with 12 shelves in a 56x56x77 inch footprint. The heavy-duty steel frame supports a 5.7 oz/yd² PE cover that provides robust weather protection. Mesh door and screen windows allow precise climate control for serious gardeners managing multiple plant varieties.
What Makes It Stand Out: The exceptional 46 lbs per shelf capacity far exceeds competitors’ 15-20 lb limits, accommodating heavy pots and grow lights. The upgraded steel wire shelves and powder-coated poles create a genuinely sturdy structure. Back shelves plus side shelving optimize space utilization beyond standard designs.
Value for Money: Priced at $53.99, it offers professional-grade weight capacity at a consumer price point. The durable materials and superior load-bearing ability make it a long-term investment that outperforms similarly priced alternatives.
Strengths and Weaknesses:
- Pros: Highest weight capacity in category; robust 5.7 oz/yd² cover; excellent ventilation control; spacious square design; versatile indoor/outdoor use
- Cons: Complex assembly with many components; connectors may be weaker than steel frame; unclear brand reputation; heavier than portable models
Bottom Line: The best choice for serious gardeners needing maximum shelf strength and durability without breaking the budget.
8. Fatazoii 56×56×78Inch Walk-in Greenhouse for Outdoors with Screen Windows, Heavy Duty Small Plant House with Thicken PE Cover and Steel Shelves, Portable Green House for Outside Garden Winter, Green

Overview: The Fatazoii greenhouse provides a spacious 55.1x55.1x77.6 inch growing environment with screen windows for ventilation control. Designed for year-round outdoor use, it accommodates up to 24 planters with its steel frame structure. The thickened PE cover offers protection against rain, snow, and debris.
What Makes It Stand Out: This model emphasizes weather resilience with specific rain and snow protection features. The screen windows provide insect-free ventilation, while the ground stake anchoring system focuses on stability. All components are removable for seasonal relocation without tools.
Value for Money: At $89.99, it’s the most expensive option reviewed. While it offers solid construction and good space, the 22 lb shelf capacity and features don’t justify the premium over similar models costing $30-40 less.
Strengths and Weaknesses:
- Pros: Spacious interior; screen windows prevent pests; easy tool-free assembly; good weather protection; portable design
- Cons: Highest price point; 22 lb capacity is average, not heavy-duty; brand recognition is limited; similar specs available for less
Bottom Line: A capable greenhouse that performs well but struggles to justify its premium price tag compared to more affordable competitors with equivalent features.
9. SPECILITE 56×56×78Inch Walk-in Greenhouse, Heavy Duty Small Plant House with Thicken PE Cover and Steel Frame, for Garden, Outdoors, Indoors, Green

Overview: The SPECILITE greenhouse mirrors the dimensions and features of other square models at 55.1x55.1x77.6 inches, accommodating up to 24 plant pots. It combines a thickened PE cover with rust-resistant steel tubes and offers dual screen windows for ventilation management in various weather conditions.
What Makes It Stand Out: Marketed as “rock-solid stable,” this model emphasizes structural integrity with heavy-duty tubes and a 22 lb weight capacity. The roll-up door and screen windows provide flexible climate control, while the tool-free assembly supports seasonal repositioning.
Value for Money: At $85.99, it’s priced near the top of the range. While construction is solid and features are comprehensive, it lacks the exceptional weight capacity of cheaper alternatives, making it a questionable value proposition.
Strengths and Weaknesses:
- Pros: Spacious square design; effective ventilation system; rust-resistant frame; easy mobility; good weather protection
- Cons: Expensive for standard specs; 22 lb capacity is modest; no unique features; competes directly with better-priced options
Bottom Line: A well-built greenhouse that delivers reliable performance, but savvy shoppers can find comparable quality at significantly lower prices.
10. Greenhouses for Outdoors, 56 x 56 x 76’’ Walk in Plant Greenhouses Heavy Duty with Durable PE Cover, 3 Tiers 12 Shelves, Heavy Duty Walk in Green Houses for Indoor Backyard Outside
Overview: This greenhouse balances affordability with performance in a 56x56x76 inch frame with 12 shelves. The high-tensile grid PE cover features double-stranded edge banding and claims 45 mph wind resistance. It provides enclosed protection against weather, pests, and rodents while regulating temperature and moisture.
What Makes It Stand Out: The wind resistance rating is the most specific durability claim among reviewed models. The cover’s engineered construction with edge banding suggests superior manufacturing. It supports up to 22 lbs per shelf and accommodates 24 plant pots across its multi-tier design.
Value for Money: At $50.99, it positions itself as a mid-range option with premium weather protection features. The wind resistance claim and reinforced cover justify the slight premium over basic models without reaching the highest price tier.
Strengths and Weaknesses:
- Pros: Specific 45 mph wind rating; reinforced cover edges; versatile indoor/outdoor use; tool-free assembly; good shelf capacity
- Cons: Wind rating may be optimistic; brand name is generic; actual steel thickness unclear; limited warranty information
Bottom Line: An excellent choice for gardeners in windy regions who need reliable protection without paying premium prices.
Why Tall Tomato Plants Demand Specialized Greenhouse Design
Indeterminate tomato varieties don’t understand the meaning of “stop growing”—they’ll keep reaching upward until frost, disease, or structural limitations halt their progress. Unlike bush varieties that politely top out at three feet, these vigorous climbers require a completely different approach to greenhouse architecture. The vertical nature of tall tomatoes creates microclimates within your structure that standard greenhouses simply aren’t equipped to handle.
Heat stratification becomes your primary enemy. Warm air naturally rises, and in a standard-height greenhouse, this creates a furnace-like layer above your plants while leaving lower levels relatively cool. With tall tomatoes, that heat pocket forms directly within the canopy, essentially cooking your fruit and stressing your plants precisely where they’re most vulnerable. Roof vents positioned at the apex aren’t just convenient—they’re critical for flushing out this superheated air before it damages developing fruit and delicate flower clusters.
Understanding Walk-In Greenhouse Dimensions for Vertical Growth
Minimum Height Requirements for Indeterminate Varieties
When planning for tall tomatoes, “walk-in” means more than just being able to stand upright. You’re designing for a plant that can grow 8-12 feet in a single season, plus the additional height needed for trellising systems and hanging supports. The sweet spot for serious tomato cultivation starts at 7 feet of interior clearance and extends upward to 10 feet or more for varieties like ‘Sun Gold’ or ‘Cherokee Purple’ that become true monsters.
Consider this: a 6-foot greenhouse might seem adequate when you plant that 8-inch seedling in March, but by August, you’ll be wrestling vines and watching perfectly good trusses develop outside your structure, exposed to pests and weather. The psychological benefit matters too—working in a spacious, airy greenhouse where you’re not constantly ducking or worrying about brushing against pollen-laden stems makes for a much more enjoyable gardening experience.
Roof Vent Configurations: Types and Functional Differences
Automated vs. Manual Ventilation Systems
The debate between manual and automated roof vents isn’t just about convenience—it’s about consistency. Tomatoes are exquisitely sensitive to temperature fluctuations, and a greenhouse that overheats for even a few hours can trigger blossom drop, reducing your yield by 30% or more. Manual vents require you to be present, vigilant, and physically capable of reaching high-mounted openings, which isn’t always practical during a heatwave or when you’re away for the day.
Automated systems using wax-filled pistons or electric actuators respond to temperature changes instantly, opening vents incrementally as conditions demand. These systems don’t take lunch breaks or forget to check the forecast. For tall tomato greenhouses, look for models with multiple vent zones—perhaps two or three separate openings that can operate independently. This allows you to create a chimney effect, drawing cool air through lower side vents while expelling hot air from multiple roof points.
Frame Materials: Balancing Strength, Weight, and Longevity
Aluminum vs. Galvanized Steel for Tall Structures
Your greenhouse frame isn’t just scaffolding—it’s the skeleton that must support hanging vines loaded with fruit, withstand wind loads at greater heights, and resist corrosion in a humidity-saturated environment. Aluminum frames offer the advantage of being lightweight and naturally rust-resistant, making them ideal for DIY installations and coastal locations where salt air accelerates metal degradation. However, aluminum’s flexibility can become problematic in taller structures, potentially allowing glazing panels to shift and create gaps.
Galvanized steel, particularly heavy-gauge options, provides the rigidity that tall greenhouses demand. The zinc coating offers excellent protection, though scratches and cut edges can become vulnerable to rust over time. For tomato-specific applications, steel frames often include integrated hanging systems and stronger rafter designs that accommodate overhead trellising without additional reinforcement. The weight penalty is significant—steel structures typically require concrete foundations rather than simple ground anchors—but the stability pays dividends during summer storms when your 10-foot tomato canopy acts like a sail.
Glazing Options: Light Diffusion vs. Direct Sun Transmission
Polycarbonate Panels vs. Polyethylene Film for Tomato Cultivation
The glazing you choose directly impacts fruit quality, disease pressure, and your greenhouse’s thermal performance. Twin-wall polycarbonate panels diffuse light beautifully, eliminating harsh shadows and reducing the risk of sunscald on developing fruit—a common issue when tomatoes are suddenly exposed to intense direct sunlight after a cloudy period. The insulation value of polycarbonate (typically R-value of 1.7 for 6mm twin-wall) also means your greenhouse retains heat more effectively during cool spring nights, extending your growing season at both ends.
Polyethylene film, while significantly less expensive, transmits direct sunlight that can create hot spots within your tomato canopy. The lack of diffusion means lower leaves receive less usable light as the upper foliage shades them out. However, film greenhouses often feature superior ventilation designs since they’re built for commercial growers who prioritize airflow. If you opt for film, ensure you’re selecting UV-stabilized, anti-drip formulations that prevent condensation from dripping onto plants and spreading disease.
Ventilation Capacity: Calculating CFM Needs for Large Plants
The Role of Side Vents and Louvered Windows
Roof vents alone won’t create the airflow tall tomatoes crave—you need a comprehensive ventilation strategy. The general rule of thumb for greenhouse ventilation calls for complete air exchange every 1-2 minutes during peak summer, but tall, dense tomato canopies complicate this calculation. You’re not just ventilating empty space; you’re forcing air through a living wall of foliage that creates resistance.
Side vents positioned low on the structure work in concert with roof vents to establish natural convection currents. For maximum effectiveness, side vents should total at least 20% of your floor area, positioned on both windward and leeward sides to capture prevailing breezes. Louvered windows offer precise control, allowing you to fine-tune airflow during transitional weather. The magic happens when you can create a gentle rustling throughout the entire plant—enough movement to strengthen stems and discourage fungal spores from settling, but not so much that it desiccates flowers or causes physical damage.
Temperature Management Strategies for Heat-Loving Tomatoes
Preventing Heat Stress During Peak Summer Months
Tomatoes thrive in warmth, but there’s a critical threshold—typically around 85-90°F—where fruit set plummets and plant stress skyrockets. In a tall greenhouse, this temperature can be reached by mid-morning on a sunny day, long before you might suspect trouble. The key is anticipatory cooling rather than reactive crisis management.
Shade cloth becomes your best friend, but the percentage matters enormously. A 30-40% shade cloth deployed during the hottest months can drop interior temperatures by 15°F without significantly impacting fruit development. The trick is installing it externally rather than inside—this prevents heat from being trapped between the cloth and glazing. Some advanced greenhouse designs incorporate retractable shade systems that deploy automatically based on light intensity, giving you set-it-and-forget-it convenience.
Humidity Control: Avoiding Blight and Fungal Issues
Morning Dew Management and Air Circulation Patterns
Tall tomato plants create a humid microenvironment within their own canopy, especially during those cool summer nights when dew forms on every surface. This moisture, combined with limited air movement, creates the perfect storm for early blight, septoria leaf spot, and the dreaded late blight. Your roof vent strategy must address this specific challenge.
The most effective approach involves “night flushing”—opening vents for 30-60 minutes after sunset to evacuate the humid air before temperatures drop enough for condensation to form. In the morning, a similar pre-dawn venting session removes moisture that accumulated overnight. This requires either a very attentive gardener or an automated system with a timer function. Some growers install small circulation fans at canopy level to keep air moving 24/7, which can reduce foliar disease by up to 60% when combined with proper venting.
Structural Stability: Wind and Snow Load Considerations
Anchoring Systems for Tall Greenhouse Models
A 10-foot greenhouse with a full tomato canopy presents significantly more wind resistance than its empty counterpart. Those lush vines catch wind like a parachute, transferring enormous stress to the frame and foundation. Standard ground stakes won’t cut it—you need a robust anchoring system that prevents both lifting and lateral movement.
Concrete pier foundations, installed at each corner and at intermediate points along the base, provide the most secure option. These should extend below your local frost line to prevent heaving during freeze-thaw cycles. For temporary installations, heavy-duty earth anchors screwed into the ground at 45-degree angles can provide surprising holding power, but they require annual inspection and retensioning. Don’t forget to anchor the roof itself—ridge vents and vent arms need reinforcement to prevent them from becoming entry points for wind damage.
Interior Layout: Maximizing Vertical Growing Space
Trellising Systems and Overhead Support Structures
Your greenhouse interior should function like a vertical farm, with every element designed to support upward growth. Overhead support wires or pipes, typically installed 8-9 feet high, provide the backbone for string trellising or Florida weave systems. These supports must be rated for significant weight—a mature tomato plant bearing fruit can easily weigh 25-30 pounds, and you’ll have dozens of them.
Consider installing a pulley system for lowering and raising plants. This brilliant but underutilized technique involves attaching the base of each tomato string to a hook that slides along an overhead wire. As plants reach the top, you can lower the entire vine by a few feet, allowing it to continue growing while keeping fruit at a manageable harvesting height. This effectively doubles your usable vertical space and prevents the chaotic jungle that develops when plants outgrow their supports.
Budget Planning: Long-Term Value vs. Initial Investment
Hidden Costs of Cheap Greenhouse Kits
That budget-friendly greenhouse kit might seem like a steal until you’re replacing warpped panels after the first summer and battling rusted frame joints by year two. For tall tomato cultivation, cutting corners on quality creates cascading problems that directly impact plant health and your sanity. Weak frames that flex in the wind create gaps where glazing meets structure, allowing precious heat to escape and pests to enter.
Consider the total cost of ownership: a quality greenhouse with proper roof vents, sturdy frame, and durable glazing might cost 40% more upfront but last 15-20 years with minimal maintenance. The cheap alternative might need significant repairs by year three and replacement by year seven. Factor in the value of your tomato crop—if a failed greenhouse costs you a season’s harvest, you’ve lost far more than the price difference between budget and premium models.
Installation Realities: DIY vs. Professional Assembly
Site Preparation for Tall Greenhouse Structures
The excitement of unboxing your new greenhouse can quickly fade when you’re staring at 200+ parts and instructions that seem to have been translated through three languages. Tall greenhouses are inherently more complex to assemble—their larger panels are unwieldy, and the need for precise alignment increases with height. A 2-inch error at the base becomes a 6-inch gap at the roofline.
Site preparation begins weeks before assembly. The ground must be level within 1 inch across the entire footprint, which often requires removing topsoil and creating a compacted gravel base or concrete slab. Consider access—not just for construction, but for future maintenance. Will you be able to reach that roof vent motor when it fails in July? Is there clearance around all sides for cleaning and repairs? These practical considerations often get overlooked in the enthusiasm to get plants under cover.
Maintenance Protocols for Peak Performance
Seasonal Deep-Cleaning and Ventilation System Care
Your greenhouse’s ventilation system is mechanical, and like any machine, it requires regular maintenance to function properly. Automated vent openers should be removed and stored during winter to prevent wax piston damage from freezing temperatures. The vent hinges and arms need annual lubrication with silicone spray—never petroleum-based products that can degrade greenhouse materials.
The deep clean between growing seasons is non-negotiable. Tomato plants are notorious disease carriers, and fungal spores overwinter on every surface. Remove all organic matter, then wash glazing inside and out with a horticultural disinfectant. Pay special attention to vent frames and seals where debris accumulates. This is also the perfect time to inspect glazing for cracks, check frame joints for corrosion, and test automatic openers before the heat of spring arrives.
Common Mistakes That Stunt Tomato Growth
Perhaps the most frequent error is underestimating the sheer biomass tall tomatoes produce. Growers install a single roof vent on a 8x12 foot greenhouse, then wonder why their plants struggle in August. Another critical mistake is positioning vents where they’ll be shaded by the tomato canopy itself—vents must be located above the maximum plant height, not at a convenient working height.
Ignoring the importance of vent maintenance ranks high on the list of greenhouse sins. A vent that sticks partially open or closed throws off your entire climate control strategy. Similarly, placing temperature sensors in the wrong location—too high, too low, or in direct sunlight—gives you false readings that lead to poor ventilation decisions. Your sensor belongs at canopy level, in the shade of the plants themselves, measuring the conditions your tomatoes actually experience.
Frequently Asked Questions
How many roof vents do I need for an 8x10 greenhouse growing tall tomatoes?
For an 8x10 structure dedicated to indeterminate tomatoes, aim for a minimum of two roof vents, each at least 2x2 feet, positioned at opposite ends of the ridge. This creates cross-ventilation and prevents stagnant air pockets. If your model offers a third vent in the center, even better—tall tomatoes create such dense canopies that more ventilation is always preferable to less.
Can I modify an existing greenhouse to add more roof vents?
Absolutely, but the modification requires careful planning. You’ll need to reinforce the ridge beam where you cut into it, as vents weaken the structural integrity. Most polycarbonate and glass greenhouses can be modified using aftermarket vent kits, but you’ll want to match your existing glazing thickness exactly. The project typically takes a full weekend and requires basic carpentry skills plus assistance—those glazing panels are heavy and awkward.
What’s the ideal temperature range for tall tomatoes in a vented greenhouse?
Maintain daytime temperatures between 70-85°F for optimal fruit set, with a slight dip to 65-75°F at night. The challenge with tall tomatoes is temperature stratification—your head-level thermometer might read 80°F while the upper canopy bakes at 95°F. Use multiple sensors at different heights, and don’t hesitate to start venting at 75°F to prevent the upper zone from overheating.
Should I close roof vents during rainstorms?
Modern roof vents are designed to prevent rain entry even when fully open, featuring overlapping designs and drip channels. However, during severe storms with wind-driven rain, partially closing vents is wise. Automated systems with rain sensors will handle this for you, but manual setups require attention. The key is finding the balance—tomatoes need fresh air even on rainy days, and humidity spikes quickly in a sealed greenhouse.
How do I prevent roof vents from becoming entry points for pests?
Install fine-mesh insect screening on the inside of vent openings. Standard window screen (18x16 mesh) blocks most insects while allowing adequate airflow. For serious pest pressure, invest in agricultural insect netting with 0.6mm openings that even excludes thrips. Clean these screens monthly during growing season—they clog quickly with pollen and dust, reducing ventilation efficiency by up to 40%.
Is morning or evening ventilation more important for disease prevention?
Both are critical, but morning venting takes priority. Opening vents for 30-60 minutes at sunrise evacuates the humid, stagnant air that accumulated overnight—the primary vector for fungal diseases. Evening venting helps reduce humidity before nightfall, but morning flushing removes the condensation that already formed. Think of it as preventative versus reactive management.
Can I use solar power to operate automatic roof vents?
Most wax-piston automatic openers are solar-powered by default—they’re heat-activated, requiring no electricity. For electric actuator systems, small solar panel kits with battery backup work wonderfully, typically costing under $200 for a two-vent setup. This is ideal for remote greenhouses without electrical service, and provides peace of mind during power outages when manual venting might be impossible.
How do I winterize roof vents in cold climates?
Remove automated openers and store them indoors to prevent freeze damage. Clean vent seals and apply silicone lubricant to prevent them from sticking during spring startup. If your greenhouse won’t be used during winter, consider covering vents with insulated panels from the inside to reduce heat loss. For year-round growing, install vent seals or weatherstripping to minimize drafts while still allowing for emergency manual venting on sunny winter days.
What’s the lifespan of typical greenhouse roof vent mechanisms?
Quality wax-piston openers last 5-7 years before the internal wax degrades and loses its expansion properties. Electric actuators typically last 10+ years but require more maintenance—annual lubrication and occasional limit switch adjustment. The vent frames and hinges themselves should last the lifetime of the greenhouse if properly maintained. Keep spare parts on hand; a failed vent opener in July can spell disaster for your tomato crop.
Do I need different vent strategies for cherry vs. beefsteak tomato varieties?
Cherry tomatoes generally produce denser, more vigorous foliage, requiring more aggressive ventilation to prevent humidity buildup within the canopy. Beefsteak varieties, while equally tall, often have more open growth habits. However, beefsteaks are more prone to blossom end rot, which can be exacerbated by temperature fluctuations that poor ventilation causes. The vent strategy remains similar, but you might open cherry tomato greenhouses 5-10°F earlier to combat their jungle-like density.