Container gardening has evolved far beyond simple pots on a patio, and with this evolution comes the need for smarter, more sustainable maintenance solutions. If you’ve ever found yourself battling stubborn weeds that seem to sprout overnight in your cherished container plants, you’re not alone—it’s one of the most frustrating challenges urban gardeners face. Enter recycled paper pulp weed discs: the unassuming, eco-friendly heroes that are quietly transforming how we manage container gardens in 2026.
These innovative biodegradable barriers represent a perfect marriage of environmental responsibility and practical gardening wisdom. Unlike synthetic weed fabrics that eventually end up in landfills or chemical herbicides that compromise soil health, recycled paper pulp discs decompose naturally while enriching your potting mix. As we dive into what makes these discs essential for modern container gardening, you’ll discover why they’re becoming the go-to choice for both novice plant parents and seasoned horticulturists who refuse to compromise between effectiveness and sustainability.
Top 10 Recycled Paper Pulp Weed Discs for Container Gardens
Detailed Product Reviews
1. Biodegradable Weed Barrier, 4 x 100 Ft Heavy Duty Garden Paper Biodegradable Landscape Fabric Paper Garden Mulch Rolls Weed Barrier for Weeds, Paper Mulch Rolls Garden Paper for Outdoor Garden Lawn
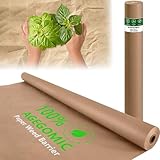
Overview: This 4x100 ft heavy-duty garden paper provides extensive coverage for large-scale weed management. Made from unbleached kraft paper, it offers a sustainable alternative to synthetic landscape fabrics. The substantial roll size makes it ideal for sprawling vegetable gardens or multiple flower beds, delivering robust protection against unwanted growth while maintaining full environmental responsibility.
What Makes It Stand Out: The reinforced cellulose fibers create exceptional durability against wind and debris while maintaining complete biodegradability. Pre-printed cutting guidelines simplify installation across irregular layouts, and its weather-resistant construction withstands seasonal transitions without tearing. The open-fiber structure uniquely balances airflow with gentle shading, creating optimal microclimates for both seedlings and mature plants while allowing natural soil respiration.
Value for Money: At $59.99 for 400 square feet ($0.15/sq ft), this represents excellent value for large projects. The cost per square foot undercuts most competitors, and the soil-enriching decomposition adds long-term value by improving soil texture and nutrient cycling. Compared to plastic barriers that require removal and disposal, this product’s self-decomposing nature saves labor and disposal costs, making it economically smart over multiple growing seasons.
Strengths and Weaknesses: Pros: Extensive coverage area, superior durability, pre-printed guidelines, enriches soil as it breaks down, excellent breathability. Cons: Higher upfront cost may deter small-scale gardeners, requires biodegradable stakes for slopes (not included), decomposition timeline varies by climate and may be unpredictable in dry conditions.
Bottom Line: Perfect for serious gardeners managing large plots. The combination of coverage, durability, and soil benefits makes it a worthwhile investment for sustainable, long-term garden management.
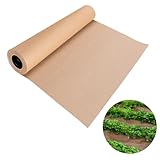
2. DECOHS 3 x 50 Ft Biodegradable Paper Weed Barrier- Heavy Duty Biodegradable Garden Bed Grass- Garden Paper Weed Control Barrier Weed Grass Blocker for Outdoor Garden Lawn

Overview: The DECOHS 3x50 ft biodegradable weed barrier offers a compact solution for modest garden spaces. This kraft paper roll provides effective weed suppression while maintaining ecological responsibility. Its manageable size suits urban gardens, small raised beds, or targeted problem areas where precision and ease of handling are priorities over maximum coverage.
What Makes It Stand Out: This barrier’s straightforward design emphasizes simplicity—roll out, cut to length, and let it work. The biodegradable material naturally integrates into soil after the growing season, eliminating removal hassle. Its breathability ensures plants receive adequate air and water while blocking sunlight from weeds, reducing soil moisture evaporation effectively without creating waterlogged conditions.
Value for Money: Priced at $31.99 for 150 square feet ($0.21/sq ft), this mid-tier option balances affordability with performance. While not the cheapest per square foot, the lower total investment makes it accessible for gardeners testing paper mulch for the first time. The soil health benefits and zero disposal costs offset the moderate price premium over plastic alternatives, delivering value beyond simple weed suppression.
Strengths and Weaknesses: Pros: Manageable size for small projects, no maintenance required, naturally decomposes, improves soil health, easy to cut and install. Cons: Smaller coverage requires multiple rolls for larger areas, less reinforced than heavy-duty options, may decompose too quickly in very wet climates, limited width for wide beds.
Bottom Line: An excellent entry point for eco-conscious gardeners with modest plots. The convenience and environmental benefits justify the cost for small to medium-scale applications where simplicity matters most.
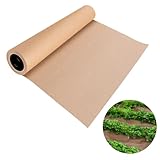
3. Biodegradable Weed Barrier, 3 x 100 Ft Heavy Duty Garden Paper Biodegradable Landscape Fabric Paper Garden Mulch Rolls Weed Barrier for Weeds, Paper Mulch Rolls Garden Paper for Outdoor Garden Lawn

Overview: This 3x100 ft heavy-duty garden paper strikes a balance between coverage and maneuverability. Constructed from thickened unbleached kraft paper, it delivers robust weed protection across medium-sized gardens while maintaining full biodegradability. The extended length serves long garden rows or multiple beds efficiently without the bulk of wider rolls.
What Makes It Stand Out: The reinforced cellulose fiber construction provides impressive tear resistance during installation yet decomposes naturally to enrich soil biology. Its balanced airflow design prevents soil suffocation while gently shading roots, creating stable growing conditions. Pre-printed guidelines facilitate precise cutting for curved beds and irregular layouts without specialized tools, making professional results achievable for home gardeners.
Value for Money: At $52.99 for 300 square feet ($0.18/sq ft), this roll offers solid middle-ground pricing. It provides 50% more coverage than 50-foot options while remaining more affordable than purchasing multiple small rolls. The soil-enriching properties deliver additional value, transforming a temporary barrier into a long-term soil amendment that enhances water retention and nutrient cycling throughout the decomposition process.
Strengths and Weaknesses: Pros: Good length for row crops, durable reinforced construction, soil-enriching decomposition, easy installation with guidelines, versatile applications across garden types. Cons: Width may be insufficient for wide beds, decomposition rate varies by soil conditions, requires careful securing in windy areas, not ideal for very small container gardens.
Bottom Line: Ideal for vegetable gardeners with linear plantings. The combination of length, durability, and soil benefits makes it a smart choice for sustainable food production and garden bed management.
4. DECOHS 4 x 100 Ft Biodegradable Paper Weed Barrier- Heavy Duty Biodegradable Garden Bed Grass- Garden Paper Weed Control Barrier Weed Grass Blocker for Outdoor Garden Lawn
Overview: The DECOHS 4x100 ft biodegradable paper weed barrier provides maximum coverage for extensive landscaping projects. This substantial roll equips gardeners to tackle large vegetable plots, commercial farm rows, or comprehensive garden renovations with a single purchase. The kraft paper construction ensures environmental responsibility at scale without compromising performance.
What Makes It Stand Out: Its generous dimensions eliminate seams in large installations, reducing potential weed breakthrough points. The material’s breathability maintains soil health across vast areas while effectively suppressing weed competition. Installation simplicity remains paramount—unroll, cut to size, and the barrier begins working immediately without complex anchoring systems or specialized expertise required.
Value for Money: At $64.99 for 400 square feet ($0.16/sq ft), this large roll offers competitive pricing for bulk buyers. While the total cost is higher, the per-square-foot rate is economical for extensive applications. Avoiding the need for multiple smaller rolls saves time and reduces material waste, making it cost-effective for large-scale operations where labor efficiency matters.
Strengths and Weaknesses: Pros: Maximum coverage per roll, seamless large-area application, naturally decomposes, improves soil health, moderate price per square foot. Cons: Significant upfront investment, heavy and bulky to maneuver alone, may be overkill for small gardens, decomposition timeline not specified, requires planning for full roll utilization.
Bottom Line: Best suited for large gardens, small farms, or landscaping professionals. The expansive coverage and soil benefits make it a prudent choice for substantial, eco-friendly weed management projects where efficiency is key.
5. 3.2x50 Ft Biodegradable Paper Weed Barrier Roll Heavy Duty Garden Paper Weed Control Biodegradable Landscape Fabric Thickened Garden Bed Grass Paper Mulch Film Weed Block Paper for Outdoor Garden Lawn

Overview: This 3.2x50 ft biodegradable weed barrier roll offers a slightly wider alternative to standard 3-foot options. Made from thickened kraft paper, it provides targeted weed control for small to medium garden spaces. The compact roll size ensures easy handling and storage while delivering effective suppression for gardeners prioritizing convenience.
What Makes It Stand Out: The product offers two width options (3.2 ft and 1.31 ft) within the same listing, allowing gardeners to select the optimal size for specific applications. The paper cuts more easily than traditional plastic barriers, simplifying customization around existing plants. Its natural decomposition enriches soil with organic matter, converting a temporary weed solution into a lasting soil amendment.
Value for Money: At $29.69 for approximately 160 square feet ($0.19/sq ft), this represents an affordable entry-level option. The lowest total price point makes it accessible for budget-conscious gardeners or those experimenting with paper mulch. While not the cheapest per square foot, the minimal financial commitment reduces risk for first-time users exploring sustainable gardening methods.
Strengths and Weaknesses: Pros: Lowest total cost, multiple width options, easy to cut and customize, naturally biodegrades, excellent breathability and permeability. Cons: Limited coverage area, may require frequent replacement, less durable in harsh weather, product description mentions two sizes causing potential ordering confusion, not suitable for large-scale projects.
Bottom Line: A budget-friendly introduction to biodegradable weed control. Perfect for small gardens, container clusters, or gardeners wanting to test paper mulch before investing in larger rolls.
6. DECOHS 4 x 50 Ft Biodegradable Paper Weed Barrier- Heavy Duty Biodegradable Garden Bed Grass- Garden Paper Weed Control Barrier Weed Grass Blocker for Outdoor Garden Lawn
Overview: The DECOHS Biodegradable Paper Weed Barrier delivers an eco-conscious alternative to synthetic landscape fabrics. This 4 x 50-foot roll of heavy-duty kraft paper effectively suppresses weed growth while naturally decomposing into soil, eliminating removal labor. Designed for vegetable gardens, flower beds, and agricultural applications, it provides season-long protection that integrates seamlessly with organic growing practices and soil health management.
What Makes It Stand Out: This product’s defining advantage is its sustainable lifecycle. Unlike petroleum-based barriers that persist for decades, the kraft paper enriches soil organic matter as it breaks down, improving microbial activity and tilth. Its breathable construction allows water infiltration and air exchange while blocking sunlight, creating optimal growing conditions. The 200-square-foot coverage suits medium-scale projects, and the material can be tilled directly into soil post-harvest, saving significant disposal time and reducing landfill waste.
Value for Money: At $34.99, DECOHS positions itself competitively within the biodegradable barrier segment, where comparable products range $30-45. While pricier than basic plastic options, the value proposition includes elimination of removal costs, soil amendment benefits, and alignment with organic certification standards. For sustainability-focused gardeners, this premium delivers tangible ecological returns. However, those in high-rainfall regions may require double-layering, potentially doubling the effective cost-per-season.
Strengths and Weaknesses: Strengths: Fully biodegradable and soil-enriching; excellent water and air permeability; eliminates post-season removal labor; compatible with organic gardening; easy to cut and install. Weaknesses: 4-foot width limits coverage efficiency for large areas; can degrade prematurely in excessively wet conditions; paper tears more easily than woven synthetics; requires careful handling during installation and watering.
Bottom Line: Ideal for eco-minded gardeners and organic growers prioritizing soil health over multi-season durability. Best suited for moderate climates where its biodegradable nature remains an asset through the growing season. Accept the trade-off between longevity and environmental benefits for a cleaner conscience and improved soil ecosystem.
Why Recycled Paper Pulp Weed Discs Are Revolutionizing Container Gardening
The shift toward paper pulp weed discs isn’t just another gardening trend—it’s a fundamental rethinking of how we approach weed management in contained environments. Traditional methods simply don’t address the unique challenges of pots, raised beds, and other confined growing spaces where soil is limited and root systems are vulnerable.
The Environmental Impact of Traditional Weed Control
Conventional weed control methods carry hidden environmental costs that container gardeners can no longer ignore. Synthetic landscape fabrics, while effective initially, fragment into microplastics that persist in soil for decades. Chemical herbicides, even those marketed as “safe,” can disrupt beneficial microorganisms essential for container soil health. The carbon footprint of manufacturing and transporting these traditional solutions further compounds their environmental debt. Recycled paper pulp discs, by contrast, repurpose post-consumer waste that would otherwise contribute to landfill overflow, creating a closed-loop system that actually improves soil structure as it breaks down.
How Paper Pulp Technology Works in Container Gardens
The science behind these discs is elegantly simple yet remarkably effective. When placed at the soil surface, the compressed paper pulp creates a physical barrier that blocks light from reaching weed seeds, preventing germination while remaining permeable to water and air. The fibrous structure acts like a sponge, capturing moisture that would otherwise evaporate from exposed potting mix. As the disc degrades over 4-6 months, it feeds beneficial soil bacteria and adds organic matter directly where roots need it most. This dual-action approach—suppression followed by soil amendment—makes it particularly valuable for container environments where soil quality depletes faster than in-ground gardens.
Key Benefits of Using Recycled Paper Pulp Weed Discs
Beyond basic weed suppression, these discs deliver a cascade of advantages that address multiple container gardening pain points simultaneously. Understanding these benefits helps you maximize their potential in your specific growing setup.
Superior Moisture Retention Properties
Container gardens lose moisture exponentially faster than in-ground plantings, with evaporation rates up to 50% higher on exposed soil surfaces. Recycled paper pulp discs create a protective microclimate that reduces surface evaporation by as much as 70%, according to recent horticultural studies. The cellulose fibers absorb and slowly release water, maintaining consistent moisture levels that prevent the dramatic wet-dry cycles that stress container plants. This property is especially crucial for moisture-loving vegetables like tomatoes and leafy greens that thrive in stable environments.
Biodegradability and Soil Enrichment
Unlike plastic alternatives that require removal and disposal, paper pulp discs complete their lifecycle right in your container. As they break down, they contribute carbon-rich organic matter that improves soil tilth and water-holding capacity. The decomposition process feeds beneficial fungi and bacteria, creating a living soil ecosystem that supports stronger root development. By season’s end, there’s nothing to throw away—just richer, more fertile potting mix ready for the next planting cycle.
Root Protection and Temperature Regulation
Container roots face extreme temperature fluctuations, with soil surface temperatures swinging 20-30 degrees between day and night. Paper pulp discs act as insulation, buffering these temperature swings and protecting shallow root systems from heat stress. This thermal regulation promotes more vigorous growth and reduces water demand. The barrier also prevents soil compaction from hard water and rain impact, keeping the growing medium loose and aerated where feeder roots develop.
Cost-Effectiveness for Urban Gardeners
When calculated over a full growing season, paper pulp discs often prove more economical than weekly hand-weeding or repeated herbicide applications. A single disc typically costs less than a cup of coffee yet provides 4-6 months of protection. Factor in the reduced water usage—conserving both resources and utility costs—and the value proposition becomes even clearer. For balcony and rooftop gardeners managing dozens of containers, this cost efficiency scales dramatically.
Understanding the Manufacturing Process
Not all recycled paper pulp discs are created equal. The manufacturing process significantly impacts performance, decomposition rate, and safety for edible crops. Savvy gardeners in 2026 are paying closer attention to these production details.
From Post-Consumer Waste to Garden Gold
The journey begins with collected office paper, newspaper, and cardboard that’s de-inked and pulped using chemical-free processes. Top-tier manufacturers employ oxygen-based bleaching rather than chlorine compounds, ensuring no harmful residues remain. The pulp is then compressed under high pressure with natural binding agents—typically starches or plant-based polymers—to create dense, uniform discs. Quality control includes testing for heavy metals, PFAS, and other contaminants that could compromise food safety. Understanding this process helps you identify brands that prioritize purity over cutting corners.
Quality Control Standards to Look For
Reputable manufacturers adhere to rigorous testing protocols that go beyond basic functionality. Look for documentation of tensile strength testing, which ensures discs don’t tear during installation or from root pressure. Permeability testing confirms water passes through at optimal rates—not too fast (which reduces effectiveness) and not too slow (which causes runoff). The best producers also conduct accelerated decomposition studies in various soil conditions, providing realistic timelines for your climate zone. These quality markers separate premium discs from bargain options that disintegrate too quickly or contain concerning contaminants.
Certifications That Matter in 2026
Third-party certifications provide independent verification of claims. The Biodegradable Products Institute (BPI) certification ensures compostability standards are met. OMRI Listing (Organic Materials Review Institute) is non-negotiable for certified organic growers. New for 2026, look for the Sustainable Forestry Initiative (SFI) Recycled Content label, which verifies responsible sourcing of paper feedstock. Some cutting-edge manufacturers now boast Carbon Negative certification, offsetting more emissions than they produce through innovative production methods.
Critical Features to Evaluate Before Buying
With dozens of options flooding the market, focusing on these key features helps narrow your choices to discs that match your specific container gardening needs.
Size and Diameter Considerations
Precision sizing is paramount in containers where space is limited. Measure your pot diameters accurately, accounting for the slight lip most containers have. Standard sizes range from 4-inch discs for herb pots to 24-inch rounds for half-barrel planters. The best approach is selecting discs 1-2 inches smaller than your container’s interior diameter, leaving a small gap at the edge that prevents water from running off the disc surface. Some manufacturers offer multi-size packs with 6, 8, and 10-inch options—ideal for gardeners with diverse container collections.
Thickness and Density Ratings
Disc thickness directly correlates with both longevity and weed suppression capability. Thin discs (1-2mm) decompose within 6-8 weeks, suitable for fast-growing annuals but requiring mid-season replacement. Medium density (3-4mm) provides 3-4 months of coverage, ideal for most vegetables and flowers. Heavy-duty options (5-6mm) last 5-6 months, perfect for perennials and woody herbs. Density is measured in grams per square meter (GSM), with 200-300 GSM hitting the sweet spot for container use—dense enough to block light but porous enough for water infiltration.
Pre-cut vs. Customizable Options
Pre-cut discs offer convenience but limit flexibility. For standard round pots, they’re perfect. However, rectangular planters, window boxes, and irregularly shaped containers benefit from roll or sheet formats you cut to size. Customizable options also allow you to create planting holes exactly where needed, rather than working around pre-punched centers that may not align with your plant spacing. Some innovative products feature perforated grids that let you customize size while maintaining structural integrity—offering the best of both approaches.
Integration with Drip Irrigation Systems
Modern container gardens increasingly employ drip irrigation for water efficiency. The best paper pulp discs accommodate this with pre-marked irrigation line guides or reinforced channels that prevent tubing from compressing the barrier. Look for discs with designated emitter holes that align with common drip spacing (6, 9, or 12 inches). This integration ensures water delivery isn’t compromised while maintaining weed suppression around irrigation points where moisture often triggers germination.
Nutrient-Infused vs. Plain Variants
Some manufacturers now infuse discs with slow-release organic fertilizers, mycorrhizal fungi, or beneficial bacteria. While these enhanced discs command a premium price, they can jumpstart plant establishment in fresh potting mix. For established perennials or native plants that prefer lean soil, plain discs are preferable. Be wary of discs with synthetic fertilizers—these contradict the sustainable ethos and can burn sensitive seedlings. Always check ingredient lists for organic certification when selecting nutrient-infused options.
Container-Specific Considerations
The unique constraints of container environments demand tailored approaches that in-ground methods simply don’t address.
Matching Discs to Pot Materials
Terracotta pots breathe and dry out quickly, making moisture-retentive paper pulp discs especially valuable. However, their rough interior can cause discs to stick and tear during removal—opt for smoother, denser discs that release more easily. Plastic and glazed ceramic pots retain moisture better but can create anaerobic conditions; choose more permeable, lighter-weight discs that allow better gas exchange. For fabric grow bags, which drain exceptionally well, use thicker discs that compensate for rapid moisture loss through the bag walls.
Adapting to Different Container Shapes
Square and rectangular containers present unique challenges as most discs are round. The solution isn’t forcing a round disc into a square hole—it’s strategic placement. Center a round disc over your main planting area, then use cut strips from a sheet product to cover corners. For oval or irregular pots, create a paper pulp “mosaic” by overlapping smaller pieces strategically. Some manufacturers now offer square discs specifically for raised bed corners and window boxes, a welcome innovation for 2026.
Depth Requirements for Various Plants
Shallow-rooted herbs and lettuces benefit from discs placed directly on the soil surface, where they suppress weeds without interfering with root development. Deep-rooted tomatoes and peppers require discs with larger pre-cut holes or customizable options that allow you to sink the disc 1-2 inches below the surface after establishment. This prevents the disc from drying and crusting around the plant stem while still protecting the surface where most weed seeds germinate.
Performance Metrics That Matter
Understanding quantifiable performance indicators helps you set realistic expectations and compare products objectively.
Decomposition Timeline Expectations
Decomposition rates vary dramatically based on climate, watering frequency, and soil biology. In warm, moist conditions, expect 30-40% faster breakdown than manufacturer estimates. Conversely, arid climates with minimal watering can extend disc life by 2-3 weeks. Most quality discs show visible degradation by week 8, with significant breakdown by week 16. Track your specific conditions and adjust replacement timing accordingly—don’t wait for complete disintegration before refreshing, as weed suppression diminishes as the disc thins.
Weed Suppression Efficacy Rates
Laboratory testing shows premium paper pulp discs block 95-98% of annual weed seed germination when properly installed. However, real-world efficacy drops to 85-90% due to edge effects, installation imperfections, and perennial weeds with deep root systems. The key is understanding that these discs excel at preventing new weeds but won’t eliminate established perennial weeds with energy reserves below the disc level. For best results, clear all existing weeds before installation and accept that occasional hand-pulling of edge weeds remains necessary.
Water Permeability Benchmarks
Optimal water permeability allows 1-2 inches of water per hour to pass through without pooling. Too-fast permeability (over 3 inches/hour) suggests insufficient density for effective weed blocking. Too-slow (under 0.5 inches/hour) creates runoff and dry soil beneath. Test this by placing a disc over a container and measuring how quickly 8 ounces of water passes through. Quality discs maintain consistent permeability throughout their lifespan, though some compaction occurs naturally as they saturate and dry repeatedly.
Installation Best Practices
Proper installation determines success more than any other factor. Even the highest-quality disc fails when installed incorrectly.
Preparing Your Container for Installation
Start with completely weed-free soil, removing every visible seedling and root fragment. Water thoroughly and allow the surface to settle for 24 hours—this prevents post-installation settling that creates gaps. For containers with existing plants, gently clear soil from around stems to create a small well where the disc will sit slightly below surface level. This prevents water from running off the disc and away from your plant’s root zone. If using nutrient-infused discs, hold off on additional fertilizer for 2-3 weeks to avoid over-concentration.
Step-by-Step Placement Guide
Center the disc over the container, ensuring equal spacing around all edges. For pre-cut center holes, align carefully with your plant stem—never force a stem through an undersized hole as this damages tissue and creates entry points for disease. Press the disc gently but firmly onto the soil surface, working from center to edges to eliminate air pockets. Air gaps allow light penetration and weed growth. Tuck edges slightly into the soil if possible, creating a seal that prevents weeds from creeping underneath. Water lightly after installation to help the disc conform to soil contours.
Layering Techniques for Maximum Effectiveness
For long-season crops or perennials, consider a double-layer approach. Install a standard disc at planting time, then add a second thinner disc (1-2mm) at mid-season when the first shows signs of thinning. This sandwich technique extends protection without disturbing roots. Another advanced method involves placing a thin disc at the bottom of the container before adding soil, preventing weeds from germinating upward while the top disc blocks downward-growing seeds. This is particularly effective for containers placed on soil surfaces where weed pressure is high.
Common Mistakes to Avoid
Learning from others’ errors saves you time, money, and frustration. These pitfalls trip up even experienced gardeners transitioning to paper pulp systems.
Overlapping Errors That Cause Problems
Overlapping discs seems logical for complete coverage, but it creates raised edges that dry out faster and allow weeds to establish in the seams. Instead of overlapping, use a single properly sized disc or cut pieces to fit exactly with minimal gaps. If overlap is unavoidable, offset seams by at least 2 inches from planting holes and secure overlaps with biodegradable stakes to prevent lifting. Never overlap more than 1 inch—thicker overlaps create water dams that either flood or starve sections of your container.
Timing Your Installation Incorrectly
Installing discs too early, before soil has warmed in spring, can slow soil heating and delay plant growth. Conversely, waiting until weeds have already germinated means you’re just covering the problem, not preventing it. The sweet spot is when soil temperatures consistently reach 60-65°F—warm enough for your desired plants but before summer annual weeds hit their germination peak. For fall plantings, install discs 2-3 weeks before seeding to preempt cool-season weeds like chickweed and henbit.
Compatibility Issues with Certain Soil Types
Heavy, clay-based potting mixes can create anaerobic conditions when covered with dense paper pulp discs, especially in poorly drained containers. Amend such soils with 20-30% perlite or coarse sand before installation to improve gas exchange. Conversely, extremely sandy mixes drain so quickly that discs dry out and degrade prematurely—add water-retentive materials like coco coir. Discs also interact poorly with soils containing fresh manure or uncomposted organic matter, which can cause excessive heat during decomposition. Always use mature, finished potting mixes for best results.
Seasonal and Climate Adaptations
Paper pulp discs perform differently across climates. Tailoring your approach to local conditions ensures consistent results.
Adjusting for Hot, Arid Climates
In desert and Mediterranean climates, discs dry and become brittle within weeks, losing effectiveness. Combat this by choosing thicker, denser options (5-6mm) and installing them slightly below the soil surface (1/2 inch) where moisture remains more stable. Pair discs with light-colored top mulch like straw to reflect heat and further slow degradation. Increase irrigation frequency but reduce volume—light, frequent watering keeps discs moist without waterlogging soil beneath. Consider applying a light coating of organic aloe vera solution to disc surfaces, which some gardeners report extends flexibility and lifespan in extreme heat.
Cold Weather Performance Characteristics
In northern climates with short growing seasons, decomposition slows dramatically. This extends disc life but can leave you with undecomposed material at season’s end. For spring plantings, use thinner discs (2-3mm) that will break down by fall cleanup time. In fall, when using discs for overwintering perennials, choose heavier options that will persist until spring, providing root protection from freeze-thaw cycles. Be aware that frozen discs become impermeable—water pools on the surface and can freeze-damage plant crowns. Brush snow off disc surfaces to prevent ice formation.
Humidity and Mold Resistance Factors
High-humidity regions promote rapid disc decomposition, but also encourage surface mold that can concern gardeners. This mold is typically benign saprophytic fungi breaking down cellulose, not plant pathogens. However, if aesthetics matter, choose discs treated with copper or potassium bicarbonate—natural mold inhibitors that don’t affect biodegradability. Ensure containers have excellent drainage to prevent water from pooling on disc surfaces for extended periods. In extremely humid conditions, consider using discs with embossed patterns that create air channels, reducing surface moisture retention.
Maintenance and Monitoring
Active management, though minimal, ensures your discs perform optimally throughout their lifespan.
Signs Your Disc Is Degrading Properly
Healthy degradation shows as gradual thinning, surface fuzziness from fungal colonization, and darkening color. The disc should remain intact but become increasingly fragile after week 10. If you see large holes appearing before week 6, this indicates poor quality material or excessive watering. Conversely, if the disc shows no change after 12 weeks in warm conditions, it may contain synthetic binding agents that won’t break down properly. Document your disc’s appearance weekly with photos to learn what normal degradation looks like in your specific setup.
When to Replace or Supplement
Don’t wait for complete failure. When you can easily see soil through thinning areas or when weed seedlings begin appearing in numbers, it’s time to supplement. For most annual vegetables, plan to add a fresh layer at 10-12 weeks, coinciding with mid-season fertilization. Perennials in large containers may need annual replacement. If a disc becomes water-repellent (hydrophobic) due to surface drying, puncture it lightly with a fork to restore permeability rather than replacing prematurely.
Combining with Other Mulching Methods
Paper pulp discs work synergistically with other mulches, not as replacements. A thin layer of compost, leaf mold, or straw (1/2 inch) on top of a disc adds aesthetic appeal while providing additional insulation. This top dressing also shelters the disc from UV degradation, extending its life by 1-2 weeks. For woody perennials, consider placing a paper pulp disc under a decorative stone mulch—this provides weed suppression while the stones prevent the disc from blowing away and create a permanent, attractive finish.
The Future of Sustainable Weed Control
The paper pulp weed disc category continues evolving rapidly, with 2026 bringing exciting innovations that expand capabilities beyond simple weed blocking.
Innovations on the Horizon for 2026
Smart discs embedded with non-toxic, water-activated dyes that indicate moisture levels are entering the market—the disc changes color when soil beneath is adequately watered. Another breakthrough involves discs impregnated with beneficial nematodes that activate as the disc degrades, providing biological control of soil-dwelling pests. Perhaps most promising are discs with variable density zones—denser around edges for weed suppression, more porous near the center for enhanced water penetration to the main plant’s root zone. These targeted designs reflect growing sophistication in understanding container microenvironments.
Integration with Smart Gardening Systems
As container gardening becomes increasingly automated, paper pulp discs are adapting to work with moisture sensors, automated irrigation, and even robotic weeders. Thin sensor-compatible discs allow probes to penetrate easily without tearing the barrier. Some manufacturers now produce discs with embedded RFID tags that track decomposition progress, sending notifications to your smartphone when replacement is due. This integration positions paper pulp discs not as low-tech alternatives, but as compatible components in high-tech gardening ecosystems.
Frequently Asked Questions
How long do recycled paper pulp weed discs actually last in container gardens?
Most quality discs last 4-6 months under typical container conditions, though this varies significantly. Warm, moist climates accelerate decomposition to 3-4 months, while cool, dry conditions can extend lifespan to 7-8 months. Thicker discs (5-6mm) generally outlast thin ones by 6-8 weeks. Monitor for visible thinning and increased weed breakthrough as your signal for replacement.
Can I use these discs in containers with seeds I’ve planted directly?
Yes, but timing is crucial. For direct seeding, wait until seedlings have developed their first true leaves and are 2-3 inches tall. Then carefully cut an X-shaped slit in the disc and place it around the established seedling. This prevents the disc from smothering germinating seeds while still providing weed suppression as plants mature. Some gardeners pre-cut discs with small holes for expected seedlings, but this requires precise planning.
Are paper pulp discs safe for organic vegetable production?
Absolutely, provided you select OMRI-listed products certified for organic use. Avoid discs with synthetic binding agents, chemical dyes, or unknown “proprietary additives.” Reputable manufacturers provide complete ingredient transparency. For maximum safety with root crops like carrots and radishes, choose plain, unenhanced discs rather than nutrient-infused versions, as you want to control exactly what contacts your edible roots.
What happens if my disc gets moldy? Is it harmful?
Surface mold is typically harmless saprophytic fungi breaking down cellulose, not plant pathogens. It indicates active decomposition and healthy soil biology. However, if you notice slimy mold with foul odor, this suggests poor drainage and anaerobic conditions—address container drainage rather than discarding the disc. For aesthetic concerns, gently brush off surface mold or top-dress with a thin layer of dry compost.
Can I compost the disc remnants at season’s end?
Yes, any remaining disc material is fully compostable and makes an excellent “green” nitrogen source for your compost pile. Break up larger pieces to accelerate decomposition. If you’ve used the disc with container soil showing disease issues, hot compost at 140-160°F to sterilize potential pathogens. Otherwise, simply mix remnants into your compost bin as you would any other paper product.
Do these discs work for perennial container plants?
They work excellently but require a different approach. Use thicker, denser discs that last 5-6 months, and plan to replace them annually in spring. For woody perennials, consider a permanent solution: place a heavy-duty paper pulp disc under 1-2 inches of gravel or decorative stone. The stone protects the disc and creates a long-lasting, attractive mulch that suppresses weeds for multiple seasons while allowing water penetration.
How do I handle containers with multiple plants in one pot?
Customize a sheet-style disc by cutting it to fit your container shape, then create individual planting holes exactly where each plant sits. Space holes according to mature plant size, not seedling size. For closely planted arrangements like herb bowls, use a solid disc and create planting holes with a bulb planter after installation. This approach maintains maximum weed suppression between plants while accommodating dense plantings.
Will these discs attract rodents or insects to my containers?
Properly manufactured discs don’t attract pests. However, if you have existing rodent issues, avoid nutrient-infused discs with fish or bone meal additives that might interest animals. The paper itself is unappealing to most pests. Some gardeners report increased earthworm activity—a beneficial outcome—as worms are attracted to the moist, organic environment beneath the disc. If ants become problematic, they’re likely attracted to the moisture, not the disc; adjust watering practices.
Can I use paper pulp discs indoors for houseplant containers?
Indoor use is generally unnecessary unless you’re battling fungus gnats, which breed in moist soil surfaces. In that case, discs can help by drying out the top layer. However, indoor conditions slow decomposition dramatically, and you may need to remove the disc manually after 6-8 months. Ensure excellent drainage, as indoor pots without evaporation can become waterlogged beneath discs. For most houseplants, a thin layer of decorative stones serves the same purpose more attractively.
How do paper pulp discs compare cost-wise to other weed control methods?
Over a single season, paper pulp discs cost 40-60% less than organic herbicide applications and 70% less than quality synthetic mulches when factoring in disposal fees. Compared to hand-weeding, the time savings alone justify the minimal expense. A typical container garden with 10 pots requires $15-25 worth of discs annually, versus $40-60 for organic herbicides or 15-20 hours of labor for manual weeding. The math becomes even more favorable when you include water savings and soil amendment value.