Picture this: It’s 8 PM on a summer evening, the air is finally cooling, and your half-court is calling your name. But as soon as you step out, you’re squinting at shadows, losing the ball in dark corners, and hoping that last layup doesn’t end with a twisted ankle. Sound familiar? You’re not alone. Every serious backyard baller knows that the difference between a good game and a great one often comes down to one critical factor: lighting that actually performs.
As we look toward 2026, the landscape of high-lumen flood lighting has evolved dramatically. LED technology is smarter, more efficient, and more accessible than ever before. Whether you’re upgrading a community court, illuminating a residential driveway setup, or planning a small recreational facility, understanding what makes a flood light truly “court-ready” will save you money, frustration, and potentially a trip to the ER. This guide breaks down everything you need to know—from lumens and beam angles to smart controls and code compliance—so you can make an informed decision without getting blinded by marketing hype.
Top 10 High-Lumen Flood Lights for Half-Court Basketball
Detailed Product Reviews
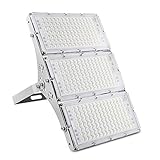
1. OPENLUX 300W LED Stadium Light Flood Light LED Tennis Court Lights ETL Listed 42000LM 5000K IP65 Waterproof Basketball Court Lights Outdoor AC 100-277V

Overview: The OPENLUX 300W LED Stadium Light delivers professional-grade illumination with an impressive 42,000-lumen output at 5000K color temperature. ETL-listed for safety and quality, this IP65-rated fixture is engineered for large outdoor venues, sports courts, and commercial applications requiring reliable, high-intensity lighting.
What Makes It Stand Out: This fixture’s exceptional brightness-to-power ratio stands out, achieving 42,000 lumens while consuming just 300W—an 80% energy reduction versus traditional lighting. The versatile 180-degree adjustable mounting bracket enables ceiling, wall, pole, or ground installation. Its 5-year warranty and 50,000-hour lifespan demonstrate manufacturer confidence.
Value for Money: At $149.99, this light occupies the mid-range price point but delivers premium performance. The energy savings alone can recoup the investment within 1-2 years for commercial users. Compared to metal halide alternatives requiring frequent bulb changes, the 10-20 year operational life eliminates maintenance costs, making it economically compelling.
Strengths and Weaknesses: Strengths:
- Outstanding 42,000-lumen output for professional applications
- ETL certification ensures electrical safety and code compliance
- Excellent heat dissipation for extended 50,000-hour lifespan
- IP65 waterproof rating handles harsh weather reliably
- Flexible installation options with adjustable bracket
Weaknesses:
- 90-degree beam angle may require multiple units for very wide areas
- 5000K color temperature might feel clinical for residential settings
- Higher initial investment than budget floodlights
Bottom Line: Ideal for sports facilities, commercial spaces, and large properties needing certified, high-performance lighting. The OPENLUX justifies its price through energy savings, durability, and professional-grade brightness.
2. CHARON 300W LED Flood Light, 24000LM Super Bright Outdoor Security Lights with Wider Lighting Angle, 6000K Daylight White, IP66 Waterproof Outdoor Lighting for Garage, Garden, Lawn, Yard, Parking Lot
Overview: The CHARON 300W LED Flood Light offers robust security illumination with 24,000 lumens of 6000K daylight white light. Designed for residential and light commercial use, this IP66-rated fixture provides reliable outdoor lighting for garages, yards, parking areas, and entryways with enhanced weather protection.
What Makes It Stand Out: This unit’s exceptional affordability combined with flexible positioning makes it highly practical. The bracket pivots 160 degrees side-to-side and 180 degrees vertically, allowing precise light direction without disturbing neighbors. Its IP66 rating exceeds many competitors, offering superior dust and water resistance for demanding environments.
Value for Money: At just $67.99, this floodlight delivers remarkable bang for your buck. The 85% energy savings and 50,000-hour lifespan eliminate frequent replacement costs. While output is lower than premium models, the price-to-performance ratio is outstanding for homeowners seeking reliable security lighting without professional-grade intensity.
Strengths and Weaknesses: Strengths:
- Extremely competitive pricing for budget-conscious buyers
- Superior IP66 waterproof rating for harsh conditions
- Highly adjustable mounting bracket for customizable coverage
- Efficient heat dissipation through die-cast aluminum housing
- 85% electricity reduction lowers operational costs
Weaknesses:
- 24,000 lumens may be insufficient for large commercial spaces
- 6000K color temperature can appear harsh and overly cool
- 24-month warranty is shorter than premium alternatives
- No certification mentioned (ETL/DLC)
Bottom Line: Perfect for residential security and modest commercial applications where value and weather resistance matter most. The CHARON delivers reliable performance at an accessible price point.
3. JAYNLT Y-9800W Solar Street Lights Outdoor, 750000LM 6500K High Powered Commercial Parking Lot Lights Dusk to Dawn, Waterproof Solar Security Flood Lamps with Remote for Driveways, Basketball Courts

Overview: The JAYNLT Y-9800W is a high-end solar-powered street light claiming an extraordinary 750,000-lumen output at 6500K. This self-contained system features a massive 50,000mAh battery and IP67-rated aluminum construction, designed for large commercial parking lots, courts, and driveways requiring off-grid illumination.
What Makes It Stand Out: Zero electricity costs and complete installation freedom distinguish this solar unit. The remote control offers 10 brightness levels and 3/5/8-hour timing modes, while the battery indicator displays real-time charge status. The wide-angle illumination reportedly covers 3,500 square feet without wiring constraints.
Value for Money: At $375.99, this premium solar light eliminates ongoing electricity expenses, potentially saving hundreds annually. For remote locations where trenching power lines is cost-prohibitive, it offers compelling value. However, the advertised lumen output appears inflated compared to industry standards for similar wattage.
Strengths and Weaknesses: Strengths:
- Complete energy independence with zero utility costs
- IP67 waterproof rating and aluminum construction ensure durability
- Intelligent remote control with multiple modes and timing
- Battery indicator provides useful status monitoring
- No electrical wiring required for flexible placement
Weaknesses:
- Extremely high upfront cost compared to grid-powered alternatives
- 750,000-lumen claim is likely exaggerated and unverified
- Performance depends entirely on adequate solar exposure
- Bulky design may not suit aesthetic-conscious installations
Bottom Line: Best suited for off-grid commercial applications where electrical access is impractical. Verify actual lumen output before purchase, but the solar convenience and energy savings justify the investment for specific use cases.
4. JAYNLT Y-6500W Solar Street Lights Outdoor, 650000LM 6500K High Powered Commercial Parking Lot Lights Dusk to Dawn, Waterproof Solar Security Flood Lamps with Remote for Driveways, Basketball Courts

Overview: The JAYNLT Y-6500W solar street light delivers high-powered illumination with a claimed 650,000-lumen output at 6500K color temperature. Featuring a 40,000mAh battery and IP67-rated aluminum housing, this dusk-to-dawn system targets commercial parking lots, courts, and large driveways seeking solar-powered convenience.
What Makes It Stand Out: This model balances solar independence with a more accessible price point than its Y-9800W sibling. The dual control modes include automatic dusk-to-dawn operation and always-on lighting with 10 adjustable brightness levels. The battery indicator helps monitor charging status, while IP67 protection ensures reliable performance in extreme weather.
Value for Money: Priced at $188.99, this unit offers a middle ground between premium solar and grid-powered lights. It eliminates electricity costs while costing half the Y-9800W model. For sun-rich regions, the payback period is reasonable, though the advertised lumen output should be approached with skepticism given typical LED efficiency standards.
Strengths and Weaknesses: Strengths:
- Significant energy savings with no monthly electricity costs
- IP67 waterproof rating withstands harsh environmental conditions
- Versatile remote control with timing and brightness adjustment
- Automatic dusk-to-dawn operation provides hands-free convenience
- Aluminum construction resists corrosion and impact damage
Weaknesses:
- Lumen specifications appear overstated compared to industry norms
- Requires consistent sunlight for optimal performance
- Higher initial investment than conventional LED floodlights
- 40,000mAh battery provides shorter runtime than the Y-9800W
Bottom Line: A practical solar solution for large outdoor spaces with reliable sun exposure. Ideal for users prioritizing energy independence over absolute brightness verification. Offers better value than its higher-powered sibling while maintaining core features.
Why Lighting Is the Unsung MVP of Half-Court Basketball
Lighting does more than just let you see the rim. It fundamentally changes how you play, how safe you feel, and how often you’ll actually use your court after sunset. Poor illumination creates uneven contrast, slows reaction time, and turns a friendly game into a hazard zone. Conversely, professional-grade lighting extends your playing hours, sharpens visual acuity, and transforms your half-court into a legitimate training environment.
The Science of Visibility and Performance
Human eyes don’t just need light—they need the right kind of light. For basketball, where split-second decisions and precise depth perception rule, uniform illumination across the entire playing surface is non-negotiable. Studies in sports vision show that inconsistent lighting can reduce a player’s ability to track a moving ball by up to 30%. That’s the difference between swishing a three and airballing because you lost the rotation in a shadow. High-lumen flood lights designed for sports applications deliver consistent lux levels that keep the ball visible from baseline to free-throw line, ensuring your jump shot is limited only by your skill, not your lighting.
Safety Considerations Beyond Brightness
A well-lit court prevents injuries. Uneven lighting creates glare and dark spots that hide imperfections in the playing surface—potholes, cracks, or debris. For half-court setups, where space is tighter and boundaries are often informal, this becomes even more critical. Proper flood lighting eliminates these hazards by providing shadow-free coverage, reducing the risk of ankle rolls and collisions. Plus, good lighting deters unwanted visitors and gives players confidence to move aggressively without second-guessing their footing.
Understanding Lumens: How Bright Is Bright Enough?
Lumens are the raw measure of light output, but what does that actually mean for your half-court? Most residential flood lights range from 5,000 to 30,000 lumens each, but the magic number depends on your court’s size, mounting height, and how seriously you take your night games.
Calculating Lumens for Half-Court Coverage
A standard half-court is 47 feet by 50 feet (for high school) or 42 feet by 50 feet (for junior high). To achieve recreational-level illumination (30-50 foot-candles), you’ll need roughly 70,000 to 100,000 total lumens distributed across the space. For competitive play, bump that to 75-100 foot-candles, requiring 120,000+ lumens. This typically translates to 2-4 high-output fixtures, not one massive unit. Spreading lumens across multiple lights reduces harsh shadows and creates that professional, uniform glow you see at outdoor facilities.
The Lumen-to-Lux Conversion That Actually Matters
Here’s where many buyers get confused. Lumens measure total light output; lux measures light hitting a surface. A 20,000-lumen fixture mounted at 15 feet delivers far more lux than the same fixture at 25 feet because of the inverse square law. For half-court basketball, aim for 50-75 lux minimum at center court, with no drop-off below 30 lux at the baselines. This means choosing fixtures with precise beam control and calculating mounting height carefully—something we’ll dive into later.
LED Technology: Why It’s the Only Serious Choice in 2026
By 2026, LED technology has rendered HID and halogen lights obsolete for sports applications. The efficiency, longevity, and controllability of modern LEDs make them the undisputed champion for half-court lighting.
Energy Efficiency That Pays for Itself
A traditional 400-watt metal halide might produce 36,000 lumens but burns inefficiently and degrades quickly. A comparable LED uses 150-180 watts to deliver the same output—roughly 60% less energy. For a court running 4 hours nightly, that’s a savings of $200-$400 annually depending on your electricity rates. Over a 10-year lifespan, you’re looking at $2,000+ back in your pocket. LEDs also maintain their brightness; metal halides lose 30-40% of their output within the first 6,000 hours.
Lifespan and Durability in Real-World Conditions
Quality LED flood lights now boast L70 ratings of 100,000+ hours, meaning they’ll retain 70% of their original brightness for over a decade of nightly use. They’re also built for impact resistance—many feature IK08 or IK10 ratings, meaning they can survive a stray ball or branch strike. Unlike fragile HID bulbs, LEDs have no filament or glass envelope to break, making them ideal for outdoor courts exposed to weather, vibrations, and the occasional dunk celebration gone wrong.
Color Temperature: Finding the Sweet Spot for Ballers
Color temperature, measured in Kelvin (K), affects how “white” your light appears. For basketball, this isn’t just aesthetics—it impacts visual clarity and player alertness.
The 5000K-6500K Performance Zone
For half-court basketball, 5000K-5700K is the gold standard. This range mimics daylight, providing crisp contrast between the ball, court lines, and surrounding environment. Anything warmer (3000K-4000K) feels too yellow, dulling the vibrancy of the court and making orange balls harder to track. Anything cooler (6000K+) can feel harsh and clinical, potentially causing eye fatigue during long shooting sessions. Stick to the daylight range for optimal performance.
Why Color Rendering Index (CRI) Matters More Than You Think
CRI measures how accurately light reveals colors compared to natural sunlight. For basketball, a CRI of 80+ is acceptable, but 85+ is ideal. Why? A high CRI ensures you can distinguish the orange ball from a brown court surface, see the subtle markings on your sneakers for footwork drills, and accurately judge the color of the rim against the backboard. Low CRI lighting flattens these details, making your court feel lifeless and harder to read visually.
Beam Angle and Light Distribution: The Geometry of Great Lighting
A 30,000-lumen fixture is useless if it’s blasting light into your neighbor’s bedroom instead of your key. Beam angle determines how that light is shaped and spread.
Narrow vs. Wide Beam Configurations for Half-Courts
For typical mounting heights of 15-25 feet, 60-90 degree beam angles work best. Narrow beams (30-45 degrees) concentrate light intensely but create hot spots and leave dark edges—fine for spotlighting but terrible for sports. Ultra-wide beams (120+ degrees) waste lumens by spilling light beyond the court boundaries. The sweet spot? Use 2-4 fixtures with 60-90 degree beams, positioned at corners or mid-court poles, overlapping their patterns to eliminate shadows.
Eliminating Shadows and Hot Spots Through Smart Positioning
Shadows kill performance. They hide the ball’s rotation and make depth perception unreliable. To achieve shadow-free coverage, mount fixtures at opposite corners or use a four-pole setup with lights at each corner of the half-court. Overlap beam patterns by 30-50% to ensure seamless transitions. Avoid mounting directly behind the backboard—this creates player shadows on the court. Instead, position lights at 30-45 degree angles to the playing surface for even, flattering illumination.
Mounting Strategies: Poles, Walls, and Everything Between
Your mounting choice dictates everything from beam angle to wiring complexity. Each approach has trade-offs in cost, installation difficulty, and light quality.
Pole-Mounted Systems for Maximum Flexibility
Poles give you height, and height is your friend. Mounting lights at 20-25 feet spreads illumination evenly and reduces glare for players. For half-courts, two 20-foot poles positioned at the corners of the free-throw line extended work perfectly. Use square steel or aluminum poles with a minimum 4x4-inch cross-section to resist wind load. Don’t forget about pole anchors—direct-bury poles are cheaper but offer less flexibility than anchor-base systems that allow future adjustments.
Wall-Mounted and Retrofit Solutions
No space for poles? Wall-mounted fixtures on a garage or house can work, but they’re trickier. You’ll need fixtures with asymmetric beam patterns designed to “throw” light outward without creating harsh glare. Mount them at least 15 feet high and use shields to prevent light from hitting windows. Retrofitting existing flood light boxes is possible but often requires upgrading wiring to handle the higher initial surge of LED drivers. Always check amperage ratings—many older circuits can’t handle multiple high-lumen LEDs.
Weatherproofing and IP Ratings: Built to Last
Outdoor lighting faces rain, snow, dust, and temperature swings. An IP (Ingress Protection) rating tells you exactly how tough your fixture is.
Decoding IP65, IP66, and IP67 for Court Lighting
For most climates, IP65 is the minimum—dust-tight and protected against water jets from any direction. IP66 handles more powerful water jets, ideal for areas with heavy rain or pressure washing. IP67 means the fixture can survive temporary immersion, which is overkill unless your court floods regularly. The key is the “6”—the first digit indicates dust protection, and you absolutely need a 6 for outdoor sports lighting. Anything lower will fail within a year.
Coastal and Extreme Climate Adaptations
Living near the ocean? Salt spray corrodes standard aluminum housings. Look for marine-grade powder coating or 316 stainless steel hardware. For extreme cold (below -20°F), ensure the LED driver is rated for low-temperature startup. Some budget fixtures fail to ignite in freezing weather. In hot climates (above 120°F), check the maximum ambient temperature rating—overheating drivers will shut down mid-game, leaving you in the dark.
Smart Features and Controls: Lighting That Thinks
2026’s flood lights are more than dumb bulbs on a timer. Smart features save energy, extend lifespan, and add convenience.
Motion Sensors and Timers for Efficiency
Passive infrared (PIR) sensors can activate lights when someone steps onto the court, then dim to 20% brightness after 10 minutes of inactivity. This cuts energy use by 40-60% compared to running full blast all evening. For serious players, look for sensors with adjustable range (up to 60 feet) and time delays to avoid mid-game blackouts. Timers are simpler but less flexible—great for scheduled practice sessions but wasteful if you forget to adjust for daylight saving time.
Dimmability and App Integration
Dimmable LEDs let you scale brightness for different activities: full power for games, 50% for shooting practice, 20% for casual hangouts. App-controlled systems via Bluetooth or Wi-Fi allow on-the-fly adjustments, scheduling, and energy monitoring. Some advanced systems even let you create “scenes”—a warm-up mode with 60% brightness, a game mode at 100%, and a cool-down mode at 30%. Just ensure your fixtures use a reliable protocol like Zigbee or Matter, not proprietary apps that’ll be obsolete in two years.
Power Supply and Electrical Requirements: What Your Circuit Can Handle
High-lumen LEDs draw serious power, and underestimating electrical needs is the fastest way to a tripped breaker—or a fire hazard.
Voltage Compatibility and Driver Quality
Most residential LED flood lights run on 120V AC, but commercial-grade units may require 208V, 240V, or even 277V. Check your panel before buying. The driver is the heart of the fixture—look for constant-current drivers with surge protection up to 10kV. Cheap drivers fail within 2-3 years, often taking the LEDs with them. Quality drivers have electrolytic capacitors rated for 105°C and offer power factor correction (PFC) above 0.95, reducing harmonic distortion on your electrical system.
Solar vs. Grid-Powered: The Off-Grid Dream
Solar-powered flood lights have improved, but they’re still not viable for high-lumen sports lighting. A single 20,000-lumen solar fixture would need a 300-watt panel and a massive battery bank—impractical for most installations. Grid-tied systems remain the only reliable option for consistent, high-output illumination. However, solar can supplement lower-lumen perimeter lighting or run a separate security light system. Don’t let eco-marketing fool you into under-lighting your court.
Glare Reduction and Light Pollution: Being a Good Neighbor
Great lighting shouldn’t come at the expense of your relationship with neighbors or the night sky. Poorly aimed floods are a nuisance.
Shielding and Cutoff Designs
Full cutoff fixtures direct 100% of light downward, eliminating upward spill. For half-courts, semi-cutoff designs with side shields are often better—they prevent light from hitting adjacent properties while allowing some upward illumination for ambiance. Look for fixtures with adjustable shields or built-in baffles. The goal is to keep light within your property lines while maintaining uniform court coverage. A simple test: stand at your property line during operation. If you’re squinting, you need better shielding.
Navigating Dark Sky Ordinances
Many municipalities now enforce dark sky regulations limiting lumens per acre and requiring shielded fixtures. Check local codes before installation—violations can mean fines and forced removal. The International Dark-Sky Association (IDA) certifies fixtures that meet strict standards. While certification isn’t always required, choosing IDA-compliant lights future-proofs your investment and often qualifies for utility rebates. Plus, it’s the right thing to do for preserving nighttime visibility in your community.
Budgeting for Quality: The Real Cost of Cheap Lights
Sticker shock is real, but the cheapest option almost always costs more long-term. Understanding the true cost breakdown helps you invest wisely.
Initial Investment vs. 10-Year Ownership Costs
A budget 20,000-lumen LED might cost $150, while a professional-grade unit runs $400+. But factor in lifespan (15,000 vs. 100,000 hours), energy efficiency (180W vs. 150W), and replacement costs, and the premium fixture saves $600-$800 over a decade. Add in potential downtime and installation labor for premature failures, and cheap lights become very expensive. Budget $800-$1,500 per fixture for quality units, plus $500-$1,000 for poles and installation per light.
Warranty Red Flags and Support Quality
A 5-year warranty is standard; 10 years is excellent. But read the fine print—many warranties prorate after year three or exclude “acts of God” like lightning strikes. Look for pass-through warranties where the manufacturer covers both fixture and driver. Also, check support availability: can you actually reach a human? Do they stock replacement parts? A lifetime warranty is worthless if the company disappears in 18 months. Reputable brands offer 24/7 technical support and maintain parts inventory for discontinued models.
Maintenance and Upkeep: Keeping Your Court Game-Ready
Even maintenance-free LEDs need occasional attention. A simple maintenance plan extends lifespan and ensures consistent performance.
Cleaning and Inspection Schedules
Dust, pollen, and bird droppings reduce light output by 10-20% annually. Clean lenses quarterly with a soft brush and mild soap—never pressure wash, as it can damage seals. Inspect housing for cracks, check mounting hardware for rust, and ensure gaskets remain intact. Annual thermal imaging can identify failing drivers before they die completely. This 30-minute routine per fixture prevents costly surprises.
When to Replace vs. Repair
If a fixture dims significantly but still works, the driver is likely failing—replace it for $50-$100 rather than the whole unit. If LEDs are flickering or dead sections appear, the chip array is compromised; replacement is usually more cost-effective than repair. Keep spare drivers on hand—they’re the most common failure point. For fixtures over 7 years old with multiple issues, upgrade to newer, more efficient models rather than sinking money into obsolete technology.
Code Compliance and Permits: Don’t Skip the Paperwork
Installing high-lumen flood lights often triggers permit requirements. Ignoring this can lead to forced removal, fines, or insurance issues.
Local Zoning and Building Codes
Most jurisdictions require electrical permits for any hardwired lighting over a certain wattage (often 600W total). Some areas classify sports lighting as “recreational facilities,” triggering additional setbacks from property lines (often 10-20 feet). Height restrictions may apply—poles over 20 feet sometimes need special approval. Call your local building department before buying anything. A 20-minute conversation can save months of headaches.
Understanding Dark Sky and Light Trespass Laws
Beyond dark sky ordinances, many areas have specific “light trespass” limits, measured in foot-candles at your property line (often 0.1-0.5 fc). You may need to submit a photometric plan showing light levels across your court and neighboring properties. Professional lighting designers can generate these for $200-$500, and they’re often required for permits. DIYers can use free photometric software, but accuracy varies. Either way, compliance is non-negotiable.
Professional Installation vs. DIY: Making the Right Call
You can save thousands installing yourself, but some situations demand a licensed electrician. Knowing the difference protects your wallet and your safety.
When to Absolutely Call a Pro
If you’re running new circuits from your main panel, upgrading service capacity, or installing poles that require concrete footings, hire a licensed electrician. They’ll ensure proper grounding, GFCI protection, and compliance with NEC Article 225 (outside branch circuits). For pole installations, a pro ensures proper wind load calculations and concrete curing—critical for 20+ foot poles that become sails in storms. The $1,500-$3,000 installation cost is cheap insurance against electrocution or a toppled pole.
DIY Success: Skills and Tools You’ll Need
If you’re simply replacing existing fixtures on existing poles or walls, DIY is feasible. You’ll need basic electrical knowledge (how to safely shut off circuits, make watertight connections), a stable ladder or lift, and tools like torque wrenches for proper mounting. Always use weatherproof junction boxes and silicone-filled wire nuts. Test everything with a non-contact voltage tester before touching wires. If you’re not 100% confident, pay for a pro’s consultation—many will review your plan for a small fee.
The Future of Sports Lighting in 2026 and Beyond
Lighting technology moves fast. What’s cutting-edge today is standard tomorrow. Understanding emerging trends helps you buy future-ready equipment.
LiDAR Mapping and Adaptive Illumination
Next-gen systems use LiDAR sensors to map player positions in real-time, dynamically adjusting brightness to follow action while dimming unused areas. This isn’t mainstream yet, but the infrastructure (smart drivers, mesh networks) is already in 2026’s high-end fixtures. Buying fixtures with upgradable firmware and open APIs ensures you can add these features later without a full replacement.
Sustainability and Circularity
Manufacturers are shifting to modular designs where individual LED boards, drivers, and lenses can be replaced separately, reducing waste. Look for fixtures with recyclable aluminum housings and take-back programs. Some companies now offer “lighting as a service”—you pay monthly and they handle maintenance, upgrades, and end-of-life recycling. This model, while new, guarantees you’ll always have cutting-edge, efficient lighting without upfront capital.
Frequently Asked Questions
How many lumens do I really need for a backyard half-court?
For recreational play, aim for 70,000-100,000 total lumens across 2-4 fixtures. Competitive players should target 120,000+ lumens to achieve 75-100 foot-candles uniformly. Remember, it’s better to have slightly more lumens with dimming capability than to under-light and regret it.
Can I mount lights on my house instead of installing poles?
Yes, but it’s trickier. You’ll need asymmetric beam fixtures mounted at least 15 feet high, with proper shielding to avoid glare and light trespass. Wall mounting works best when the house is set back from the court baseline; otherwise, you’ll create harsh shadows and blind players driving toward the wall.
What’s the ideal mounting height for half-court flood lights?
20-25 feet is optimal. Below 15 feet, you’ll get excessive glare and uneven distribution. Above 25 feet, you lose efficiency and may need more powerful (and expensive) fixtures to maintain required lux levels. Two 20-foot poles at the free-throw line extended corners provide ideal geometry.
Do I need a permit to install basketball court lighting?
Almost certainly yes. Most jurisdictions require electrical permits for hardwired fixtures exceeding 600W total. Many also have zoning restrictions on pole height and light trespass. Check with your local building department before purchasing—requirements vary widely, and violations can be expensive.
How do I prevent light from bothering my neighbors?
Use full cutoff or semi-cutoff fixtures with side shields, aim beams precisely within your property, and consider lower lumen packages with more fixtures for better control. A photometric plan helps ensure compliance with local light trespass ordinances (typically 0.1-0.5 foot-candles at the property line).
Are solar-powered flood lights viable for basketball courts?
Not for high-lumen applications. Solar can’t reliably generate the 150+ watts needed per fixture for sports-level brightness. Grid-tied power remains the only practical option for consistent, high-output lighting. Solar works for low-level perimeter or security lighting only.
What’s the difference between IP65 and IP67?
Both are dust-tight (the “6”), but IP65 handles water jets while IP67 survives temporary immersion. For basketball courts, IP65 is sufficient and more cost-effective. IP67 is overkill unless your court experiences flooding. Focus on the first digit—always demand a 6 for outdoor use.
Can I dim LED flood lights without flickering?
Yes, if you use compatible drivers and dimmers. Look for fixtures with 0-10V dimming or DALI protocols. Avoid TRIAC dimmers designed for incandescents—they cause flicker and shorten LED lifespan. Quality drivers maintain flicker-free operation down to 10% brightness.
How often should I clean my flood light lenses?
Quarterly cleaning maintains optimal output. Dust and pollen can reduce brightness by 10-20% annually. Use a soft brush and mild soap; never pressure wash. Inspect seals and gaskets during cleaning to catch potential water intrusion before it damages the driver.
What’s the most common failure point in LED flood lights?
The driver. It’s the electronic component that converts AC to DC power for the LEDs. Drivers typically fail before the LEDs themselves, especially in extreme temperatures. Choose fixtures with replaceable, high-quality drivers (rated for 105°C capacitors) and keep a spare on hand for quick swaps.