Your pristine white vinyl fence looked perfect when it was first installed, but years of sun, weather, and maybe a little boredom have left you craving something more vibrant. Perhaps you’re staring at your neighbor’s bold burgundy fencing and wondering if your own yard could use a similar splash of personality. The good news? Transforming your vinyl fence from bland to brilliant is absolutely achievable—with the right knowledge and materials. Painting vinyl fencing isn’t just about aesthetics; it’s about extending the life of your investment while expressing your unique style.
Unlike wood or metal, vinyl presents unique challenges and opportunities when it comes to painting. The wrong product will peel within months, while the right formulation can last for years, maintaining its color and protecting the substrate beneath. This comprehensive guide walks you through everything you need to know about selecting and applying the best vinyl fence paint, ensuring your colorful fencing and edging project becomes a long-lasting success story rather than a cautionary tale.
Top 10 Vinyl Fence Paint for Colorful Fencing
Detailed Product Reviews
1. Barrette 4 Oz Vinyl Fence Cement White

Overview: The Barrette 4 Oz Vinyl Fence Cement is a specialized adhesive designed specifically for securing decorative post caps to vinyl fence posts. This small-but-mighty tube contains enough product to attach approximately ten post tops, making it ideal for focused fence finishing projects.
What Makes It Stand Out: Unlike general-purpose adhesives, this cement is formulated to bond specifically with vinyl materials while maintaining a clean white finish that matches standard vinyl fencing. The precision application ensures minimal mess, and the color-matched formula eliminates unsightly yellowing or discoloration over time.
Value for Money: At $26.86 for 4 ounces, this is a premium-priced specialty product. However, for homeowners invested in maintaining their vinyl fence’s aesthetic integrity, it’s worth the cost. Generic construction adhesives may be cheaper but can discolor or fail to bond properly with vinyl, potentially leading to costly replacements.
Strengths and Weaknesses: Strengths include its vinyl-specific formulation, clean white color match, and adequate quantity for small to medium projects. Weaknesses are its limited versatility—it’s not suitable for other materials—and relatively high price per ounce compared to multi-purpose alternatives.
Bottom Line: Perfect for DIY fence installers or homeowners replacing post caps. If you’re only securing a few vinyl post tops and want a professional, long-lasting finish, this specialized cement justifies its premium price. For larger projects or mixed-material jobs, consider a more versatile PVC adhesive instead.
2. America’s Fence Store PVC Glue 6 Ounces – Waterproof Adhesive for Building Vinyl Fences, Decks, and Railings – Glues Vinyl Parts Together

Overview: America’s Fence Store PVC Glue is a professional-grade waterproof adhesive engineered for constructing and repairing vinyl fences, decks, and railings. This versatile 8-ounce tube delivers high-strength bonding power specifically formulated for PVC materials, making it essential for both new installations and maintenance projects.
What Makes It Stand Out: The anti-UV solvent formula prevents yellowing and fading, ensuring the adhesive remains invisible on white PVC even after years of sun exposure. The precision nozzler enables controlled application, while the screw-on cap preserves unused product for multiple projects. Its versatility extends beyond fencing to decks and railings.
Value for Money: Priced at $30.99, this glue sits in the mid-range for specialty adhesives. The 8-ounce quantity provides enough material for numerous caps and small repairs, and the resealable design maximizes value. Compared to the Barrette cement, it offers greater versatility at a similar price point, making it more economical for varied projects.
Strengths and Weaknesses: Strengths include waterproof performance, UV resistance, multi-surface PVC compatibility, and the resealable tube. Weaknesses involve its specialization—it’s ineffective on non-PVC materials—and the fact that casual users might find it excessive for attaching just one or two post caps.
Bottom Line: An excellent choice for homeowners undertaking comprehensive vinyl exterior projects. Contractors and serious DIYers will appreciate its professional-grade formulation and versatility. For single-cap repairs, a smaller tube might be more economical, but this remains the superior all-around PVC adhesive.
3. Majic Paints 8-0046-1 Latex Flat Barn & Fence Paint, 1-Gallon, White
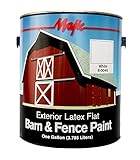
Overview: Majic Paints Latex Flat Barn & Fence Paint is a robust exterior coating designed for large-scale outdoor projects. This one-gallon container provides premium protection for wood, masonry, brick, and metal surfaces, delivering exceptional weather resistance with a clean, flat white finish.
What Makes It Stand Out: The formula’s outstanding UV and fade resistance ensures long-lasting color retention despite harsh sun exposure. Its bug-free drying property—setting in just 30 minutes—prevents insects from embedding in the fresh paint, a common problem with outdoor applications. With coverage up to 250 square feet per gallon, it efficiently handles substantial fencing projects.
Value for Money: At $31.85 per gallon, this paint offers remarkable value for extensive projects. The cost per square foot is approximately $0.13, competitive with premium exterior paints. The time-saving quick-dry formula and superior hiding power reduce labor costs and the need for multiple coats, making it economical for barns, fences, and exterior structures.
Strengths and Weaknesses: Strengths include multi-surface versatility, excellent weather resistance, rapid bug-free drying, and high coverage rate. Weaknesses are the limited flat finish option—no gloss or semi-gloss variants—and potential inadequate coverage on highly porous surfaces requiring additional coats.
Bottom Line: Ideal for property owners with extensive fencing or barn painting needs. The quick-drying, durable formula makes it perfect for large outdoor projects where time and longevity matter. For small touch-ups, consider a quart size, but for comprehensive coverage, this gallon delivers exceptional performance and value.
4. LYWYGG 7x5ft Colorful Rustic Wood Fence Wall Texture Easter Photography Backdrops Paint Child Baby Shower Birthday Party Background CP-146

Overview: The LYWYGG 7x5ft Colorful Rustic Wood Fence Backdrop is a lightweight vinyl photography background featuring a photorealistic rustic wood fence design. Measuring 2.1m x 1.5m, this thin, digitally-printed backdrop is designed for easy handling during photo shoots, parties, and home decoration applications.
What Makes It Stand Out: This backdrop delivers remarkable visual authenticity at an incredibly low price point. The high-definition digital printing captures wood grain details and weathered textures with lifelike accuracy. Its collapsible, wrinkle-resistant design stores compactly, while the non-reflective surface ensures professional-quality photos without harsh glare or hotspots.
Value for Money: At $12.99, this backdrop represents exceptional affordability. Comparable fabric backdrops cost 2-3 times more, making this an accessible option for amateur photographers, parents planning birthday parties, or anyone seeking temporary decorative wall coverage. The reusable nature further enhances its cost-effectiveness for occasional use.
Strengths and Weaknesses: Strengths include unbeatable price, realistic print quality, lightweight portability, and versatile applications from photography to party decor. Weaknesses involve the thin vinyl material, which can appear less premium up close, and persistent folding creases that may require steaming or hanging to remove before use.
Bottom Line: An outstanding budget solution for casual photographers and event planners. While professional studios may prefer heavier-duty alternatives, this backdrop excels for children’s parties, baby showers, and social media content creation. For the price, its performance and versatility are hard to beat.
5. LYWYGG 8x6ft Colorful Rustic Wood Fence Wall Texture Easter Photography Backdrops Paint Child Baby Shower Birthday Party Background CP-146-0806
Overview: The LYWYGG 8x6ft Colorful Rustic Wood Fence Backdrop is the larger sibling of the 7x5ft version, offering expanded coverage for bigger spaces and group photography. At 2.4m x 1.8m, this thin vinyl backdrop maintains the same high-definition rustic wood fence design while providing 60% more surface area for enhanced versatility.
What Makes It Stand Out: This size upgrade accommodates full-body portraits, larger party groups, and more ambitious decorative installations without sacrificing the impressive print quality. The seamless construction ensures no visible joints interrupt the realistic wood texture, while the lightweight material remains easy to hang using simple clamps or tape.
Value for Money: Priced at $24.99, this larger backdrop commands a 92% price premium over the 7x5ft version while offering only 60% more area. The cost per square foot is less economical, but for users who genuinely need the extra space, the convenience outweighs the relative expense. It eliminates the need to stitch multiple backdrops together for larger scenes.
Strengths and Weaknesses: Strengths include generous coverage area, consistent print quality, versatility for bigger projects, and manageable weight. Weaknesses mirror the smaller version: thin material feels less durable, folding creases require preparation to remove, and the price jump may not justify the size increase for solo portraits or small gatherings.
Bottom Line: Choose this larger size only if your projects regularly demand extra coverage. For individual headshots or small parties, the 7x5ft version offers better value. However, for event photographers, larger families, or those wanting more decorative impact, this backdrop provides the necessary scale while maintaining the same quality and convenience.
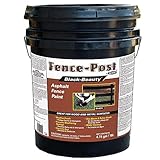
6. Gardner-Gibson 9005-GA 5GAL Fence Post Paint, 608 Fl Oz (Pack of 1), Black
Overview:
Gardner-Gibson’s 9005-GA is a heavy-duty 5-gallon black paint engineered specifically for fence posts but versatile enough for multiple surfaces. This water-based coating protects wood fences from rot and decay while serving as an anti-corrosive barrier for metal pipes, storage tanks, and vertical masonry. With 608 fluid ounces in a single container, it’s designed for substantial outdoor projects where durability and uniform coverage are paramount.
What Makes It Stand Out:
The sheer volume sets this apart—most fence paints come in 1-gallon cans, forcing multiple purchases for large properties. Its multi-substrate formulation eliminates the need for separate wood and metal primers, streamlining application. The anti-corrosive additives provide industrial-grade protection typically found in specialized marine paints, not residential fence products. The deep black finish offers UV resistance and creates a classic, uniform aesthetic that hides imperfections in weathered wood.
Value for Money:
At $0.10 per fluid ounce ($65.99 total), this represents exceptional bulk savings compared to standard $25-35 gallon cans. A typical wood fence requires 1-2 gallons per 100 linear feet; this 5-gallon pail covers approximately 1,500-2,000 square feet, making it ideal for large perimeter fences. The preventive rot and corrosion protection extends surface life by 3-5 years versus untreated wood, saving replacement costs that dwarf the paint investment.
Strengths and Weaknesses:
Strengths: Massive quantity for large projects; versatile multi-surface application; superior rot and corrosion prevention; excellent cost-per-ounce value; professional-grade durability
Weaknesses: Impractical for small repairs (excess waste); requires proper storage to prevent skinning; limited color options; may need thinning for spray application; heavy to transport
Bottom Line:
For property owners with extensive fencing or multiple outdoor structures, Gardner-Gibson 9005-GA delivers professional results at a consumer-friendly price. The bulk format and protective qualities make it a smart investment for long-term maintenance. Skip it for touch-ups—this is for serious projects where volume and durability matter.
Why Paint Your Vinyl Fence at All?
Vinyl fencing revolutionized the outdoor living space with its promise of maintenance-free longevity, so the idea of painting it might seem counterintuitive. However, the motivations go far beyond mere vanity. Fading is inevitable—even the highest-quality vinyl will lose its luster after a decade of UV exposure. Painting offers a cost-effective alternative to replacement, allowing you to refresh your property’s appearance for a fraction of the cost of new panels.
Beyond restoration, painting unlocks design possibilities that manufacturers never intended. Want to match your fence to your home’s trim color? Create an ombre effect across different sections? Coordinate with landscaping elements? Paint makes these visions possible. Additionally, a quality paint job adds an extra layer of UV protection, potentially extending your fence’s structural integrity by shielding it from the very radiation that causes brittleness over time.
Understanding Your Vinyl Fence’s Unique Composition
Before you even think about opening a paint can, you need to understand what you’re working with. Vinyl fencing isn’t just plastic—it’s polyvinyl chloride (PVC) combined with specific additives like titanium dioxide for UV resistance, impact modifiers for durability, and acrylic capstock for weatherability. This composition creates a non-porous, smooth surface that repels water but also repels most conventional paints.
The manufacturing process matters too. Virgin vinyl differs from recycled content, and co-extruded fences have a layered structure with different compounds in the core versus the cap layer. This matters because adhesion isn’t just about sticking to the surface—it’s about bonding with a material that naturally wants to shed anything applied to it. The slickness that makes vinyl so easy to clean is the same characteristic that makes it challenging to paint.
The Science Behind Paint Adhesion on Vinyl
Paint adhesion on vinyl operates on principles that differ fundamentally from wood or metal applications. With porous materials, paint penetrates the surface, creating a mechanical bond. Vinyl’s non-porous nature eliminates this mechanism, requiring chemical adhesion instead. This means the paint must remain slightly flexible after curing, moving with the vinyl as it expands and contracts with temperature fluctuations.
Thermal cycling presents the biggest challenge. Your fence can swing from 40°F on a cold morning to 140°F in direct afternoon sun, causing the vinyl to expand and contract significantly. Standard paints cure to a rigid film that can’t accommodate this movement, leading to cracking and delamination. Quality vinyl-specific formulations incorporate elastomeric properties, maintaining elasticity throughout their service life. Understanding this scientific foundation helps you appreciate why specialty products aren’t just marketing—they’re engineering necessities.
Acrylic Latex Paint: The Gold Standard for Vinyl
When contractors talk about painting vinyl, they’re almost always referring to 100% acrylic latex formulations. These water-based paints have revolutionized exterior coating technology, offering the perfect balance of flexibility, durability, and environmental friendliness. The acrylic resins create a breathable film that allows moisture vapor to escape while preventing liquid water intrusion—a critical feature for outdoor applications.
What makes acrylic latex particularly suited for vinyl is its inherent flexibility. The polymer chains in the dried film remain pliable, stretching and compressing with the substrate without losing adhesion. Premium formulations also include advanced UV stabilizers that protect both the paint film and the underlying vinyl from solar degradation. Look for products specifically labeled “vinyl safe” or “for vinyl siding,” as these have been tested for compatibility with PVC substrates.
Epoxy-Based Formulations: When Durability is Paramount
For situations demanding maximum durability, epoxy-modified acrylics offer a compelling alternative. These hybrid formulations combine the flexibility of acrylic latex with the chemical resistance and hardness of epoxy resins. The result is a coating that withstands harsh cleaning chemicals, resists graffiti, and maintains color saturation in extreme climates.
The trade-off comes in application complexity and cost. Epoxy-based paints typically require more precise mixing, have shorter pot lives, and demand stricter surface preparation. They’re also less forgiving during application, showing brush marks more readily if not applied correctly. However, for commercial applications, high-traffic areas, or regions with severe weather patterns, the extended service life—often 12-15 years versus 7-10 for standard acrylics—justifies the additional investment and effort.
Key Features to Evaluate in Vinyl Fence Paint
Selecting the right paint requires evaluating several critical performance characteristics beyond the marketing claims. First, examine the solids content by volume—a higher percentage indicates more pigment and binder relative to solvents, translating to better coverage and durability. Premium exterior paints typically contain 35-45% solids, while bargain options might dip below 25%.
Flexibility rating, often expressed as elongation percentage, tells you how much the paint film can stretch before cracking. For vinyl, you want at least 200% elongation. UV resistance is another non-negotiable; look for paints with UV absorbers and hindered amine light stabilizers (HALS) that prevent both fading and chalking. Finally, consider the gloss level—satin or low-luster finishes tend to hide imperfections better than high-gloss and show less chalking over time.
The Critical Role of Primers in Vinyl Painting
Skipping primer is the single biggest mistake DIYers make when painting vinyl. A dedicated bonding primer isn’t optional—it’s the foundation upon which your entire paint job depends. These specialty primers contain adhesion promoters that chemically etch the vinyl surface, creating microscopic anchor points for the topcoat to grip.
The primer also serves as a uniform base that ensures consistent color and sheen across the entire fence. Without it, you might notice color variation where the underlying vinyl has faded unevenly. Most importantly, primer provides a barrier that prevents plasticizers from migrating out of the vinyl and into the paint, which can cause softening and eventual failure. Apply primer to every square inch of surface, including edges and cut ends, using the manufacturer’s recommended coverage rate—typically 300-400 square feet per gallon.
Surface Preparation: The Non-Negotiable Foundation
Even the world’s best paint will fail if applied to a poorly prepared surface. Start by thoroughly cleaning the fence with a pressure washer set to low pressure (under 1,500 PSI) to avoid damaging the vinyl. Use a specialized vinyl siding cleaner or a mixture of mild detergent and water, working from bottom to top to prevent streaking. Pay special attention to areas with mildew, which requires treatment with a bleach solution.
After cleaning, inspect the fence for chalking—the powdery residue that indicates UV degradation. Perform the tape test: press clear packing tape against the surface and pull it away. If you see a white residue on the tape, you have chalking that must be removed. Use a chalk-removing cleaner or a diluted vinegar solution. Finally, lightly scuff the surface with fine-grit synthetic sanding pads (never steel wool, which can leave rust stains). This mechanical abrasion gives the primer additional bite without damaging the vinyl.
Application Methods: Brush, Roll, or Spray?
Your choice of application method significantly impacts both the final appearance and the paint’s longevity. Brushing offers the best control for detailed work and ensures the paint is worked into the surface, but it’s labor-intensive and can leave brush marks if you’re not experienced. Use high-quality synthetic bristle brushes—nylon or polyester—that won’t absorb water from latex paints.
Rolling covers large flat areas quickly, but standard rollers can create stipple texture and may not adequately coat the grooves common in vinyl fencing. Use foam rollers specifically designed for smooth surfaces, and back-brush immediately after rolling to eliminate bubbles and ensure even distribution. Spraying provides the most uniform finish and fastest coverage, but requires careful masking of surrounding areas and expertise to avoid runs. Airless sprayers with .015-.017 tips work best, applying the paint in thin, overlapping passes while maintaining a wet edge.
Color Theory for Exterior Vinyl Fencing
Color selection for vinyl fencing involves more than personal preference—it requires understanding how colors behave in outdoor environments. Dark colors absorb more heat, which can cause the underlying vinyl to expand beyond its designed tolerances. Most manufacturers recommend staying within a Light Reflectance Value (LRV) of 55 or higher for vinyl to prevent heat distortion. This doesn’t mean you’re limited to pastels, but deep charcoals and blacks require specially formulated heat-reflective paints.
Consider your home’s architecture and surrounding landscape. Cool colors (blues, greens) recede visually, making yards appear larger, while warm colors (reds, oranges) advance, creating a cozier feel. Monochromatic schemes using variations of your home’s trim color create sophisticated cohesion. Don’t forget about the psychological impact—blues evoke calm, greens suggest tranquility, and yellows feel welcoming. Order sample quarts and paint large test panels that you can observe throughout the day as lighting conditions change.
Design Strategies for Fencing & Edging
Transforming your fence from a boundary marker into a design feature requires strategic thinking about color placement and patterns. Two-tone designs—picking out the posts in a contrasting color from the panels—add architectural interest without overwhelming the space. Consider painting the exterior face one color and the interior another, creating different experiences for neighbors versus your private space.
For edging applications where vinyl meets landscaping, use color to create visual transitions. A gradient that shifts from a bold color at ground level to a softer tone at the top can make the fence appear shorter and less imposing. Stenciling patterns or geometric designs on select panels creates focal points. Remember that horizontal stripes can make a fence appear longer, while vertical stripes add height perception. Whatever design you choose, map it out on paper first, and create a detailed plan showing which colors go where.
Expected Lifespan and Maintenance Schedules
A properly executed paint job on vinyl fencing should last 7-12 years, depending on climate, color choice, and paint quality. South-facing fences in intense sun will degrade faster than north-facing installations. Dark colors will show fading more quickly than lighter shades. Establish a maintenance schedule that includes annual cleaning with a garden hose and soft brush to remove dirt and organic growth before it can damage the film.
Inspect your fence each spring and fall for signs of failure: chalking, cracking, or peeling. Catching issues early allows for spot repairs rather than complete repainting. Keep leftover paint properly sealed and stored for touch-ups. Most paint failures start at stress points—corners, edges, and areas where panels meet posts. Pay special attention to these zones during inspections. With proactive maintenance, you can often extend the service life by 30-40% beyond the expected timeframe.
Common Pitfalls That Ruin Vinyl Paint Jobs
Even experienced painters make mistakes when working with vinyl for the first time. Painting in direct sunlight causes the paint to skin over before it can properly level, resulting in visible lap marks and reduced adhesion. The surface temperature of the vinyl should be between 50°F and 85°F during application—use an infrared thermometer to verify, don’t rely on air temperature alone.
Another critical error is applying paint too thickly. Heavy coats may look better initially but cure poorly and are prone to cracking. Two thin coats always outperform one thick coat. Failing to account for thermal expansion joints is another rookie mistake—never paint across expansion gaps, as this will cause the paint to crack when the fence moves. Finally, using interior paint or exterior paint not formulated for vinyl guarantees premature failure. The chemistry simply isn’t compatible.
Environmental and Health Considerations
Modern paint technology has made significant strides in reducing environmental impact, but you still need to make informed choices. Look for low-VOC (volatile organic compounds) or zero-VOC formulations that minimize air pollution and reduce health risks during application. Water-based acrylics inherently have lower VOC levels than solvent-based alternatives, making them the eco-friendly choice for most projects.
Consider the lifecycle impact of your project. Painting extends the life of existing vinyl, keeping it out of landfills—a significant environmental win since PVC isn’t biodegradable. For cleanup, never wash paint down storm drains. Use containment systems and dispose of waste at hazardous material collection facilities. Some manufacturers offer take-back programs for leftover paint. If you’re painting near water features or vegetable gardens, choose products specifically labeled as safe for aquatic environments and food-growing areas.
Budgeting Your Vinyl Fence Painting Project
Cost estimation for vinyl fence painting requires calculating more than just paint and primer. A typical 150-linear-foot privacy fence requires approximately 3-4 gallons of primer and 4-5 gallons of topcoat, depending on coverage rates and the number of coats. Premium vinyl-safe paint runs $50-70 per gallon, while primer costs $40-55 per gallon—substantially more than standard exterior paint, but non-negotiable for quality results.
Factor in preparation materials: pressure washer rental ($75-100/day), specialized cleaners ($20-30), quality brushes and rollers ($50-75), painter’s tape and plastic sheeting ($30-40), and safety equipment ($20-30). If spraying, add $50-100 for rental and additional masking materials. Professional installation typically costs $3-7 per square foot, including preparation. For a DIY project on that 150-foot fence, budget $800-1,200 for materials, plus 20-30 hours of labor. The investment pays dividends in extended fence life and enhanced curb appeal.
Professional Installation vs. DIY: Making the Right Choice
The decision to hire professionals or tackle the project yourself hinges on several factors beyond just budget. DIY painting makes sense for straightforward fences in good condition, where you have time to do proper preparation. The learning curve is manageable, and the satisfaction of transforming your own space is significant. You’ll need basic comfort with ladders, attention to detail, and patience for the multi-day process.
Professional painters bring expertise in surface assessment, access to commercial-grade equipment, and crews that can complete large projects quickly. They’re particularly valuable for complex fences with lattice work, multiple colors, or significant chalking issues. Professionals also carry insurance that protects you if something goes wrong. The break-even point typically occurs around 300-400 square feet of fence surface—below that, DIY usually saves money; above that, professional efficiency often makes the cost difference negligible when you factor in your time.
Warranty Implications You Must Understand
Here’s a critical but often overlooked consideration: painting your vinyl fence almost certainly voids the manufacturer’s warranty. Most vinyl fence warranties explicitly exclude coverage for any alterations, including painting. This means if the fence fails structurally after painting, you’re on your own for replacement costs. However, this doesn’t mean you shouldn’t paint—it means you should time the painting appropriately.
If your fence is relatively new and still under warranty, consider waiting until the warranty period expires before painting. Most warranties run 20-30 years for residential installations, but coverage for appearance issues typically expires much sooner—often after 5-10 years. Once the aesthetic warranty expires, the structural warranty still protects against manufacturing defects, but you’re free to paint without losing valuable coverage. Some paint manufacturers offer their own warranties on the coating, typically 5-10 years, which can provide some peace of mind.
Seasonal Timing for Optimal Results
Timing your project to coincide with optimal weather conditions dramatically improves results. Late spring and early fall typically offer the best combination of moderate temperatures, lower humidity, and reduced precipitation. You want consistent weather with daytime highs between 60°F and 80°F, nighttime lows above 50°F, and relative humidity below 70%.
Avoid painting during pollen season if you have allergies, as airborne particles will stick to wet paint. In humid climates, morning dew can delay start times until surfaces dry completely—often not until late morning. Plan your schedule around weather forecasts, building in buffer days for preparation and unexpected delays. Remember that paint needs time to cure before exposure to rain; even “rain-ready” products require 2-4 hours of dry time. Starting a project when a storm front is moving through is a recipe for disaster.
Troubleshooting Guide for Common Issues
Even perfect preparation can’t prevent every problem. If you notice bubbling shortly after application, it’s typically moisture trapped beneath the paint or painting over a damp surface. Unfortunately, the only fix is to strip the affected area and start over. Alligatoring—a pattern of cracks resembling reptile skin—indicates incompatible layers, usually from painting latex over an oil-based product without proper primer.
Chalking that appears within the first year suggests either using interior paint or a low-quality exterior product. Wash the surface and apply a quality topcoat to encapsulate the failing layer. Peeling at edges often results from inadequate surface prep or missing those areas with primer. For small spots, sand the edges smooth, prime, and touch up. If you’re experiencing poor hide and needing additional coats, the problem is likely low solids content in your paint—unfortunately, the solution is more coats or starting over with better paint.
Frequently Asked Questions
How long does painted vinyl fencing actually last compared to replacing it?
A quality paint job extends your fence’s aesthetic life by 7-12 years at roughly 15-20% of replacement cost. Since vinyl fencing typically lasts 20-30 years structurally, painting at the 10-year mark essentially gives you a brand-new looking fence for the remainder of its functional lifespan, making it a highly economical choice.
Can I paint my dark-colored vinyl fence a lighter color?
Yes, but it requires meticulous preparation and a high-hide primer. Dark vinyl has often absorbed significant heat over its lifetime, potentially making it more brittle. Use a bonding primer with strong opacity to block the underlying color, and expect to apply three thin topcoats rather than two to achieve full coverage and prevent telegraphing of the dark color through the new light paint.
Will painting my vinyl fence make it hotter and cause warping?
This is a valid concern. Dark paints can increase surface temperatures by 40-60°F compared to white vinyl. However, using vinyl-safe paints with appropriate LRV values (55+) and avoiding the darkest colors prevents heat buildup. If you must have a dark color, choose paints specifically formulated with infrared-reflective pigments that stay cooler than traditional formulas.
How do I know if my fence is still paintable or too far gone?
Perform the fingernail test: press your fingernail into an inconspicuous area. If the vinyl feels chalky and leaves a white residue, it’s still paintable with proper cleaning. If it feels brittle and cracks, or if you can push your fingernail through the surface, the vinyl has degraded too much and replacement is the safer option.
What’s the difference between paint for vinyl siding versus vinyl fencing?
Chemically, they’re nearly identical—both require flexible, acrylic latex formulations. The primary difference is marketing and sometimes UV package intensity. Fencing paint may include additional mildewcides since fences experience more ground moisture. Siding paint works perfectly well on fencing, but always verify it’s rated for vertical surfaces and can handle the specific exposure your fence receives.
Can I paint only one side of my vinyl fence?
Technically yes, but it’s not recommended. Uneven painting can create thermal stress differentials, where the painted side expands and contracts differently than the bare side. This can lead to warping over time. If you must paint only one side (often due to neighbor disputes), choose the lightest color possible to minimize heat differential and consider painting the top rail and edges for continuity.
How do I handle the glossy factory finish on my vinyl fence?
That glossy finish is actually a UV-protective capstock layer that must be dulled for paint to adhere. After cleaning, lightly scuff the entire surface with fine-grit sanding pads (220-grit or higher) or a synthetic scrubbing pad. You’re not trying to remove the layer, just create microscopic scratches. Follow with a thorough rinse and ensure the surface is completely dry before priming.
Is spray painting really better than brushing for vinyl fences?
For uniformity and speed, spraying is superior. It delivers a factory-like finish without brush marks and gets paint into grooves and textures more effectively. However, it requires extensive masking, produces more overspray waste, and has a steeper learning curve. For most homeowners, a combination approach works best: spray the main panels and use a brush for posts, edges, and detail work.
What happens if it rains before the paint fully cures?
Most quality exterior paints are rain-ready within 2-4 hours, but this assumes ideal conditions. If rain occurs before the paint has skinned over, you’ll likely see water spotting, streaking, or complete wash-off in heavy downpours. Unfortunately, the only remedy is waiting for everything to dry completely and assessing the damage. Light spotting might be correctable with another coat; significant wash-off requires stripping and restarting that section.
Can I change colors later, or am I stuck with my choice forever?
Vinyl paint is repaintable, but each layer adds thickness and reduces flexibility slightly. You can change colors every 5-7 years without issue, provided the underlying paint is sound. Simply clean thoroughly, scuff the existing paint, and apply a bonding primer before your new color. However, if you notice any peeling or cracking, you must remove the failing paint completely before recoating, as new paint won’t stabilize a deteriorating base.