Creating a gracefully curved retaining wall is one of landscaping’s most visually striking challenges. Unlike straight walls that rely on simple stacking, curves demand precision, foresight, and blocks engineered to handle tension, compression, and the subtle shifts that nature inevitably brings. Whether you’re terracing a sloped backyard, framing a flower bed, or creating a dramatic seating area, the right interlocking retaining wall blocks can mean the difference between a wall that stands for decades and one that begins to fail before the first frost.
But here’s the truth: not all interlocking blocks are created equal when it comes to curves. The block you’d choose for a linear driveway retaining wall might fight you every step of the way when you try to bend it around a fire pit. Understanding the nuanced relationship between block geometry, connection systems, and soil mechanics is essential before you ever break ground. This guide walks you through everything you need to know to select, plan, and install interlocking retaining wall blocks that will make your curved edging project a lasting success.
Top 10 Interlocking Retaining Wall Blocks for Curved Edging
Detailed Product Reviews
1. RTS Home Accents Rock Lock Interlocking Landscape Edging and Border System, Curved Section With Spikes, 2.5 Feet Long (Pack of 4)
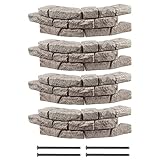
Overview: The RTS Home Accents Rock Lock system delivers premium landscape edging with remarkably realistic stone appearance. This pack includes four interlocking curved sections totaling 10 feet, constructed from high-impact plastic designed to mimic natural rock formations while remaining lightweight and manageable for DIY installation.
What Makes It Stand Out: The system’s authentic rock texture rivals genuine stone, while 18-inch spikes provide exceptional stability against frost heave and ground movement. The interlocking design creates seamless transitions, eliminating gaps that plague lesser systems. Its curved sections naturally accommodate garden beds and tree rings without cutting or modification.
Value for Money: At $321.87 ($80.47 per section), this represents a significant investment. While substantially cheaper than natural stone installation, it’s among the most expensive plastic edging options. The premium pricing is justified by superior durability, realistic aesthetics, and included heavy-duty hardware, though budget-conscious buyers may find better value in alternative systems.
Strengths and Weaknesses: Strengths include outstanding realism, robust weather-resistant construction, excellent stability from long spikes, and seamless interlocking connections. Weaknesses are the high price point, limited 10-foot coverage per pack, and plastic composition that may not satisfy those preferring authentic materials or traditional aesthetics.
Bottom Line: Perfect for homeowners prioritizing aesthetics and professional results. The Rock Lock system commands a premium but delivers exceptional quality and visual appeal that justifies its cost for high-end landscaping projects where appearance is paramount.
2. Landical 8 Pcs Retaining Wall Block Faux Stone Edging for Landscaping, 17 x 13 Inch Garden Border Landscape Edging Blocks Garden Plastic Fence for Mulch Flower Bed Patio Lawn Path Walkway

Overview: Landical’s 8-piece faux stone edging system provides a convenient, digging-free solution for creating crisp garden borders. Each 17x13 inch section features integrated ground stakes, delivering approximately 11.5 linear feet of attractive border coverage with minimal physical exertion required.
What Makes It Stand Out: The revolutionary no-dig installation eliminates traditional landscaping labor, enabling tool-free setup within minutes. Built-in stakes and lightweight construction allow effortless repositioning. Weather-resistant plastic withstands mowers, temperature fluctuations, and seasonal ground movement while maintaining decorative appeal across various applications from flower beds to pathway edging.
Value for Money: At $54.99 for eight pieces (roughly $6.87 per section), this offers exceptional value. The competitive pricing makes professional-looking borders accessible to budget-conscious homeowners. Included stakes and durable construction eliminate hidden costs, providing complete solution value that surpasses basic edging requiring separate hardware purchases.
Strengths and Weaknesses: Strengths include effortless no-dig installation, robust weather-resistant construction, mower-safe design, versatility for driveways and pathways, and remarkable affordability. Weaknesses include less authentic stone appearance than premium alternatives, potential stability concerns in very loose or sandy soils, and possible UV fading over extended periods.
Bottom Line: Perfect for DIY enthusiasts prioritizing convenience and affordability. Landical’s system delivers impressive results with minimal effort, making it ideal for homeowners wanting attractive landscape definition without professional installation expenses or strenuous digging.
3. Landical 4 Pcs Retaining Wall Block Faux Stone Edging for Landscaping, 17 x 13 Inch Garden Border Landscape Edging Blocks Garden Plastic Fence for Mulch Flower Bed Patio Lawn Path Walkway
Overview: This 4-piece version of Landical’s faux stone edging delivers the same convenient, digging-free solution in a compact package ideal for smaller projects. Each 17x13 inch section features integrated ground stakes, providing approximately 5.75 linear feet of attractive border coverage for targeted landscape enhancements.
What Makes It Stand Out: The system’s dig-free installation eliminates traditional landscaping labor, enabling tool-free setup within minutes. Built-in stakes and lightweight construction allow effortless repositioning. Weather-resistant plastic withstands mowers, temperature fluctuations, and seasonal ground movement while maintaining decorative appeal across various applications from flower beds to pathway edging.
Value for Money: At $29.99 ($7.50 per section), this smaller pack maintains solid value, though slightly higher per-unit cost than the 8-piece bundle. It’s perfect for modest projects where bulk purchasing would be wasteful, preventing unnecessary expense while delivering affordable professional aesthetics for targeted landscape enhancements.
Strengths and Weaknesses: Strengths include effortless no-dig installation, robust weather-resistant construction, compact packaging for small-scale projects, and good overall value. Weaknesses include limited coverage per pack, less authentic stone appearance than premium alternatives, potential stability concerns in very loose soils, and possible UV fading over extended periods.
Bottom Line: Perfect for DIY beginners or those with specific small-scale needs. This 4-piece set provides quality and convenience while allowing precise purchasing, making it a smart, economical choice for accent borders and modest garden improvements without commitment to larger quantities.
4. Emsco Group Trim Free Landscape Edging - 10’ of Interlocking Adjustable Brick Sections - Blocks Grass and Weeds - Terra Cotta

Overview: Emsco Group’s Trim Free Landscape Edging delivers a 10-foot system with an innovative flange design that eliminates string trimming. The adjustable brick-pattern sections create upscale slate aesthetics while providing practical weed and grass barrier functionality for low-maintenance landscapes.
What Makes It Stand Out: The patented trim-free flange is genuinely revolutionary, preventing grass encroachment while providing a stable mowing surface that eliminates time-consuming edging work. Sections adjust up to 90 degrees in either direction, offering unparalleled flexibility for creating curves, right angles, and custom contours without cutting or special tools.
Value for Money: At $137.99 for 10 feet, this mid-range priced edging delivers excellent value through labor-saving functionality. The time saved on trimming alone justifies the cost for many homeowners. While pricier than basic options, the professional appearance and maintenance-reducing design provide compelling return on investment.
Strengths and Weaknesses: Strengths include innovative trim-free design, exceptional adjustability, upscale brick appearance, easy no-dig installation, and significant time savings. Weaknesses include limited terra cotta color option that may not suit all landscapes, plastic construction despite premium appearance, and flange effectiveness depends on precise installation and soil conditions.
Bottom Line: Highly recommended for homeowners prioritizing low maintenance. The trim-free feature alone makes this a worthwhile investment for those tired of constant string trimming, delivering professional results while significantly reducing ongoing lawn care time.
5. RTS Home Accents Rock Lock Interlocking Landscape Edging and Border System, Curved Section With Spikes, 2.5 Feet Long (Pack of 2)

Overview: This 2-pack of RTS Home Accents Rock Lock edging delivers the same premium rock appearance as larger sets but in a compact quantity ideal for small projects. Two interlocking curved sections total 5 feet, perfect for modest garden beds, tree rings, or accent borders where only limited coverage is needed.
What Makes It Stand Out: The system’s hyper-realistic stone texture creates authentic natural aesthetics without the weight and cost of genuine stone. The 18-inch spikes provide superior stability uncommon in edging at this tier, preventing frost heave and shifting. The interlocking design ensures seamless connections and professional results even in small applications.
Value for Money: At $162.44 ($81.22 per section), the per-unit cost is slightly higher than the 4-pack, making this less economical for large projects. However, for targeted applications, it prevents over-purchasing waste. The premium pricing reflects quality but may be difficult to justify for minor landscaping needs compared to more affordable alternatives.
Strengths and Weaknesses: Strengths include exceptional realism, robust weather-resistant construction, outstanding stability from long spikes, and seamless interlocking connections. Weaknesses are high per-unit cost, limited 5-foot coverage per pack, and premium pricing that may exceed requirements for small projects. Plastic composition, while durable, may not satisfy all aesthetic preferences.
Bottom Line: Best suited for homeowners needing premium rock aesthetics in small quantities. While quality is undeniable, the high per-unit cost makes this practical only for specific accent applications where larger packs would be wasteful. Consider the 4-pack for better value if additional coverage might be needed.
Why Curved Edging Demands Specialized Interlocking Blocks
Curved walls introduce forces that straight walls simply don’t experience. When you bend a course of blocks, you create tension at the outer edge and compression at the inner edge. Standard rectangular blocks resist this bending, creating gaps in the face or forcing you to cut every single unit. Specialized blocks for curved edging feature tapered sides, offset pinning systems, or flexible connectors that allow natural radius creation without compromising structural integrity. The key is understanding that you’re not just stacking stones—you’re engineering a system that must handle lateral earth pressure while maintaining aesthetic continuity.
Understanding the Anatomy of Interlocking Retaining Wall Blocks
Before diving into curves, master the components. Interlocking blocks typically feature a front face, top and bottom connection points, and sometimes a rear lip or pin system. For curves, pay special attention to the side profile—blocks with slight tapers (often 1-3 degrees) allow convex curves without cutting. The connection mechanism matters enormously: rear-lip systems offer speed but limited flexibility, while pin or clip systems provide adjustable alignment. The core void affects weight and drainage, while the face texture influences shadow lines that become more pronounced on curves. Understanding these elements helps you evaluate whether a block system will accommodate your desired radius or fight against it.
The Physics Behind Curved Wall Stability
Curved retaining walls actually possess a mechanical advantage over straight walls—they’re inherently more stable. The arch effect distributes lateral soil pressure more evenly, converting some of that pressure into compressive force along the curve. However, this advantage only materializes if the blocks interlock correctly. Poor connections create hinge points where the wall can buckle outward. The critical factor is continuous load path: each block must transfer force to its neighbors without interruption. When planning, consider that tighter curves increase stress concentrations at the inner radius, requiring more precise block placement and often a deeper buried base course to counteract overturning moments.
Key Design Considerations for Curved Retaining Walls
Start with your radius measurement. Measure from the center point of your intended curve to the face of the wall—this determines everything else. A 5-foot radius creates very different demands than a 20-foot sweep. Next, consider wall height. Curves amplify the effects of height; a 4-foot tall curved wall behaves more like a 5-foot straight wall in terms of pressure. Tiered curves require offsetting the radius of each tier to maintain visual harmony. Don’t forget access points—curves complicate gate and stair placement. Finally, think about viewing angles: a curve that looks perfect from your patio might appear awkward from the driveway. Create a full-scale layout with garden hoses or spray paint before committing.
Material Options: Pros and Cons for Curved Applications
Concrete segmental blocks dominate the market for good reason—they’re manufactured with precise tapers and consistent dimensions. Wet-cast concrete offers smoother faces and tighter tolerances for premium curves, while dry-cast provides rustic texture at lower cost. Natural stone creates stunning curves but requires expert cutting and fitting; it’s rarely “interlocking” in the modern sense and depends heavily on skilled labor. Composite blocks (recycled materials) offer lightweight handling and flexibility but may lack the mass needed for taller walls. Clay pavers can work for low, decorative curves but don’t provide true interlocking strength. For most DIYers and professionals, engineered concrete blocks with integrated connection systems offer the best balance of performance, aesthetics, and installability for curved applications.
Block Sizing and Scaling for Graceful Curves
Block dimensions directly impact your curve’s smoothness. Large blocks (16+ inches long) create pronounced, segmented curves that read as angular unless your radius is very generous. Medium blocks (12 inches) offer versatility for moderate curves. Small blocks (8-10 inches) allow tight, fluid radii but require more courses for height, increasing labor. Height matters too: taller blocks (8 inches high) speed installation but reduce flexibility; shorter blocks (4-6 inches) give you more adjustment points for smooth curves. The golden ratio? For most residential projects, 12-inch long by 4-inch high blocks provide the sweet spot between efficiency and aesthetic refinement. Always check the manufacturer’s minimum radius specification—this is non-negotiable.
The Importance of Tapered vs. Straight Units
This is where many projects succeed or fail. Tapered blocks have one slightly shorter side (typically 1/2 to 1 inch difference) allowing them to fan out naturally for convex curves. For concave curves, you simply flip them around. The taper angle determines the tightest possible radius—steeper tapers enable tighter curves. Straight units require cutting for any curve, which introduces weak points and labor costs. Some advanced systems offer dual-purpose blocks with score lines that let you break off a tapered section when needed. When evaluating blocks, lay three units in a test curve on flat ground. If you see gaps larger than 1/4 inch at the front face, the taper is insufficient for your design.
Connection Systems: What Makes Blocks Truly Interlock
Not all “interlocking” is equal. Rear-lip blocks have a protrusion that catches the block below—fast but fixed, limiting curve flexibility. Pin systems use fiberglass or plastic pins inserted through holes, allowing rotational adjustment for curves but requiring careful alignment. Clip systems snap together and offer the most adjustability but can be visible from certain angles. Setback systems rely on gravity and friction with a built-in batter (lean) and work well for gentle curves but need geogrid reinforcement for height. For tight curves, pin or clip systems are superior because they let you slightly rotate each block relative to its neighbor, maintaining connection while achieving the desired radius.
Backfill and Drainage: The Hidden Heroes of Curved Walls
Curves complicate drainage because water follows the path of least resistance, often collecting at the inner radius. Free-draining aggregate (3/4-inch clean gravel) is mandatory behind the wall, extending at least 12 inches back. Perforated drain pipe must follow the curve, placed at the base just behind the wall face with a slight slope to daylight. Filter fabric separates your gravel from native soil, preventing clogging. For tight curves, consider vertical drainage columns every 4-6 feet using geocomposite drains. Remember: water pressure increases exponentially with height, and a curved wall with inadequate drainage will bulge at its weakest point, typically the center of the longest curve segment.
Base Preparation: Building on a Solid Foundation
A curved wall’s base must be perfect—there’s no room for error. Excavate a trench that follows your exact radius, making it 6 inches wider than your block depth and 8-12 inches deep (depending on wall height). Compact the native soil with a plate compactor in lifts no thicker than 6 inches. Lay 4-6 inches of crushed stone base (not pea gravel—angular stone locks together) and compact to 95% Standard Proctor density. The critical step: screed your base perfectly level. Use a long, flexible board that can bend to your curve. Even a 1/2-inch dip will telegraph up through every course, creating a wavy top. For long curves, set grade stakes every 2 feet and string a level line to guide your screeding.
Radius Limitations: Understanding Minimum Bend Radius
Every block system has a minimum radius—the tightest curve it can make without cutting or special corner units. This spec is determined by block length and taper angle. For example, a 12-inch block with a 2-degree taper might achieve a 6-foot radius. Attempting tighter curves results in gaps at the front face or disconnection at the back. Convex curves (bulging outward) are typically easier than concave curves (caving inward) because the block faces naturally separate. For concave curves, you may need corner blocks or wedge units to maintain a tight face. Always add 10% to the manufacturer’s stated minimum radius for real-world conditions—subgrade movement and installation tolerances will eat into that spec.
Aesthetic Factors: Texture, Color, and Face Styles
On curves, texture becomes dynamic. Split-face blocks create dramatic shadows that shift as you walk past, emphasizing the curve’s flow. Smooth-face blocks offer a modern, clean look but show imperfections more readily. Tumbled blocks provide a weathered appearance that forgives minor gaps. Color choice impacts visual cohesion: blended colors hide variation between blocks, while solid colors make a bold statement but require careful sorting to avoid banding. Consider face orientation—some blocks have a top and bottom face that must align correctly, while others are reversible. For serpentine walls, alternate the “good” face direction to create a woven pattern that enhances the curve’s natural movement.
Installation Best Practices for Tight Curves
Start from the center of your longest curve and work outward in both directions—this ensures symmetry. Use a radius template made from plywood cut to your exact inner curve; check every third block against it. Dry-lay your first course completely before setting it with adhesive or pins—this lets you adjust the radius perfectly. For extremely tight curves, stagger your vertical joints by at least one-third block length, not just half; this prevents a zipper effect if settlement occurs. Backfill as you go, compacting every 8 inches of lift. Never exceed three courses before adding gravel backfill—the outward pressure from unbalanced soil will push your curve out of alignment. Use a rubber mallet, not a metal hammer, to tap blocks into place without chipping the face.
Common Mistakes That Compromise Curved Walls
Mistake #1: Ignoring the minimum radius spec. This leads to gaps that fill with debris, creating pressure points. Mistake #2: Using a string line for layout. Strings don’t show curves accurately; use a garden hose or spray paint. Mistake #3: Inadequate base compaction. Curves concentrate load; soft spots cause differential settlement that shows as a kink. Mistake #4: Forgetting to account for batter. Each course steps back 1/2 to 1 inch; over 8 courses, your radius shrinks by 8 inches—plan this from the start. Mistake #5: Poor drainage at the curve apex. Water pools here, saturating soil and doubling pressure. Always daylight your drain pipe at the lowest point of the curve, not just at the wall ends.
Maintenance and Longevity Considerations
Curved walls require seasonal inspection. Check the cap stones—they’re the first to shift on a curve because they lack the interlock of lower courses. Reseal caps with construction adhesive if loose. Inspect drainage outlets after fall leaf drop; a clogged pipe turns your wall into a dam. Look for settlement patterns: a dip in the curve’s center suggests base failure, while bulging indicates drainage problems or insufficient block strength. Every three years, examine joint gaps. Expansion and contraction can widen them, allowing weed growth that eventually destabilizes blocks. Fill gaps with polymeric sand designed for wide joints. For walls over 6 feet tall, consider a professional inspection every five years to assess geogrid tension and soil conditions behind the curve.
Cost Factors and Budget Planning
Curved walls cost 20-40% more than straight walls of the same length due to increased labor and material waste. Block cost varies by system: tapered units often command a 15% premium over standard blocks. Labor multipliers: expect 1.5x the time for curves, especially for cutting and fitting. Equipment: you may need a wet saw with a diamond blade for radius cuts ($50-100 rental). Hidden costs: geogrid for tall curves (required every 2-3 courses above 3 feet), additional drainage pipe (you’ll need more footage to follow the curve), and cap stones (often require special corner caps at $8-15 each). DIY savings: handling base prep yourself saves 30% of total cost, but leave tall walls to professionals—the engineering complexity of curved, tall structures isn’t worth the risk.
Environmental and Sustainability Considerations
Modern block manufacturing offers greener choices. Recycled-content blocks use up to 40% post-consumer material without sacrificing strength. Local sourcing reduces transportation emissions—look for manufacturers within 100 miles. Permeable face designs allow water to seep through the wall face, reducing runoff and pressure buildup. For eco-conscious projects, consider dry-stack systems that use no mortar, allowing the wall to be dismantled and reused. Living walls integrate plant pockets into the block face; on curves, these create stunning living sculptures that improve biodiversity. Be aware that light-colored blocks reduce heat island effect but may show stains more readily. Finally, calculate embodied carbon: a curved wall using fewer blocks due to its arch strength may have lower lifetime carbon footprint than a straight wall requiring more material.
Frequently Asked Questions
1. What’s the tightest curve I can build without cutting blocks?
It depends on the block’s taper, but most residential systems achieve a 5-6 foot radius. Check the manufacturer’s spec sheet for “minimum radius without cutting”—this is your starting point. For tighter curves, you’ll need wedge-shaped corner blocks or a different system.
2. Do curved retaining walls need geogrid reinforcement?
Yes, if the wall exceeds 3-4 feet in height. The curve provides some inherent stability, but tall walls generate enormous outward pressure. Geogrid should be placed every 2-3 courses, extending back at least 60% of the wall height into the retained soil.
3. Can I convert a straight wall design to a curve using the same blocks?
Only if the blocks are specifically rated for curves. Standard straight blocks will gap at the front face. You’d need to switch to a tapered system or plan to cut every single block, which compromises structural integrity and is rarely cost-effective.
4. How do I prevent the cap stones from separating on a curve?
Use a high-quality exterior construction adhesive on both the block below and the cap itself. For tight curves, consider using narrower cap pieces (4-6 inches wide) that bend more easily. Some systems offer flexible cap strips specifically for this purpose.
5. Is a curved wall more expensive than a straight wall?
Typically 20-40% more due to increased labor, more complex base preparation, and potential waste from cutting. However, a well-designed curve may require less total length to achieve the same visual enclosure, partially offsetting the cost.
6. What’s the best backfill material for curved walls?
Use 3/4-inch clean crushed stone (no fines) directly behind the wall, extending 12-18 inches back. This provides drainage and reduces pressure. Fill the remaining area with compactable gravel, separated by filter fabric to prevent soil migration.
7. How do I calculate how many blocks I need for a curved wall?
Measure your radius and arc length (the degrees of your curve). Divide the arc length by block length, then add 10-15% for waste and cutting. Most manufacturers offer online calculators—use them, but verify with your own measurements.
8. Can I build a curved retaining wall on a slope?
Yes, but the base must be stepped down with the slope, maintaining level courses. Each step creates a small vertical segment that complicates the curve. This is advanced work; consider hiring a professional for walls over 2 feet tall on slopes.
9. Do I need a permit for a curved retaining wall?
Most municipalities require permits for walls over 3-4 feet tall, regardless of shape. Curves don’t exempt you from engineering requirements. Check local codes—some areas require engineered drawings for any wall over 6 feet, curved or straight.
10. How long do interlocking retaining wall blocks last on curves?
Quality concrete blocks last 50-75 years or more. The curve itself doesn’t reduce lifespan if properly built. Failure usually stems from inadequate drainage or base preparation, not the shape. Properly installed curved walls often outlast straight walls because they handle soil movement better.