Transforming your morning coffee grounds and vegetable peelings into nutrient-dense garden fertilizer might sound like alchemy, but it’s actually one of the most accessible forms of closed-loop sustainability available to modern households. Worm farming—technically known as vermicomposting—has exploded in popularity among eco-conscious homeowners, apartment dwellers, and gardening enthusiasts who recognize that “waste” is simply a resource out of place. The right worm farm starter kit doesn’t just manage your kitchen scraps; it orchestrates a miniature ecosystem that produces what many horticulturists call “black gold”: a microbial-rich soil amendment that can dramatically improve plant health, water retention, and soil structure.
But here’s the challenge: not all worm farm kits are created equal. The market has become saturated with options ranging from budget-friendly plastic bins to premium hardwood systems with sophisticated drainage. Choosing the wrong setup for your specific living situation, climate, or scrap output can lead to frustrated worms, smelly kitchens, and abandoned composting dreams. This comprehensive guide cuts through the marketing noise to examine the essential features, design philosophies, and practical considerations that separate transformative worm farming systems from expensive plastic boxes that’ll gather dust in your garage.
Top 10 Worm Farm Starter Kits for Kitchen Scraps
Detailed Product Reviews
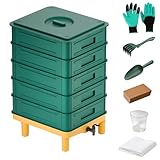
1. Blütezeit 5-Tray Worm Compost Bin, 53QT Outdoor & Indoor Worm Composter with Worm Farm Starter Kits for Home & Kitchen Recycling Food Waste (Gold)

Overview: The Blütezeit 5-Tray Worm Compost Bin delivers a premium 53-quart (50L) vermicomposting solution suitable for indoor and outdoor environments. This gold-colored system targets both beginners and experienced users seeking efficient odor-controlled decomposition through its stackable five-tray design and comprehensive accessory package.
What Makes It Stand Out: The integrated soil meter for tracking moisture, pH, and light levels sets this apart from most competitors. The extensive starter kit—including coco-coir brick, non-woven fabric, turning fork, and spigot for worm tea—provides exceptional out-of-the-box readiness. The distinctive gold finish offers aesthetic appeal rarely seen in functional composting equipment, making it suitable for visible indoor placements.
Value for Money: At $89.99, this represents a mid-to-high range investment. The included soil meter and specialized tools justify the premium over basic $60-70 models. For beginners needing complete equipment, the bundled accessories eliminate separate purchases worth $30-40, effectively making the core composter competitively priced while delivering superior convenience.
Strengths and Weaknesses: Strengths:
- Complete accessory bundle with soil monitoring tools
- Effective odor management through strategic ventilation
- Compact footprint relative to 50L capacity
- Attractive alternative color option Weaknesses:
- Premium pricing may deter budget-conscious buyers
- Gold color shows stains more readily than black plastic
- Worms must be purchased separately
Bottom Line: Ideal for beginners wanting a turnkey solution with professional-grade monitoring capabilities. The accessory value offsets the higher price, making it a smart long-term investment for serious home composters.
2. Outill Worm Farm Kit,Worm Composter for Vermicomposting Starter, Indoor & Outdoor Worm Composter, Worm Compost Bin for Recycling Food Waste (Black,4-Tray 20L)

Overview: The Outill Worm Farm Kit presents a budget-friendly entry point into vermicomposting, though the product specifications contain notable contradictions. The title advertises a 4-tray 20L system, while features claim 65L capacity across three trays—creating uncertainty about actual dimensions and tray count.
What Makes It Stand Out: The aggressive $42.99 price point makes this the most affordable multi-tray system reviewed. The UV-resistant black PP plastic construction provides durability for outdoor exposure. Inclusion of a worm tea faucet adds unexpected value typically reserved for mid-range models, enhancing its appeal for cost-conscious beginners.
Value for Money: If the actual capacity matches the advertised 65L, this offers unmatched cost-per-liter value at under $0.70 per liter. Even at 20L, the price remains competitive. However, specification inconsistencies require buyer verification upon delivery. The limited accessory set (basic tools only) reflects the low price but doesn’t diminish core functionality.
Strengths and Weaknesses: Strengths:
- Exceptionally affordable pricing
- Includes liquid fertilizer collection faucet
- UV-resistant construction for outdoor longevity
- Straightforward stackable design Weaknesses:
- Conflicting capacity and tray specifications
- Minimal included accessories
- Unclear warranty terms and brand support history
Bottom Line: A viable option for budget-restricted beginners willing to accept specification ambiguity. Verify actual capacity immediately upon receipt to determine if this represents an exceptional value or misleading marketing.
3. Blütezeit 3-Tray Worm Composter, 32QT Worm Farm with Compost Worms Starter Kit for Indoor & Outdoor, Worm Composting Bin for Recycling Food Waste (Green)

Overview: The Blütezeit 3-Tray Worm Composter provides a compact 32-quart (30L) solution in an attractive green finish. Designed for smaller households and limited spaces, this system maintains the brand’s emphasis on user-friendliness while offering modular expandability for future growth.
What Makes It Stand Out: The scalable modular design allows users to add trays as composting needs increase, preventing obsolescence. The included soil meter—a feature rare in 3-tray systems—enables precise environmental control. The natural green aesthetic integrates seamlessly into garden settings, distinguishing it from utilitarian black alternatives.
Value for Money: Priced at $76.99, this model costs only $13 less than the 5-tray Blütezeit unit, creating poor price-to-capacity ratio. The 30L capacity suits singles or couples but limits larger families. While accessories add value, budget-conscious buyers should strongly consider the 5-tray version for superior long-term value.
Strengths and Weaknesses: Strengths:
- Expandable tray system grows with user needs
- Includes soil meter and comprehensive tool set
- Effective odor-free operation
- Space-efficient for apartments and balconies Weaknesses:
- Poor value compared to same-brand 5-tray model
- Limited initial capacity for high waste volumes
- Green color may clash with modern interior decor
Bottom Line: Best for small households prioritizing space efficiency over raw capacity. Most buyers should upgrade to the 5-tray model unless space constraints are absolute.
4. 5-Layer Worm Compost Bin, 85L Worm Composter for Indoor & Outdoor, Starter Kits for Vermicomposting Starter, Garden Worm Composting Bin for Recycling Food Waste (Black)
Overview: The TOP XIAN NEW 5-Layer Worm Compost Bin delivers substantial 85L capacity across five trays, targeting serious composters processing significant kitchen waste. This black PP plastic system emphasizes practical functionality with ergonomic features and a no-nonsense approach to vermicomposting.
What Makes It Stand Out: Integrated carrying handles on every tray dramatically improve ergonomics during harvesting—a frequently overlooked convenience. The 85L capacity exceeds most home systems, while the explicit after-sales guarantee demonstrates manufacturer confidence. The straightforward design prioritizes function over frills.
Value for Money: At $72.99 for 85L, this achieves exceptional $0.86 per liter pricing, undercutting competitors while providing 70% more capacity than 50L models. The basic accessory set (gloves, rake, shovel, measuring cup) covers essentials without premium extras. This suits experienced users who own specialized tools and prioritize volume over bundled extras.
Strengths and Weaknesses: Strengths:
- Superior capacity-to-price ratio
- Ergonomic carrying handles on all trays
- Strong after-sales satisfaction guarantee
- Robust 85L capacity for heavy waste producers Weaknesses:
- Lacks advanced accessories like soil meters
- Basic tool quality may disappoint experienced users
- Limited brand recognition and third-party reviews
Bottom Line: A practical, high-volume workhorse for value-focused composters comfortable with basic tools. The capacity and ergonomic design deliver professional-grade utility at a consumer price point.
5. 5-Tray Worm Composter, 85L Outdoor & Indoor Worm Compost Bin with Worm Farm Starter Kits, Vermicomposting for Recycling Food Waste in Garden (Black)

Overview: This 5-Tray Worm Composter combines 85L capacity with innovative design features for efficient decomposition. The system emphasizes hands-free operation through mesh-based worm migration and promotes zero-waste applications, including using excess worms as poultry feed, appealing to homesteaders and sustainable living advocates.
What Makes It Stand Out: The mesh base design enables natural upward worm migration between layers, eliminating manual intervention and optimizing composting efficiency. The manufacturer uniquely markets excess worms as high-protein chicken feed, showcasing creative circular economy thinking. Strategic ventilation holes maintain aerobic conditions while controlling odors.
Value for Money: Priced at $74.99, this matches competitor pricing while offering the desirable mesh migration feature. The 85L capacity and functional design provide strong baseline value, though the vague accessory description leaves exact inclusions unclear. It balances innovation and affordability, sitting comfortably in the mid-range segment.
Strengths and Weaknesses: Strengths:
- Mesh base facilitates efficient worm migration
- Large 85L capacity with expandable 5-tier design
- Dual collection of solid compost and liquid worm tea
- Creative zero-waste applications beyond composting Weaknesses:
- Ambiguous accessory details in product listing
- Unverified brand reputation for long-term durability
- No soil monitoring tools included
- Marketing focus on poultry feed may not appeal to all users
Bottom Line: An excellent choice for gardeners wanting efficient, low-maintenance operation with innovative design features. The mesh base and zero-waste philosophy distinguish it from conventional stackable bins.
6. Blütezeit 5-Tray Worm Compost Bin, 53QT Worm Composter Indoor & Outdoor, Worm Farm Starter Kit for Vermicomposting, Recycling Food Waste (Green)
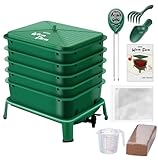
Overview: The Blütezeit 5-Tray Worm Compost Bin is a comprehensive vermicomposting solution designed for serious composters. With a 53-quart capacity spread across five stackable trays, this system transforms kitchen scraps into nutrient-rich compost efficiently. The high-quality PP construction ensures durability for both indoor and outdoor use, while the compact footprint makes it suitable for apartments, balconies, or gardens.
What Makes It Stand Out: This kit distinguishes itself through exceptional completeness. Unlike competitors, it includes a turning fork, shovel, soil meter, non-woven fabric, coco-coir brick, anti-slip feet, and a spigot for harvesting worm tea. The integrated soil meter monitoring moisture, pH, and light levels removes guesswork for beginners. The five-tray system allows for continuous composting—worms migrate upward as they process waste, simplifying harvest from lower trays.
Value for Money: At $89.99, this represents strong value despite being pricier than basic models. Purchasing accessories separately would cost significantly more, and the five-tray design offers 67% more capacity than typical three-tray systems in this price range. The odor-control ventilation system and detailed user manual further justify the premium.
Strengths and Weaknesses: Strengths: Complete accessory kit eliminates additional purchases; five trays enable efficient continuous composting; robust ventilation prevents odors; durable construction; soil meter aids optimal conditions. Weaknesses: Higher price point may deter beginners; worms not included; five trays might be excessive for single-person households; assembly instructions could overwhelm novices.
Bottom Line: Ideal for committed composters seeking a turnkey solution. The Blütezeit kit’s comprehensive accessories and five-tray design justify its premium price, making it a worthwhile investment for households serious about waste reduction.
7. 3-Tray Worm Farm Kit, 65L Worm Composter for Vermicomposting Starter, Indoor & Outdoor Worm Composter, Worm Compost Bin for Recycling Food Waste

Overview: The 3-Tray Worm Farm Kit offers a straightforward, large-capacity solution for vermicomposting enthusiasts. With 65 liters across three stackable trays, this black PP plastic system efficiently processes organic waste while maintaining a compact footprint suitable for indoor or outdoor use. The built-in faucet provides convenient access to nutrient-rich worm tea, a valuable liquid fertilizer for plants.
What Makes It Stand Out: This composter’s primary distinction is its impressive capacity-to-price ratio. The 65-liter volume handles substantial kitchen scraps for families, while the stackable design simplifies waste addition and compost harvesting. The closed system with strategic ventilation minimizes odors, making it viable for apartment dwellers. The durable black plastic accelerates decomposition by absorbing heat, though this may require monitoring in hot climates.
Value for Money: Priced at $59.89, this kit undercuts many competitors while offering 30% more capacity than standard 50-liter models. The inclusion of a faucet and three reusable trays provides essential functionality without unnecessary frills. However, the absence of accessories like bedding material or tools means additional upfront costs.
Strengths and Weaknesses: Strengths: Excellent value for large capacity; effective odor control; sturdy construction; faucet included; suitable for beginners; efficient heat absorption. Weaknesses: Only three trays limit continuous composting efficiency; no accessories included; black color may overheat in direct sunlight; basic design lacks premium features.
Bottom Line: A practical, budget-friendly choice for families wanting serious composting capacity without premium costs. The 3-Tray Worm Farm Kit delivers core functionality effectively, making it ideal for cost-conscious beginners.
8. Worm Farm for Kids Shipped with Live Worms, Food & Book - Worm Farm Kit with Ecosystem, Soil, Mixing Sand, Magnifying Glass & More

Overview: The Worm Farm for Kids is an educational observation kit designed to introduce children to vermicomposting and ecosystem science. This complete package includes 20 live redworms, custom worm food, a 40-page illustrated book, magnifying glass, and all necessary setup materials. The clear observation chamber allows kids to witness worms’ daily activities and decomposition processes firsthand.
What Makes It Stand Out: What truly distinguishes this kit is its focus on experiential learning. The included “We Dig Worms” book provides engaging, age-appropriate information about worm life cycles and environmental importance. The magnifying glass and green mixing sand encourage interactive exploration, while the pre-measured food eliminates guesswork. Shipping live worms ensures immediate engagement, though survival depends on prompt setup.
Value for Money: At $39.99, the value lies in educational content rather than composting volume. The live worms, book, and specialized tools would cost substantially more if purchased separately. This isn’t designed for serious waste management—its small scale processes minimal scraps—but excels as a STEM learning tool.
Strengths and Weaknesses: Strengths: Complete educational package; live worms included; engaging 40-page book; magnifying glass enhances observation; immediate hands-on learning; affordable entry point. Weaknesses: Very limited composting capacity; worms may perish during shipping; not suitable for household waste reduction; single-season interest for some children; requires parental supervision.
Bottom Line: Perfect for parents and educators seeking an interactive biology lesson. This kit prioritizes learning over output, making it an excellent educational investment despite its limited practical composting applications.
9. 2 Packs Inground Worm Composter, Outdoor Worm Farm Compost Bin Kit with Lid for Raised Garden Beds, Reducing Food Waste Composting Systems - with Shovel & Gloves

Overview: The 2-Pack Inground Worm Composter offers a unique approach to vermicomposting by integrating directly with garden beds. This kit includes two 0.7-gallon PVC bins that install directly into soil, allowing worms to move freely between the composter and surrounding garden. The 360-degree ventilation and dual-lid design prevent rainwater entry while maintaining airflow.
What Makes It Stand Out: This system’s standout feature is its passive, continuous fertilization method. Unlike above-ground bins requiring manual compost harvesting, worms distribute nutrients directly into root zones. The anti-corrosive PVC construction withstands outdoor conditions year-round. The included stainless steel shovel and protective gloves facilitate installation, though digging holes is required.
Value for Money: Priced at $26.99 for two units, this represents exceptional value for gardeners. The inground design eliminates odor concerns entirely and requires minimal maintenance once established. However, the small capacity suits only small households or specific garden zones.
Strengths and Weaknesses: Strengths: Direct soil integration maximizes plant benefit; eliminates odors completely; prevents rainwater dilution; durable PVC construction; extremely affordable; minimal maintenance. Weaknesses: Very limited capacity (0.7 gallons per bin); requires physical installation; unsuitable for indoor use; not ideal for apartments; worms not included.
Bottom Line: Best suited for gardeners with raised beds seeking low-maintenance soil improvement. While impractical for general composting, its direct integration and affordability make it an excellent specialized tool for targeted garden fertilization.
10. LuckyNote 3-Tray Worm Farm Kit,65L Worm Composter for Vermicomposting Starter, Indoor & Outdoor Worm Composter, Worm Compost Bin for Recycling Food Waste

Overview: The LuckyNote 3-Tray Worm Farm Kit provides a 65-liter vermicomposting solution with practical features for indoor and outdoor use. Constructed from durable black and yellow PP plastic, this stackable system measures 19.8 x 15 x 18 inches and weighs just nine pounds empty. The built-in faucet simplifies collection of liquid fertilizer, while strategic ventilation maintains optimal worm activity.
What Makes It Stand Out: This kit differentiates itself through its color-coded design and straightforward functionality. The three-tray system enables basic continuous composting, with worms migrating upward as lower trays mature. The ventilation system effectively contains odors, making it suitable for kitchen or balcony placement. The black and yellow aesthetic may appeal to users wanting visual distinction from standard black bins.
Value for Money: At $54.99, it’s competitively priced against similar 65-liter models, offering a slight savings over some competitors. The inclusion of a faucet and stackable design covers essential needs, though accessories like bedding or tools require separate purchase.
Strengths and Weaknesses: Strengths: Large 65L capacity; affordable pricing; effective odor control; lightweight construction; faucet included; suitable for beginners. Weaknesses: Only three trays limit efficiency; yellow color may fade outdoors; no included accessories; basic feature set; plastic construction less premium than some alternatives.
Bottom Line: A solid, no-frills option for budget-conscious composters needing substantial capacity. The LuckyNote kit delivers reliable performance for household waste reduction without unnecessary complexity.
Why Worm Farming is the Ultimate Closed-Loop System
Every year, the average American household tosses nearly 300 pounds of food waste into landfills, where it decomposes anaerobically and releases methane—a greenhouse gas 25 times more potent than carbon dioxide. Worm farming intercepts this waste stream at the source, converting it into two valuable outputs: worm castings (the nutrient-rich excrement that supercharges soil biology) and worm tea (the liquid leachate that acts as a potent foliar feed and soil drench). Unlike traditional composting, which requires significant outdoor space and regular turning, vermicomposting operates quietly under your sink, in a closet, or on a shaded balcony, processing waste continuously without odors when managed correctly.
The ecological elegance lies in the efficiency. A pound of red wiggler worms (approximately 1,000 individuals) can consume half their weight in organic matter daily. Over a year, that small colony can divert hundreds of pounds of food scraps from the waste stream while producing enough castings to revitalize multiple garden beds. This isn’t just waste reduction—it’s waste transformation at its most sophisticated.
Understanding Vermicomposting Basics
Before evaluating starter kits, grasp the fundamental biology. Worm composting relies on epigeic earthworm species—surface dwellers that thrive in rich organic matter, unlike garden earthworms that burrow deep into soil. These worms don’t actually “eat” food scraps directly; they consume the microorganisms that decompose the waste. This distinction matters because successful vermicomposting requires creating an environment where both worms and beneficial microbes flourish together. Temperature (55-77°F is ideal), moisture (like a wrung-out sponge), oxygen, and pH balance are the critical parameters your kit must help you maintain.
Types of Worm Farm Starter Kits Explained
The design architecture of your worm farm dramatically impacts maintenance effort, harvesting ease, and overall success. Manufacturers have developed four primary system types, each with distinct advantages for different users.
Stacked Tray Systems
These vertically oriented kits feature multiple perforated trays that nest within each other. You start with bedding and worms in the bottom tray, adding food scraps gradually. As that tray fills, you place the next tray on top with fresh bedding. Worms migrate upward through the perforations toward new food sources, leaving behind fully processed castings in the lower tray. This design eliminates the need to manually separate worms from finished compost—a task that deters many beginners. The best stacked systems include at least three trays, allowing continuous processing while one tray cures. Look for trays with tapered edges and smooth interior surfaces that prevent worms from getting crushed during stacking.
Continuous Flow Reactors
Borrowing technology from commercial operations, these kits feature a grid or mesh bottom where finished castings collect in a tray or drawer below. You add food and bedding at the top, and worms continuously work downward, leaving castings to fall through the grid. Premium models include crank-operated cutting bars that slice off finished compost from the bottom. While these systems command higher prices, they represent the lowest-maintenance option for serious composters processing significant waste volumes. The key design element is the grid spacing—too wide and worms fall through, too narrow and castings clog the system.
Single Bin Designs
The simplest and most affordable option, these function like traditional compost bins but optimized for worms. A single container holds bedding, worms, and food scraps together. Harvesting requires stopping feeding for several weeks, pushing contents to one side, adding fresh bedding to the other, and waiting for worms to migrate. While more labor-intensive, single bins excel for users wanting maximum capacity in minimal space. They also teach you intimate knowledge of your worm colony’s behavior, making them excellent educational tools.
DIY-Ready Kits
These hybrid offerings include essential components—worm bedding, detailed instructions, sometimes the worms themselves—while expecting you to provide the container. This approach appeals to environmentally conscious buyers who want to repurpose existing storage totes or wooden crates. Quality DIY kits include precisely sized drainage screens, specialized bedding blends, and aeration templates that eliminate guesswork. They often cost less while reducing plastic consumption, though they require more initial assembly effort.
Key Features That Separate Good Kits from Great Ones
Beyond basic design type, several features indicate manufacturer expertise and user-focused engineering. A truly great starter kit includes integrated moisture control systems—typically reservoirs with drainage spigots that prevent anaerobic conditions while allowing you to collect worm tea. Look for aeration elements beyond simple holes: corrugated side panels, vented lids with bug screens, and raised bases that promote airflow underneath.
The best kits also consider the user experience with thoughtful details like transparent observation windows (educational and helps monitor moisture levels), ergonomic handles for moving full trays, and included scrapers or harvesting tools. Perhaps most importantly, premium kits come with comprehensive guides that don’t just explain setup, but troubleshoot common issues before they become problems. These guides should detail ideal feeding schedules, bedding recipes, and seasonal adjustments.
Sizing Your Worm Farm: From Apartment Dwellers to Homesteaders
Size selection is where most beginners stumble. The general rule: one pound of worms needs about one square foot of surface area and can process roughly 3.5 pounds of scraps weekly. But this metric alone is misleading. A single person generating minimal scraps might manage with a compact 1.5-square-foot system processing 2-3 pounds weekly. A family of four, however, needs at least 4-5 square feet of surface area to handle typical kitchen output.
Consider not just current waste generation but future aspirations. Many enthusiasts find their scrap production increases once they have worms—suddenly onion peels and carrot tops become valuable resources rather than waste. A modular system that allows expansion prevents the need to purchase an entirely new kit six months in. Conversely, oversized systems for minimal waste create problems: excess moisture accumulation, uneaten food rotting, and worms spreading thin. The sweet spot is a system processing 75% of your weekly scraps, leaving margin for error.
Material Matters: Plastic, Wood, and Alternative Options
The material composition of your worm farm affects temperature regulation, durability, and worm comfort. Food-grade recycled plastic dominates the market for good reason—it’s lightweight, easy to clean, impervious to moisture, and provides insulation. However, not all plastics are equal. UV-stabilized plastic is essential for outdoor setups, while BPA-free certification matters for indoor systems where temperature fluctuations might cause leaching.
Wood offers superior breathability and aesthetic appeal, particularly for outdoor installations. Cedar and redwood naturally resist rot and insects, though they cost significantly more. Untreated pine will decompose within a year in moist worm environments. The best wooden kits use marine-grade plywood with non-toxic sealants, but these require periodic maintenance and are considerably heavier.
Emerging alternatives include bamboo fiber composites and bagasse (sugarcane waste) panels, which offer biodegradability and lower carbon footprints. However, these materials haven’t proven long-term durability in vermicomposting applications. For most users, high-quality recycled plastic strikes the optimal balance of longevity, performance, and sustainability.
The Red Wiggler Advantage: Why Species Selection Matters
Starter kits including live worms typically ship Eisenia fetida—the red wiggler—for good reason. This species tolerates the widest temperature range, reproduces prolifically in captivity, and thrives in the dense organic matter conditions of worm bins. Some kits might offer Eisenia andrei (tiger worms) or Perionyx excavatus (blue worms), which process waste faster but are more sensitive to temperature fluctuations.
Be wary of kits promising “mixed species” for broader temperature tolerance. In practice, different species have incompatible reproduction rates and habitat preferences, leading to one species outcompeting others. A monoculture of red wigglers is actually more stable. The best kits specify worm age—bedding-run juveniles adapt better to new environments than mature adults. They should also guarantee live delivery with temperature-controlled shipping and clear instructions for acclimation.
Essential Accessories Included in Quality Kits
A bare-bones kit includes just the bin and maybe some bedding. A truly valuable starter kit bundles tools that streamline the learning curve. Look for included bedding materials—coconut coir, shredded cardboard, and aged compost provide the ideal carbon-to-nitrogen ratio and microbial inoculation. Some kits include pH testing strips, which help diagnose problems before worms suffer.
Harvesting accessories separate premium kits: fine-mesh screens for sifting castings, angled scrapers that conform to tray corners, and collection trays with pour spouts for worm tea. Perhaps most valuable are feeding calendars and scrap tracking sheets that help beginners establish sustainable routines. The best kits also include a small supply of grit—crushed eggshells or rock dust—that worms need for digestion, a detail novices often overlook.
Indoor vs. Outdoor Placement: Making the Right Choice
Your living situation dictates kit features more than any other factor. Indoor systems must prioritize odor prevention through superior ventilation and sealed lids with gasket systems. They should also have stable bases that won’t tip in tight spaces and aesthetic designs that blend with kitchen decor. Consider height—under-sink installations need compact vertical profiles, while closet systems can be taller.
Outdoor kits face different challenges: temperature extremes, pests, and weather exposure. They require insulated walls, rainproof lids with secure latches, and pest-proof ventilation screens fine enough to exclude fruit flies and gnats but allow airflow. Elevated designs prevent flooding during heavy rains and deter ants. Some premium outdoor kits include optional shade cloths or thermal blankets for seasonal protection. The key is matching the kit’s engineering to your intended location from day one.
Seasonal Considerations for Year-Round Composting
Worms are cold-blooded; their activity correlates directly with ambient temperature. Below 40°F, they enter dormancy and stop processing waste. Above 85°F, they become stressed and may die. This biological reality makes seasonal planning crucial. For year-round outdoor composting in climates with freezing winters, kits with thick insulation (2+ inches) and optional heating elements maintain viability. Indoor systems face summer air conditioning and winter heating—extreme dryness that requires moisture monitoring.
The best starter kits include seasonal guides detailing feeding reductions during temperature extremes, bedding adjustments for moisture retention, and strategies for moving systems indoors temporarily. Some advanced kits feature thermometer probes that let you monitor internal temperatures without opening the bin, preventing heat loss during winter checks. Understanding these seasonal rhythms before purchasing prevents the disappointment of a dormant system during your peak summer vegetable scrap season.
The True Cost of Getting Started: Budget vs. Premium Kits
Entry-level plastic stacking kits start around $50, but these often omit worms and essential accessories. By the time you purchase worms ($30-50), bedding ($15), and basic tools ($20), the true cost approaches $100-120. Mid-range kits ($100-150) typically include everything needed for immediate startup: worms, bedding, tools, and comprehensive guides. Premium systems ($200-400) offer superior materials, larger capacity, and design features that reduce long-term maintenance.
Consider cost per pound of waste processed over five years. A $120 kit processing 10 pounds weekly handles 2,600 pounds annually—about 4.6 cents per pound. A $300 premium kit processing twice as much drops to 2.3 cents per pound. The real value calculation must include your time: premium systems requiring 15 minutes weekly versus budget options needing 30-45 minutes. For busy professionals, the time savings justify higher upfront costs. Factor in replacement parts availability too—a kit from an established manufacturer with accessible customer support saves money long-term.
Setting Up Your First Worm Farm: A Step-by-Step Overview
Even the best kit fails without proper setup. The process begins before worms arrive: assemble the system, add moistened bedding, and let it sit for 24-48 hours to develop microbial activity. This “pre-composting” step ensures worms have immediate food sources. When adding worms, spread them gently across the surface rather than dumping in a clump—they’ll burrow downward naturally. Cover with a damp newspaper or breathable fabric to retain moisture while allowing gas exchange.
Initial feeding is critical: start with just 2-3 cups of scraps buried under bedding, then wait a week. This prevents overwhelming the colony while it acclimates. Quality kits include detailed setup timelines and “first feeding” guides that prevent novice mistakes like overfeeding or improper moisture levels. The best guides also include a 30-day checklist for monitoring progress and making adjustments.
Maintenance Routines That Keep Your Worms Thriving
Successful vermicomposting hinges on consistent, minimal-effort routines. Weekly maintenance involves checking moisture levels (squeeze a handful—only a few drops should appear), adding bedding if the bin looks soggy, and burying new scraps in rotating locations to encourage even worm distribution. Monthly tasks include harvesting small amounts of castings, checking pH, and fluffing bedding to prevent compaction.
Premium kits simplify these routines with design features like moisture reservoirs that indicate when drainage is needed, and viewing windows that show bedding density without disturbing the colony. The included maintenance guides should anticipate your questions: How deep should food be buried? (2-3 inches) How much bedding to add when? (when you see more than 50% castings) What does healthy worm activity look like? (worms throughout the bin, not clustered at the top or bottom).
Troubleshooting Common Worm Farm Problems
Even well-designed kits encounter issues. Worms crawling up the sides signal anaerobic conditions—too much moisture or acidic conditions from overfeeding citrus. A rotten smell indicates excess water or insufficient aeration, requiring immediate bedding addition and feeding cessation. Fruit fly invasions mean exposed food scraps or overly wet surface conditions.
Quality kits include laminated troubleshooting cards or digital resources with photos comparing healthy vs. problematic bins. They should explain the “why” behind each issue, not just quick fixes. For instance, understanding that worms surface during rain because their burrows flood helps you recognize similar moisture problems in your bin. The best manufacturers offer email support with photos, helping diagnose issues specific to your setup.
Harvesting Your Black Gold: When and How to Collect Castings
The harvest moment is where kit design truly proves its worth. In stacked tray systems, you simply remove the bottom tray when worms have migrated upward, leaving nearly pure castings. For single bins, the “side-to-side” method works but takes 2-3 weeks. Continuous flow reactors allow incremental harvesting from the bottom.
Timing matters: castings are ready when they’re dark, crumbly, and smell like forest soil—typically 3-6 months for new systems, faster for established colonies. The best kits include castings maturity indicators: color charts, texture descriptions, and even simple smell tests. They also provide storage guidance—castings lose microbial activity if stored dry, so they should be used within 3-6 months or kept slightly moist in breathable bags.
Scaling Up: When and How to Expand Your Worm Operation
Most beginners underestimate how quickly they’ll become composting evangelists. Once you witness the transformation and see garden results, you’ll likely want to process more waste. Modular kits allow adding trays or connecting multiple units. Some stacking systems can be daisy-chained, creating processing “towers” that handle 20+ pounds weekly.
The scaling decision point typically arrives when you’re consistently producing more scraps than your worms can process, or when castings harvests can’t keep up with garden demands. Quality kits include expansion guides: how to split colonies, introduce new trays without disrupting existing worms, and manage multiple bins efficiently. They should also warn against scaling too quickly—worm populations double every 60-90 days under ideal conditions, so patience prevents overfeeding disasters.
Environmental Impact: Your Kitchen’s Carbon Footprint Reduction
Beyond garden benefits, worm farming creates measurable environmental impact. Each pound of food scraps diverted prevents approximately 0.5 pounds of methane emissions. Over a year, a typical family processing 10 pounds weekly prevents 260 pounds of methane—equivalent to taking a car off the road for 200 miles. The resulting castings sequester carbon in soil and reduce need for synthetic fertilizers, which require fossil fuels to manufacture.
Premium kits often include environmental impact trackers: simple calculators or apps where you log weekly scraps and see cumulative benefits. This gamification reinforces habit formation and provides tangible data for eco-conscious families. Some manufacturers partner with carbon offset programs, turning your composting into verified environmental credits. While not essential, these features signal a company’s commitment to the broader sustainability mission beyond profit.
Frequently Asked Questions
How many worms should a starter kit include for a family of four?
A family of four typically generates 4-6 pounds of suitable scraps weekly, requiring 1.5-2 pounds of red wigglers (1,500-2,000 worms). Kits offering “1 pound of worms” are generally sized for 1-2 people. Understocking leads to food waste accumulation and odor issues, while overstocking causes resource competition and slower reproduction. Reputable suppliers include enough worms to process 75% of your waste immediately, with the expectation that the colony will self-regulate and expand to full capacity within two months.
Can I put meat, dairy, or oily foods in my worm farm?
Standard advice warns against meat and dairy due to odor and pest attraction, but mature, well-managed systems can process small amounts. The key is burying these items deep (4-6 inches) in established bins with high worm density and plenty of carbon-rich bedding. However, beginners should avoid them for the first six months. Oily foods coat worms’ skin, interfering with respiration, and should be excluded entirely. Quality starter kits provide comprehensive “yes/no/maybe” food lists that help you expand feeding options safely as your expertise grows.
Why does my worm farm smell bad, and how do I fix it?
A healthy worm farm smells like fresh earth. Unpleasant odors indicate anaerobic conditions—either excess moisture, overfeeding, or insufficient aeration. First, stop adding food for two weeks. Then add dry, shredded cardboard or coconut coir to absorb moisture and create air pockets. Fluff the entire bin contents gently with a hand fork to introduce oxygen. Check that drainage holes aren’t clogged and that your bin isn’t sitting in its own leachate. This three-step protocol resolves 90% of odor issues within days.
How long until I can harvest my first batch of castings?
Expect your first harvest in 3-4 months under optimal conditions. The initial bedding needs time to develop a robust microbial community, and the worm population must establish itself. Many beginners make the mistake of harvesting too early, collecting partially processed material that still contains recognizable bedding. Premium kits include timeline markers—“Day 30: Check for worm cocoons,” “Day 60: Bedding should be 50% reduced”—that help you track progress. Resist the urge to rush; properly finished castings are dark, uniform, and smell like forest soil, not food scraps.
Can I leave my worm farm unattended for two weeks during vacation?
Absolutely. Worms can survive 3-4 weeks without fresh food, living off their castings and bin microbes. Before leaving, add a generous layer of moist bedding (shredded cardboard or coconut coir) and bury one large feeding of slow-release foods like pumpkin or melon rinds. Place the bin in a cool, dark location to reduce activity and moisture loss. Some premium kits include “vacation mode” instructions with specific feeding amounts and bedding depths based on bin size. Avoid the temptation to overfeed before leaving—excess food will rot and create problems.
What’s the difference between worm tea and leachate, and are both beneficial?
Worm tea is actively brewed by steeping castings in aerated water, creating a microbial explosion that’s a potent foliar spray. Leachate is the liquid draining from your bin, which can contain beneficial microbes but also phytotoxic compounds if your bin is out of balance. Many kits incorrectly label leachate collection as “tea.” Use leachate diluted 10:1 on non-edible plants or soil applications, never on leaves you’ll eat. True worm tea requires separate brewing equipment. Quality kits explain this distinction and provide safe application guidelines for both liquids.
My worm farm attracts fruit flies. How do I get rid of them?
Fruit flies indicate exposed food scraps or overly wet surface conditions. Immediately bury all food under at least 2 inches of bedding. Add a dry layer of shredded paper on top to absorb excess moisture. For active infestations, place a small cup of apple cider vinegar with a drop of soap near the bin to trap adults. Prevention is key: freeze fruit scraps for 24 hours before feeding to kill eggs, and always cover fresh additions with bedding. The best kits include tight-fitting lids with fine mesh screens that exclude flies while maintaining ventilation.
Can I keep a worm farm in an apartment without a balcony?
Indoor worm farming is not only possible but often more successful than outdoor setups because of stable temperatures. Choose a compact stacking system (2-3 square feet) that fits under a kitchen sink or in a closet. The key is odor prevention through proper aeration and moisture control—features to prioritize in apartment-friendly kits. Place the bin on a plastic tray to catch any accidental spills. Many urban dwellers report that guests never notice their worm farm until shown, as healthy bins emit no smell. Just avoid placing bins near heating vents that cause excessive dryness.
What should I do with excess worms when the population explodes?
A thriving worm population doubles every 60-90 days, eventually reaching your bin’s carrying capacity. Excess worms can be shared with friends starting their own farms, sold to local gardeners or bait shops, or used to expand your own operation. Some kits include “worm gift bags”—breathable sacks for sharing colonies. Alternatively, release them into a compost pile or heavily mulched garden bed where they’ll contribute to soil health. Never release non-native worms into natural ecosystems, as they can disrupt forest floor ecology. Red wigglers are not invasive in most North American gardens but check local regulations.
Are worm farms safe around pets and children?
Worm farms are completely safe and make excellent educational tools for children. The worms themselves are harmless, and the microbial ecosystem in a healthy bin poses no pathogen risk. However, curious pets may knock over unsecured bins. Choose kits with stable, wide bases and consider placing them in latched cabinets if you have large dogs. The primary concern is preventing children from overfeeding—kids love feeding worms, but too much food causes problems. Create a “worm feeding chart” where children earn stickers for proper feeding amounts, turning maintenance into a learning game rather than a chore.