There’s something undeniably charming about a wooden greenhouse that nestles perfectly against a garden fence. It feels less like an imposition on your outdoor space and more like a natural extension of it—part garden structure, part architectural feature. Unlike their aluminum cousins that can sometimes look jarringly modern, wooden lean-to greenhouses carry a timeless quality that whispers of traditional kitchen gardens and Victorian walled estates. When thoughtfully chosen, they don’t just provide a haven for your seedlings; they enhance the entire aesthetic of your outdoor living space.
The magic lies in the synergy. A well-designed wooden lean-to greenhouse should appear as though it grew organically from your fence line, creating a seamless transition between functional growing space and boundary structure. But achieving this harmony requires more than just picking any timber-framed model and propping it against your panels. From wood species and finish compatibility to proportional sizing and foundation considerations, every decision impacts both the visual integration and the practical performance of your investment. Whether you’re a seasoned horticulturist or a weekend window-box gardener, understanding these nuances will transform your purchasing decision from a simple transaction into a strategic garden design choice.
Top 10 Wooden Lean-To Greenhouses for Garden Fencing
Detailed Product Reviews
1. Outsunny Raised Garden Bed with Polycarbonate Greenhouse, Lean-to Garden Wooden Cold Frame Greenhouse, Flower Planter Protection, Lean to Roof, 41" x 22.5" x 28.25", Gray
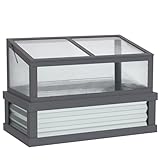
Overview: This compact hybrid combines a raised garden bed with a lean-to polycarbonate greenhouse, offering versatile protection for flowers, vegetables, and herbs. Measuring just 41" x 22.5" x 28.25", it’s designed for small spaces like patios, balconies, or corners of your yard. The wooden construction provides a natural aesthetic, while the clear polycarbonate top creates a microclimate for extended growing seasons.
What Makes It Stand Out: Unlike larger greenhouses, this unit serves multiple purposes: use the cold frame alone for direct-ground planting, pair it with the raised bed for ergonomic gardening, or even repurpose it as a chick brooder. The lean-to design maximizes space efficiency, and the polycarbonate panels offer better insulation than traditional glass while remaining lightweight. Its modular nature lets you experiment with greenhouse gardening without committing to a permanent structure.
Value for Money: At $113.12, this sits in the mid-range for small greenhouses. You’re essentially getting two products—a raised bed and a cold frame—for the price of one. Comparable separate units would cost $150+. While wood requires more maintenance than aluminum, the polycarbonate panels provide durability that cheaper PE covers lack, making it a smart investment for beginners testing their green thumb.
Strengths and Weaknesses: Pros: Space-saving design, versatile dual-function use, attractive wood finish, good insulation, suitable for small-scale gardening. Cons: Very limited growing space, wood may rot without proper treatment, not walk-in height, polycarbonate panels could yellow over time.
Bottom Line: Perfect for urban gardeners or beginners wanting to experiment with season extension. Its versatility justifies the price, but serious growers will quickly outgrow its limited capacity. Treat the wood annually for longevity.
2. Outsunny 6’ x 4’ Aluminum Lean-to Greenhouse Polycarbonate Walk-in Garden Greenhouse with Adjustable Roof Vent, Rain Gutter and Sliding Door for Winter, Clear

Overview: This 6.3’ x 4.2’ x 7’ walk-in greenhouse offers serious gardeners a durable, year-round growing solution. The aluminum alloy frame with galvanized steel base provides robust support, while polycarbonate panels block harmful UV rays while retaining heat. Designed to lean against a wall, it maximizes space without sacrificing the walk-in convenience you need for tending larger plants.
What Makes It Stand Out: Professional-grade features set this apart: a sliding door saves space compared to swinging doors, the five-level adjustable roof vent provides precise ventilation control, and integrated rain gutters collect water for sustainable irrigation. The snap-in polycarbonate panels simplify assembly while creating a tight seal. With a windproof level 4 rating, it withstands moderate storms better than flimsier alternatives.
Value for Money: At $215, this represents a significant step up from budget PE-covered models. However, the aluminum frame and polycarbonate panels will last 5-10 years with minimal maintenance, versus 1-3 years for cheaper options. You’re paying for durability, better temperature control, and professional features that justify the premium for serious gardeners who view this as a long-term investment.
Strengths and Weaknesses: Pros: Extremely durable construction, excellent UV protection, superior ventilation options, space-saving sliding door, integrated water management, stable in wind. Cons: Highest price point, complex assembly requiring two people, polycarbonate can scratch, limited size for the cost.
Bottom Line: Ideal for committed gardeners seeking a semi-permanent structure. The quality materials and thoughtful design features make it worth every penny if you plan to use it for multiple seasons. Assembly is challenging but results in a sturdy, reliable greenhouse.
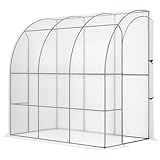
3. Outsunny 10’ x 5’ x 7’ Lean to Greenhouse, Walk-in Green House, Plant Nursery with 2 Roll-up Doors and Windows, PE Cover and 3 Wire Shelves, Green

Overview: This spacious 10’ x 5’ x 7’ walk-in greenhouse delivers impressive capacity at a budget price point. The galvanized steel frame supports a protective polyethylene cover and includes three tiers of wire shelving with six panels, maximizing vertical growing space. Designed to lean against any wall, it creates a protected nursery environment for vegetables, herbs, and flowers without consuming your entire yard.
What Makes It Stand Out: You get remarkable square footage—50 square feet—plus 22 lbs capacity per wire panel, allowing dense plant organization. The dual roll-up doors provide excellent access from either end, while zippered windows with screens offer ventilation without letting in pests. At under $70, it’s rare to find this much covered growing space with included shelving, making it perfect for maximizing production in minimal space.
Value for Money: At $67.88, this is the best value-per-square-foot option reviewed. Comparable greenhouses with shelving cost $120+. While the PE cover won’t last as long as polycarbonate, replacement covers are inexpensive. The included guy ropes and stakes provide decent stability for the price. For budget-conscious gardeners wanting maximum capacity, this is nearly impossible to beat.
Strengths and Weaknesses: Pros: Massive growing area, included shelving doubles capacity, excellent ventilation, dual door access, unbeatable price, easy to relocate. Cons: PE cover degrades in 1-2 years, steel frame may rust, less insulating than polycarbonate, requires careful anchoring, zipper quality inconsistent.
Bottom Line: The ultimate starter greenhouse for those prioritizing space over longevity. Accept that you’ll replace the cover eventually, but enjoy years of extended growing seasons. Perfect for renters or gardeners testing their commitment before investing in permanent structures.
4. Outsunny 7’ x 4’ x 7’ Outdoor Lean to Greenhouse, Walk-in Green House Plant Nursery with Roll-up Window, PE Cover, White
Overview: This 7’ x 4’ x 7’ walk-in greenhouse offers a middle-ground solution for gardeners needing reliable plant protection without premium costs. The polyethylene cover creates a controlled microclimate leaning against your home, garage, or shed. With 28 square feet of floor space and full walk-in height, it comfortably houses vegetables, herbs, flowers, and even small tropical plants while occupying minimal yard space.
What Makes It Stand Out: The straightforward design focuses on essential functionality: full zippered walk-in access, a roll-up window for ventilation, and a lean-to structure that uses your existing wall for stability. The white PE cover diffuses light evenly, reducing hot spots while maintaining humidity. Four included ropes and stakes provide basic wind protection. Its simplicity means faster assembly and fewer parts that can break compared to more complex models.
Value for Money: Priced at $74.99, this positions itself as a sensible mid-tier option. You’re paying slightly more than the cheapest models for better proportions and walk-in convenience, but saving significantly versus polycarbonate units. The size is ideal for casual gardeners who want more than a cold frame but less than a full greenhouse. Replacement covers are affordable, extending its lifespan economically.
Strengths and Weaknesses: Pros: Walk-in height at low price, simple assembly, good ventilation, space-efficient lean-to design, versatile for various plants, lightweight and movable. Cons: No included shelving (must purchase separately), PE cover durability concerns, steel frame corrosion risk, limited weather resistance, basic anchoring system.
Bottom Line: A solid choice for hobbyists wanting walk-in convenience on a budget. Plan to add your own shelving and replace the cover every couple of years. It reliably extends your growing season without overwhelming small spaces or budgets.
5. Outsunny 10’ x 3’ x 7’ Walk-in Lean-to Greenhouse, Steel, 4 Zipper Roll-up Windows & 2 Doors, UV Protecting PE Cover for Growing Flowers, Vegetables, Tropical Plants, Saplings, Succulents, Green

Overview: This narrow 10’ x 3.3’ x 7’ greenhouse maximizes linear growing space along walls or fences. The galvanized steel frame supports a UV-protective PE cover with four roll-up mesh windows and two zippered doors, creating excellent cross-ventilation. At nearly 10 feet long but only 3 feet deep, it’s perfect for narrow side yards, balconies, or aligning against garage walls where width is limited but length is available.
What Makes It Stand Out: Exceptional ventilation with four windows and two doors allows precise climate control—crucial for tropical plants and seedlings. The 4" extended edges bury deep into soil for superior stability without concrete. Four slant-supporting rods and spiral ground nails provide wind resistance uncommon in PE greenhouses. This thoughtful engineering addresses common budget-greenhouse weaknesses while maintaining affordability.
Value for Money: At $83.59, you’re getting premium features—dual doors, four windows, and advanced anchoring—typically found on $150+ models. The narrow footprint might limit some uses, but for linear growing along structures, it’s ideal. The UV-protected PE cover lasts slightly longer than standard versions. This represents excellent value if your space matches its dimensions.
Strengths and Weaknesses: Pros: Superior ventilation system, excellent stability features, UV-protected cover, dual door access, space-saving narrow design, reinforced frame. Cons: Only 3’ depth limits large plants, PE cover still temporary, assembly instructions unclear, narrow width restricts movement inside, no shelving included.
Bottom Line: Best suited for narrow spaces where width is constrained. The ventilation and stability upgrades make it far more functional than basic PE models. Serious gardeners will appreciate the climate control, while casual users benefit from the durability improvements. Just ensure the slim profile fits your gardening style before purchasing.
6. LYNSLIM Wooden Greenhouse, Cold Frame Greenhouse for Outdoor,Raised Flower Planter Shelf with Transparent Flip-Top Roof,Mini Greenhouse Cabinet for Outside 29” W x 15”D x 50” H (Fir Wood)
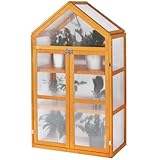
Overview: The LYNSLIM Wooden Greenhouse offers a compact solution for gardeners working with limited outdoor space. Measuring just 29 inches wide and 15 inches deep, this fir wood structure fits perfectly on balconies, patios, or small porches. The transparent polycarbonate panels maximize light transmission while maintaining stable internal temperatures for seed starting and protecting tender plants.
What Makes It Stand Out: This mini greenhouse distinguishes itself with genuine fir wood construction rather than plastic framing, giving it an attractive natural aesthetic. The lockable double doors provide security and easy access, while the adjustable roof vent with support rod enables precise ventilation control. Two-tier shelving maximizes vertical growing space in a tiny footprint, making it ideal for urban gardeners.
Value for Money: At $79.99, this greenhouse sits in the sweet spot between flimsy plastic models and expensive cedar structures. The wood/polycarbonate combination offers better durability and insulation than PE-covered alternatives at similar price points. For beginners or those with space constraints, it delivers professional features without the premium cost.
Strengths and Weaknesses: Strengths include excellent light transmission, sturdy wood construction, secure locking mechanism, and space-efficient design. The adjustable ventilation system provides crucial temperature control. Weaknesses involve the relatively small growing area, potential weathering of untreated fir wood over time, and assembly that requires careful alignment. The narrow depth limits larger plant containers.
Bottom Line: The LYNSLIM Wooden Greenhouse excels as an entry-level cold frame for small-space gardening. Its thoughtful ventilation and security features make it a reliable choice for protecting seedlings and herbs, though serious gardeners will eventually want more capacity.
7. Lean-to Greenhouse with 3-Tier Shelves: Ohuhu Portable Walk-in Wall Mounted Green House with Mesh Windows, 79"x39"x83" Large Greenhouses with 2 Roll-Up Zipper Doors Reinforced Structure for Outdoors

Overview: The Ohuhu Lean-to Greenhouse delivers impressive dimensions at 6.5x3.3x7 feet while maintaining a budget-friendly price point. This wall-mounted design maximizes space efficiency by utilizing existing structures for support. The included 3-tier plant rack adds immediate organization, holding up to 66 pounds total without requiring tools for assembly.
What Makes It Stand Out: This greenhouse’s wind-resistant engineering sets it apart. External weight bags, upgraded ground stakes, ropes, and wall-fixing accessories create a multi-layered defense against weather. The dual roll-up doors on both sides provide exceptional access and airflow control. The powder-coated metal frame with four additional top support bars addresses common collapse issues seen in budget greenhouses.
Value for Money: At $62.99, this represents exceptional value for a walk-in greenhouse of this size. Comparable freestanding models cost twice as much. While the PE cover won’t match polycarbonate longevity, the reinforced structure and included shelving make it far more practical than basic pop-up greenhouses. The lean-to design saves money by eliminating one wall panel.
Strengths and Weaknesses: Major strengths include rapid tool-free setup, superior wind resistance features, walk-in accessibility, and dual-door ventilation. The 3-tier rack is a valuable inclusion. Weaknesses include PE cover’s shorter lifespan versus rigid panels, dependency on a wall for optimal stability, and potential zipper durability issues. The 22-pound per-shelf limit restricts heavy planters.
Bottom Line: This Ohuhu greenhouse offers unbeatable space and features for under $65. Perfect for renters or seasonal gardeners, its wind-resistant design overcomes typical portable greenhouse weaknesses. Just don’t expect decade-long durability from the cover material.
8. Outsunny Raised Garden Bed with Polycarbonate Greenhouse, Wooden Cold Frame Greenhouse, Garden Flower Planter Protection, Peak Roof, 35.5" x 31.5" x 36", Natural

Overview: Outsunny combines a galvanized steel raised bed with a detachable fir wood cold frame, creating a versatile two-in-one growing system. The 12-inch deep planting bed provides ample root space, while the polycarbonate-topped greenhouse section protects plants from frost and pests. The peak roof design measures 35.5 inches wide and 36 inches tall overall.
What Makes It Stand Out: The hybrid design offers unmatched flexibility—use the raised bed alone for deep-rooted vegetables, add the cold frame for season extension, or deploy just the greenhouse cabinet elsewhere for seed starting. The twin-wall polycarbonate panels provide 90% light transmission with excellent insulation. The openable roof vent tilts for ventilation and easy plant access.
Value for Money: Priced at $139.99, this unit costs more than basic cold frames but less than buying separate raised bed and greenhouse components. The galvanized steel bed resists rust far better than wood-only alternatives. For gardeners wanting both elevation and protection, it eliminates the need for two purchases, justifying the moderate premium.
Strengths and Weaknesses: Strengths include dual-function versatility, durable steel bed construction, effective polycarbonate insulation, and smart rain-deflecting roof design. The openable roof provides excellent access. Weaknesses involve the fir wood frame requiring weatherproofing, limited interior height restricting taller plants, and assembly complexity from multiple components. The 31.5-inch depth may be narrow for some crops.
Bottom Line: This Outsunny hybrid excels for gardeners seeking flexibility. The steel bed and polycarbonate cover combination offers durability that justifies the price. Ideal for kitchen gardens where raised bed convenience meets season-extending protection.
9. 4x6FT Wooden Greenhouses for Outdoors, Wooden Walk-in Green House with Cedar Frame, Greenhouse Kit with 6MM Thick Polycarbonate Panel
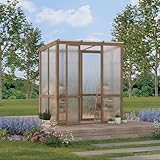
Overview: This premium walk-in greenhouse targets serious gardeners with its robust cedar frame and 6mm twin-wall polycarbonate panels. The 4x6-foot footprint provides 24 square feet of growing space with 80-inch headroom. Pre-cut and pre-drilled components simplify assembly of what would otherwise be a complex structure. The lockable door adds security for valuable plants and tools.
What Makes It Stand Out: Cedar construction offers natural rot resistance and wind stability up to 56 mph without requiring additional anchors. The 6mm polycarbonate panels provide superior insulation and 99.99% UV protection—far exceeding standard greenhouse films. The adjustable roof vent opens to 45 degrees for maximum airflow control. This is a true four-season structure, not a seasonal pop-up.
Value for Money: At $369.99, this represents a mid-range investment for a permanent greenhouse. While significantly pricier than PE or thin polycarbonate models, the cedar frame and thick panels justify the cost through longevity. Comparable aluminum-framed greenhouses with similar panel thickness cost $500+. The included lockable door and engineered wind resistance add value.
Strengths and Weaknesses: Strengths include exceptional durability, superior UV protection, walk-in accessibility, lockable security, and true four-season capability. The cedar frame requires minimal maintenance. Weaknesses involve higher upfront cost, two-box shipping that may arrive separately, and foundation requirements for optimal stability. Assembly requires time and basic carpentry skills despite pre-drilled holes.
Bottom Line: For committed gardeners seeking a permanent, year-round greenhouse, this cedar-framed model delivers professional-grade features at a reasonable price. The thick polycarbonate and sturdy frame make it a worthwhile long-term investment that will outlast cheaper alternatives by years.
10. Outsunny 5’ x 4’ x 7’ Outdoor Lean to Greenhouse, Walk-in Green House Plant Nursery with Roll-up Window, PE Cover, White

Overview: Outsunny’s lean-to greenhouse provides a compact 5x4-foot growing space with 7-foot height at an entry-level price point. The polyethylene cover creates a protected microclimate for seedlings, herbs, and small plants. Designed to anchor against existing walls, it maximizes stability while minimizing material costs. The roll-up window and zippered door offer basic ventilation control.
What Makes It Stand Out: This model’s simplicity and affordability make it accessible to absolute beginners. The lean-to design inherently improves stability compared to freestanding pop-up greenhouses. Four included ropes and stakes provide additional wind security. The white PE cover diffuses light evenly while protecting against UV damage and light rain. Setup is straightforward without complex framing.
Value for Money: At $67.99, this is one of the most affordable walk-in greenhouses available. While the PE cover won’t match polycarbonate’s lifespan, the price allows gardeners to test greenhouse growing without major investment. Replacement covers cost $20-30, making long-term ownership economical. For seasonal use or mild climates, it delivers adequate protection.
Strengths and Weaknesses: Strengths include unbeatable price, easy installation, lean-to stability, and sufficient size for starter plants. The roll-up window provides simple ventilation. Weaknesses involve PE cover durability (typically 1-3 seasons), limited insulation for winter use, zipper vulnerability, and dependency on a wall for best performance. The frame lacks the reinforcement of pricier models.
Bottom Line: This Outsunny lean-to is the perfect starter greenhouse for budget-conscious gardeners. It provides walk-in convenience and basic protection at a price that’s hard to beat. Manage expectations regarding longevity, and you’ll find it an excellent gateway to extended-season growing.
Why Choose a Wooden Lean-To Greenhouse?
The Natural Aesthetic Advantage
Wooden structures possess an inherent warmth that synthetic materials struggle to replicate. The grain patterns, subtle color variations, and tactile quality of timber create a living surface that ages gracefully, developing character rather than just weathering. When positioned against a fence—typically the most dominant vertical element in a garden—a wooden greenhouse frame can either complement existing timber fencing or provide an organic counterpoint to metal or composite panels. This natural material dialogue establishes visual continuity, making the greenhouse feel like a deliberate design choice rather than an afterthought.
Space-Saving Design Philosophy
The lean-to configuration maximizes growing potential in compact gardens where every square foot matters. By utilizing the fence as a structural backbone, you eliminate the need for rear wall construction and reduce the overall footprint. This clever geometry means you’re not sacrificing valuable planting beds or patio space. Instead, you’re activating a previously underutilized boundary zone, transforming a passive divider into an active growing environment. For urban gardeners or those with modest plots, this represents the difference between having a greenhouse and wishing you had the room for one.
Understanding the Lean-To Structure
Definition and Core Benefits
A lean-to greenhouse is characterized by its single-pitched roof that slopes away from the supporting wall—in this case, your garden fence. This asymmetrical design isn’t merely aesthetic; it serves critical functional purposes. The slope optimizes rainwater runoff, prevents debris accumulation, and can be oriented to capture maximum sunlight based on your garden’s aspect. The fence provides thermal mass, absorbing heat during the day and radiating it back slowly at night, creating a more stable microclimate than freestanding structures. This passive temperature regulation reduces heating costs and protects delicate plants from sudden temperature swings.
How It Differs from Freestanding Models
Unlike standalone greenhouses that require four-sided construction and independent stability, lean-to models derive structural integrity from their attachment point. This fundamental difference influences everything from glazing bar spacing to wind load calculations. The fence-side wall can be unglazed or partially glazed, allowing for shelving, tool storage, or climbing plant support. Freestanding models, by contrast, must prioritize all-around light transmission, often at the expense of functional wall space. The lean-to’s inherent efficiency means more interior area dedicated to actual growing rather than circulation paths around a central bench.
Integration with Garden Fencing: The Key Considerations
Matching Materials and Finishes
The most successful integrations occur when the greenhouse timber either matches or intentionally contrasts with your fencing. For cedar fences, a cedar-framed greenhouse creates a monolithic, custom-built appearance. If your fence is pressure-treated pine, consider whether you’ll stain the greenhouse to match or select a premium hardwood that stands as a feature piece. The key is intentionality—accidental mismatches look neglected; deliberate design choices look sophisticated. Pay attention to hardware finishes too; black ironmongery can tie into fence post caps or gate fittings, while brushed stainless steel offers a contemporary edge against modern composite fencing.
Height Alignment Strategies
Fence height dictates greenhouse ridge height and overall proportions. Standard fence panels typically stand 1.8 meters tall, which aligns perfectly with many lean-to models designed for residential use. However, if your fence exceeds 2 meters or features decorative trellis toppers, you’ll need to consider whether the greenhouse should match this extended height or sit below it, creating a stepped silhouette. The eaves height—where the greenhouse meets the fence—should be at least 1.5 meters to provide comfortable working headroom and accommodate tall plants like tomatoes or grapevines.
Creating a Cohesive Visual Flow
Think beyond the structure itself. The transition zone between greenhouse base and fence line offers opportunities for integration. A continuous gravel strip or matching paving that runs along the fence and under the greenhouse creates a unified ground plane. Planting low-growing herbs or alpine strawberries along this edge softens the junction. For ultimate cohesion, consider extending fence battens horizontally across the greenhouse’s rear wall, or mirroring the fence’s top rail as a decorative element on the greenhouse’s front facade.
Critical Features to Evaluate Before Buying
Frame Construction Quality
Examine joint methods with scrutiny. Mortise and tenon joints, secured with hardwood dowels, indicate craftsmanship that withstands seasonal wood movement. Avoid models relying solely on butt joints and screws, as these will loosen as timber expands and contracts. Corner braces should be integrated, not bolted-on afterthoughts. The wood’s moisture content at manufacture matters too—kiln-dried timber below 20% moisture content is less likely to warp. Ask about the species’ natural durability rating; class 1 timbers like oak or iroko need minimal treatment, while class 3-4 softwoods require robust preservative systems.
Glazing Options Explained
Horticultural glass offers superior clarity and longevity but poses safety risks in family gardens. Toughened safety glass provides peace of mind but at premium cost. Polycarbonate panels—twin-wall or triple-wall—deliver excellent insulation and hail resistance, though they can develop algae between layers over time. Consider UV transmission rates; some plastics filter beneficial UV-B rays that plants use for robust growth. For wooden frames, dry-glazing systems with rubber gaskets are preferable to putty, allowing for natural wood movement without cracking seals.
Ventilation Systems That Work
A lean-to greenhouse can overheat rapidly due to its enclosed nature. Look for a minimum of two opening roof vents, plus side louvres positioned on the non-fence side for cross-ventilation. Automatic openers, powered by wax-filled cylinders that expand with temperature, are non-negotiable for anyone who works away from home. These passive devices require no electricity and begin opening around 18-20°C. For larger structures, consider whether the design accommodates future fan installation—pre-wired louvres or mounting plates save major retrofitting headaches.
Access and Door Design
Single hinged doors save space but require clearance to swing open. Sliding doors offer better accessibility but demand precise tracking to avoid jamming. The threshold height matters for wheelchair access and for wheelbarrow entry; a low-profile threshold with weather stripping provides the best compromise. Check the door’s sealing system—compression seals are more effective than brush strips. For security, integrated lockable handles are preferable to padlock hasps that can rust and become unsightly.
Size and Dimension Planning
Measuring Your Available Space
Start by establishing your fence’s structural soundness. Lean-to greenhouses exert lateral loads, so fence posts must be secure with concrete footings. Measure the usable fence length, subtracting 30cm at each end for maintenance access. Consider the projection distance from the fence—1.2 meters provides a narrow walkway, while 2 meters allows for central staging and comfortable movement. Don’t forget to account for roof overhang, which typically extends 15-20cm beyond the frame, potentially encroaching on boundary regulations.
Internal Layout Considerations
Your intended crops dictate internal configuration. For seed starting, you’ll need bench space at different heights—cool-season crops lower, heat-lovers higher. For overwintering tender perennials, floor space becomes priority. Vine crops like cucumbers require vertical training wires on the fence-side wall. Before committing to dimensions, sketch a layout including paths, work surfaces, and storage. Remember that a lean-to’s sloping roof creates a high and low side; position tall plants toward the fence and shade-tolerant herbs in the lower front zone.
Proportional Design Principles
The greenhouse should relate to both fence scale and garden size. A massive 3-meter-long structure against a 5-meter fence overwhelms the space, while a diminutive 1.2-meter model on a 20-meter boundary looks lost. The golden ratio (approximately 1:1.618) provides a reliable guide—if your fence is 1.8m high, a greenhouse length of 2.9m creates pleasing proportions. Visual weight matters too; a dark-stained greenhouse appears smaller and more anchored, while natural cedar draws the eye and can dominate visually.
Material Matters: Wood Types and Treatments
Hardwood vs Softwood Debates
Hardwoods like oak, sapele, or utile offer 25+ year lifespans without treatment, developing silver-grey patinas that many find attractive. Their density resists warping and provides excellent screw-holding power. However, they cost 3-4 times more than softwoods and require pre-drilling to avoid splitting. Pressure-treated softwoods (pine or spruce) deliver 15-year durability at accessible price points. Modern treatment processes using alkaline copper quaternary (ACQ) or copper azole are safer than old CCA methods. The choice often boils down to whether you value long-term low-maintenance or initial affordability.
Weatherproofing and Longevity
All wooden greenhouses need protection, even “durable” species. End grain is particularly vulnerable—ensure it’s sealed with preservative or metal caps. Check that glazing bars are designed with drip grooves to channel water away from joints. Factory-applied preservative should penetrate 3-5mm into the wood; surface coatings alone won’t suffice. Re-treatment schedules vary by exposure; south-facing structures may need annual attention, while north-facing ones can go 2-3 years. Water-based preservatives maintain the natural wood appearance; solvent-based options offer longer protection but alter the color.
Eco-Friendly Treatment Options
For the environmentally conscious gardener, look for timber certified by the Forest Stewardship Council (FSC) and treated with boron-based preservatives. These low-toxicity treatments protect against insects and decay while being safe around edible crops. Some manufacturers offer untreated larch or cedar that rely on natural tannins for protection—these require more frequent maintenance but eliminate chemical concerns. Another emerging option is thermally modified timber, where heat treatment changes the wood’s cellular structure, dramatically improving rot resistance without chemicals.
Foundation and Installation Essentials
Preparing the Site Against Your Fence
Never install directly onto soil. A lean-to greenhouse needs a level, stable base that won’t settle unevenly. Concrete slabs provide the most durable foundation, but require significant excavation and may need planning permission if they alter drainage patterns. Pressure-treated timber bearers on compacted gravel offer a simpler alternative, though they reduce overall height slightly. The critical factor is ensuring the base is perfectly square and level—any deviation transfers stress to the greenhouse frame and compromises door operation. Use a laser level for precision; traditional spirit levels can mislead over longer distances.
Drainage Considerations
Water management can make or break your greenhouse experience. The base should slope gently away from the fence (1:80 gradient is ideal) to prevent water pooling against fence posts. Install a French drain along the fence side if your soil is heavy clay. Inside, consider a porous floor surface like pea gravel or slatted decking over a membrane. This allows spilled water to drain while keeping tools and pots off damp ground. For serious growers, a slight internal slope toward a central drain connected to a water butt creates a self-watering system for summer crops.
Anchoring Methods for Stability
Your fence cannot be the primary anchor. Proper lean-to greenhouses feature ground anchors that secure the base to the foundation, independent of the fence. Auger-style screw anchors driven into the ground at each corner provide excellent hold in most soils. In windy exposures, consider chemical anchor bolts set into concrete pads. The connection to the fence should be flexible—using slotted brackets that allow for wood movement without transferring structural loads. Avoid drilling directly into fence posts if they belong to your neighbor; this creates legal complications and potential damage liability.
Ventilation and Climate Control
Passive Ventilation Strategies
Leverage the lean-to’s natural advantages. The fence creates a thermal mass that moderates temperature swings, while the sloping roof encourages hot air to accumulate at the high point where roof vents can expel it. Position side vents low on the non-fence side to create a chimney effect—cool air enters low, warms, rises, and exits high. Louvred vents are more effective than hinged panels because they remain open during light rain. For maximum efficiency, ensure the total vent area equals at least 15% of the floor area, with roof vents comprising two-thirds of this total.
Automated Solutions
Modern greenhouse automation has become surprisingly affordable. Solar-powered vent openers eliminate wiring concerns and operate silently. For larger structures, consider a thermostat-controlled exhaust fan that kicks in when temperatures exceed 25°C. Shade cloth systems, either external roller blinds or internal pull-screens, can be automated with light sensors. These are particularly valuable for south-facing lean-tos that can reach 40°C+ on sunny spring days. Remember that automation should supplement, not replace, manual controls—always have a failsafe method to ventilate if power or mechanical systems fail.
Seasonal Adjustments
Your ventilation strategy must evolve through the year. In winter, seal all but essential vents to conserve heat, using breathable insulation panels on the interior. Spring requires aggressive venting to prevent damping-off disease in seedlings. Summer demands maximum airflow, potentially removing some glazing panels entirely. Autumn brings the challenge of trapping daytime heat while preventing overnight condensation. A lean-to’s fence-side wall is perfect for seasonal modifications—install removable insulation boards that can be fitted in October and stored in May, dramatically extending your growing season.
Blending with Different Fencing Styles
Horizontal Slat Fencing
The current trend for horizontal slat fencing, often in dark stains, creates a contemporary backdrop that pairs beautifully with cedar greenhouses. Match the slat spacing in your greenhouse design—some manufacturers offer slatted rear walls that echo this pattern. The key is aligning horizontal lines; if your fence slats are 15cm wide with 2cm gaps, replicate this rhythm in the greenhouse’s lower cladding or staging fronts. This creates a visual conversation between the two structures that feels intentional and designed.
Traditional Lap Panel Fencing
Close-board or lap panel fencing offers a solid, uniform surface that can make a greenhouse appear to emerge from the fence itself. Here, color matching becomes paramount. If your fence is stained a rich brown, stain the greenhouse to match, but consider leaving the interior natural to maximize light reflection. The solidity of lap panels allows you to treat the greenhouse as a focal point—perhaps painting it a contrasting sage green that complements foliage while the fence recedes into the background.
Trellis and Living Fence Integration
For fences covered in climbers, the greenhouse must accommodate plant growth. Ensure the eaves are high enough that mature clematis or honeysuckle can drape over without blocking vents. Some innovative designs incorporate the trellis into the greenhouse structure itself, using the fence as a support for espalier fruit trees that grow through special ports in the rear wall. This living integration creates a greenhouse that feels part of the garden’s ecosystem rather than an addition to it.
Maintenance and Care Regimen
Annual Treatment Schedules
Mark your calendar for late September, when temperatures are mild but before winter weather arrives. Inspect all joints for movement, checking that screws remain tight and brackets haven’t shifted. Clean glazing inside and out to maximize winter light. Apply preservative to any areas showing wear, paying special attention to end grain and horizontal surfaces where water pools. Lubricate all hinges and sliding door tracks with silicone spray—avoid oil-based products that attract dust. This annual ritual takes half a day but adds years to your greenhouse’s lifespan.
Glazing Cleaning and Replacement
Dirty glazing can reduce light transmission by 30%, directly impacting plant health. Use a soft brush and mild detergent, never pressure washers that can force water into frame joints. For algae between polycarbonate panels, some designs allow panel removal for cleaning—check this before purchase. When replacing broken glass, always use glazing clips rather than adhesive, as the frame will continue to move seasonally. Keep spare clips and end caps on hand; these small components are often proprietary and can be hard to source years later.
Hardware Upkeep
Stainless steel hardware is worth the upgrade in coastal or polluted urban environments where standard zinc-plated fittings corrode within seasons. Check door seals annually; perished rubber lets in drafts and pests. The automatic vent openers contain mineral oil that can leak over time—wipe them clean and check for sticky operation. If your greenhouse features adjustable louvres, ensure the worm gear mechanisms remain greased. These moving parts are the greenhouse’s Achilles’ heel; neglect them and you’ll face costly repairs.
Cost Analysis and Budget Planning
Initial Investment Breakdown
A quality wooden lean-to greenhouse represents a significant investment, typically ranging from £800 for a basic 1.5m² softwood model to £4,000+ for a 4m² hardwood structure with toughened glass. This price includes the frame and glazing but rarely covers the base, delivery, or installation. Factor in £200-400 for a proper foundation, plus potential fence reinforcement costs. Automated vents add £50-80 each, and shading systems can cost £150+. The “real” price is often 30% higher than the advertised figure.
Long-Term Value Considerations
Calculate cost per year of service. A £2,000 hardwood greenhouse lasting 25 years costs £80 annually, while a £600 softwood model lasting 8 years costs £75 per year—similar value but different cash flow. Consider energy savings; a lean-to’s thermal efficiency can reduce heating costs by 40% compared to freestanding models. Factor in crop value too—growing your own tomatoes, peppers, and herbs can save £200+ annually, meaning the structure pays for itself over its lifetime while providing immeasurable gardening satisfaction.
Hidden Costs to Anticipate
Site preparation often reveals surprises—removing old concrete, improving drainage, or dealing with buried utilities. Check for overhead power lines that might complicate delivery or installation. Some local authorities require planning permission for structures over 2.5m height within 2m of a boundary, costing application fees. Insurance may need updating to cover the structure and increased garden value. Finally, consider the cost of your time; even “simple” installations consume weekends that could be spent gardening.
DIY vs. Pre-Manufactured: Making the Choice
Skill Level Assessment
Building from scratch demands intermediate carpentry skills, including cutting compound angles for the roof pitch and creating weatherproof joints. You’ll need a chop saw, router for glazing rebates, and confidence with levels and squares. Pre-manufactured kits reduce skill requirements to basic assembly, though you’ll still need two people, a full weekend, and patience with instructions. Most kits use simplified joints that sacrifice some longevity for ease of construction. Be honest about your abilities; a poorly built DIY greenhouse becomes a maintenance nightmare.
Time Investment Realities
A pre-manufactured 2m x 2m lean-to typically requires 12-16 hours of assembly time, plus base preparation. A custom build from plans can consume 40-60 hours of cutting, fitting, and finishing. The DIY route offers customization but demands sustained focus over several weeks. Consider your gardening calendar—starting a build in March means missing the critical spring sowing season. Many gardeners find that buying a kit frees them to focus on soil preparation and seed starting while the structure is professionally installed.
Customization Trade-offs
DIY allows perfect sizing for awkward spaces and integration of personal features like integrated potting benches or specialized staging. However, sourcing materials individually often costs more than kit manufacturing economies of scale. Pre-manufactured models offer limited customization—perhaps choice of door position or staging inclusion—but benefit from engineered designs where every component is optimized. Some premium manufacturers offer “bespoke kit” services, where they modify standard designs to your dimensions, bridging the gap between off-the-shelf and fully custom.
Styling Your Greenhouse-Fence Combination
Color Coordination Techniques
The traditional approach matches greenhouse stain to fence color, creating a unified plane. For a more dynamic look, use the greenhouse as an accent—deep forest green against natural cedar fencing, or charcoal grey against weathered silver wood. Consider the “rule of three” in garden design; if your fence is one color, your greenhouse a second, repeat one of those colors in a third element like a garden bench or shed for cohesion. Always test stains on sample pieces; wood species absorb color differently, and wet stain looks dramatically different from the dried finish.
Planting Schemes for Seamless Transition
The area where greenhouse meets fence is prime real estate for climbing plants that soften hard edges. Plant clematis or jasmine to grow up the fence and spill onto the greenhouse roof, but position them so they don’t shade winter crops. In front of the greenhouse, low-growing herbs like thyme and oregano create a fragrant edge that ties into any garden style. For contemporary gardens, geometric planting of box balls or grasses in linear beds mirrors the greenhouse’s structure. In cottage gardens, allow self-seeders like nigella and calendula to blur the transition naturally.
Lighting and Accessories
External lighting should highlight the greenhouse without creating light pollution. Solar-powered spike lights positioned to graze the fence behind the greenhouse create dramatic silhouette effects. Inside, LED grow lights on timers extend growing hours in winter; choose full-spectrum units that don’t cast unnatural purple hues visible from the house. For accessories, select tool racks and potting trays in materials that echo your fence—galvanized metal for modern slat fences, wrought iron for traditional panels. This attention to detail elevates the entire composition from functional structure to garden centerpiece.
Environmental Impact and Sustainability
Wood Sourcing Certifications
Demand FSC or PEFC certification to ensure timber comes from responsibly managed forests. These schemes guarantee replanting and biodiversity protection. Some manufacturers use reclaimed timber from old buildings or scaffolding boards, offering unique character and minimal environmental impact. Ask about chain of custody documentation; reputable suppliers can trace every beam from forest to finished product. Avoid tropical hardwoods unless they carry specific sustainable certification—many species are illegally logged, contributing to deforestation.
Thermal Efficiency Benefits
The lean-to design inherently reduces heating demand by 30-50% compared to freestanding models. The fence wall’s thermal mass stores daytime heat, while the single-pitch roof minimizes air volume needing heating. When combined with double-wall polycarbonate glazing, these structures can maintain frost-free conditions through most UK winters without supplementary heating. This translates to lower carbon emissions and reduced running costs. Some gardeners install reflective insulation panels on the fence-side wall during winter, bouncing light onto plants while adding an extra R-value of 2-3.
End-of-Life Considerations
Quality wooden greenhouses are biodegradable at end-of-life, unlike aluminum or PVC structures. Metal hardware can be recycled, and untreated wood can be chipped for mulch. When purchasing, ask about disassembly design—structures held with bolts and screws are easier to dismantle and repurpose than those using adhesives. Some manufacturers offer take-back schemes, reclaiming old frames to refurbish and resell. This circular approach minimizes waste and often provides a small return on your initial investment.
Frequently Asked Questions
What exactly is a lean-to greenhouse and how does it differ from a standard greenhouse?
A lean-to greenhouse is a structure built against an existing wall or fence, using that surface as one of its sides. Unlike freestanding greenhouses that have glass or polycarbonate on all sides, lean-to models have a solid rear wall that provides insulation and structural support. This design makes them more thermally efficient, space-saving, and often more affordable since you’re utilizing an existing structure. The single-pitched roof slopes away from the supporting wall, typically requiring less material and offering easier rainwater management than the dual-pitched roofs common on standalone models.
Can I install a wooden lean-to greenhouse against my neighbor’s fence?
This is legally complex and generally inadvisable. You must have explicit written permission from your neighbor, as you’ll need to attach brackets or supports to their property. Even with permission, consider what happens if they replace the fence or if disputes arise. A better approach is to install your own fence posts and panels specifically to support the greenhouse, positioned just inside your boundary. This gives you full control and avoids neighborly complications. Always check your property deeds and local regulations before proceeding.
What type of wood lasts longest for a lean-to greenhouse?
Hardwoods like oak, iroko, or sapele offer the longest natural lifespan, often exceeding 25 years without treatment due to their high tannin content and dense grain. Among softwoods, western red cedar is the premium choice, naturally rot-resistant and stable. Pressure-treated pine or spruce, when properly maintained, will last 15-20 years. The key is not just species but also grade—select timber free of knots in critical structural areas, as knots are weak points where decay begins. Always choose timber rated for “hazard class 3” (above ground, exposed) minimum.
Do I need planning permission for a lean-to greenhouse against my fence?
In the UK, most lean-to greenhouses fall under “permitted development” if they’re under 2.5m tall and positioned more than 2m from the boundary. However, if you’re attaching to a boundary fence, you may be within that 2m zone, triggering height restrictions of 2m. Conservation areas, listed buildings, and properties with Article 4 directions have stricter rules. Always verify with your local planning authority before purchasing. In the US, regulations vary by municipality—check zoning laws, HOA covenants, and permit requirements. It’s better to spend an hour confirming than face enforcement action later.
How do I prevent my fence from rotting where the greenhouse touches it?
Create a physical and ventilated gap between greenhouse and fence. Use spacer brackets that hold the greenhouse frame 2-3cm away from the fence, allowing air circulation. Install a waterproof membrane on the fence surface behind the greenhouse, tucked under the fence capping and extending to ground level. Ensure the greenhouse roof overhangs enough that water doesn’t cascade down the fence. Most importantly, avoid direct soil contact with fence posts—use concrete spurs or metal post anchors to keep wood out of the damp ground.
Can I build a wooden lean-to greenhouse on a patio or concrete base?
Yes, but with important modifications. The base must be perfectly level and capable of supporting the concentrated loads at anchor points. You’ll need to drill into the concrete to install anchor bolts, which may compromise the patio’s integrity or damp-proof membrane. Consider using a timber sub-frame on adjustable feet that distributes weight more evenly. Drainage becomes critical—without soil absorption, water must be channeled away through gaps in the base or a connected drainage system. A patio installation also loses the thermal mass benefit of soil against the rear wall.
What’s the best glazing option for a beginner gardener?
Twin-wall polycarbonate offers the best balance of safety, insulation, and durability for newcomers. It’s virtually unbreakable, provides good UV protection, and the air gap between layers offers insulation value around R-1.7. While not as visually clear as glass, modern polycarbonate has excellent light diffusion that reduces scorching and shadows. It’s also lightweight, simplifying installation. The downside is potential algae growth between layers if seals fail, and it scratches more easily than glass. For a family garden with children or where ball sports are played nearby, polycarbonate eliminates safety worries.
How do I ventilate a lean-to greenhouse on a hot summer day?
Implement a multi-pronged approach. Open all roof vents fully and position side louvres on the non-fence side to create cross-breeze. If temperatures exceed 30°C, prop open the door and use a circulating fan to prevent hot spots. Apply external shade paint or deploy shade cloth on the roof, which can reduce internal temperatures by 10-15°C. For extreme heat, temporarily remove some glazing panels or install a misting system. The lean-to’s design actually helps here—the fence provides afternoon shade, and you can leverage this by orienting the structure so the fence blocks the hottest western sun.
Will a wooden greenhouse attract pests or termites?
Quality timber treated to appropriate standards resists insect attack, but vigilance is wise. Termites are rare in the UK but problematic in warmer US states. Keep the greenhouse interior dry—excess moisture attracts wood-boring insects. Avoid stacking wood or cardboard against the frame, as these harbor pests. Inspect annually for small holes or frass (wood dust) indicating boring insects. Cedar’s natural oils repel many insects, while pressure-treatment chemicals deter others. For organic gardeners concerned about chemicals, borate treatments offer effective, low-toxicity protection that’s safe around food crops.
How long should I expect my wooden lean-to greenhouse to last?
With proper maintenance, a pressure-treated softwood greenhouse should serve 15-20 years. Hardwood models extend to 25-30 years. The glazing typically needs replacement first—polycarbonate panels may cloud after 10-15 years, and rubber seals perish in 8-12 years. Hardware like hinges and vent openers might need replacement every 5-10 years. The determining factor is maintenance discipline; annual inspection and prompt repair of any issues dramatically extend lifespan. A neglected wooden greenhouse can fail in under 10 years, while a well-cared-for structure becomes a multi-generational garden feature.