Starting seeds indoors transforms from a frustrating gamble into a near-certain science when you arm yourself with the right tools. Most gardeners struggle with dismal germination rates not because of a “black thumb,” but because they’re missing critical supplies that commercial nurseries consider non-negotiable. The difference between watching 30% of your seeds sprout and achieving that coveted 99% success rate isn’t luck—it’s about creating a controlled environment where temperature, moisture, light, and oxygen exist in perfect harmony.
While experienced growers might make seed starting look effortless, they’ve simply mastered the art of using professional-grade supplies that eliminate variables. This comprehensive guide breaks down the ten essential supply categories that serious gardeners rely on, focusing specifically on the features and characteristics that separate amateur equipment from the tools that virtually guarantee every viable seed will become a thriving seedling. Whether you’re starting a few tomatoes on a windowsill or launching a full-scale backyard nursery, understanding what to look for in these supplies will revolutionize your success rate.
Top 10 Seed Starting Supplies for High Germination
Detailed Product Reviews
1. Gardzen 5-Set Seed Starter Tray Kits, Durable Plant Germination Trays with Humidity Vented Domes and Bases, Ideal for Seed Starting, Indoor Gardening, and Greenhouse (Total 200 Cells)

Overview:
The Gardzen 5-Set Seed Starter Tray Kits deliver exceptional capacity for serious gardeners, providing 200 cells across five durable trays. Each 40-cell unit features upgraded dual adjustable vents on the humidity domes, offering superior airflow control compared to single-vent designs. Made from premium plastic, these trays withstand multiple growing seasons while clear domes enable easy monitoring of seedling progress. Drain holes prevent waterlogging, and included stickers create a tighter dome-to-base seal for optimal moisture retention. This versatile system excels at germinating vegetables, herbs, and flowers indoors or in greenhouse environments. While lacking integrated lighting or heating, its heat mat compatibility and straightforward design make it accessible for beginners yet robust enough for experienced growers managing extensive seed inventories.
What Makes It Stand Out:
The dual vent system represents a significant upgrade, allowing precise humidity management that prevents damping-off disease. With 200 cells at under $20, the capacity-per-dollar ratio is unmatched for ambitious home gardeners or market growers needing volume.
Value for Money:
At $19.99 ($0.10 per cell), this offers one of the lowest costs per planting site available. Competing products typically charge 2-3x more per cell, making it economical for large-scale seed starting without sacrificing quality.
Strengths and Weaknesses:
Strengths: Massive 200-cell capacity, durable construction, superior dual ventilation, excellent drainage, clear observation domes, heat mat compatible
Weaknesses: No integrated lighting or heating, shorter domes limit plant height, basic features may disappoint advanced users
Bottom Line:
If you’re starting dozens of varieties or hundreds of plants, this kit provides unbeatable value and capacity. It’s a workhorse system that prioritizes quantity and essential functionality over high-tech features, making it ideal for annual seed starting.
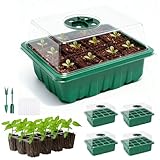
2. Bonviee 5-Pack Seed Starter Trays, Seed Starter Kit with Adjustable Humidity Dome and Base Indoor Greenhouse Mini Propagator for Seeds Growing Starting (12 Cells Per Tray, Green)

Overview:
The Bonviee 5-Pack Seed Starter Trays provides an ultra-affordable entry into indoor gardening with 60 cells across five compact, crystal-clear trays. Each 12-cell unit features adjustable vents for temperature and humidity control, while the robust plastic construction withstands heat mat temperatures without warping—a crucial feature for boosting germination rates. The 1.5-inch square cells accommodate larger seeds like tomatoes and peppers that struggle in smaller compartments. Watertight base trays prevent leaks, and ten included plant labels aid organization. While cell count per tray is modest, the five-tray configuration offers flexibility to start different varieties simultaneously. The system’s simplicity makes it perfect for beginners testing their green thumb or apartment dwellers with limited space, requiring minimal learning curve despite lacking detailed instructions.
What Makes It Stand Out:
The crystal-clear trays provide the best visibility on the market, letting you monitor root development and moisture levels without disturbing seedlings. Heat mat compatibility at this ultra-low price point is exceptional for boosting germination success.
Value for Money:
At $9.99 ($2 per tray), this is the most economical quality option available. Comparable clear trays alone often cost $3-4 each, making this bundle effectively half the price of purchasing components separately.
Strengths and Weaknesses:
Strengths: Ultra-affordable, crystal-clear observation, heat mat resistant, ideal cell size for large seeds, includes labels, leak-proof bases
Weaknesses: Low cells per tray (12), no integrated lighting, basic ventilation, limited capacity for serious growers
Bottom Line:
Perfect for beginners or casual gardeners needing a simple, reliable system for starting a few dozen plants. The transparency and heat resistance offer surprising quality at a rock-bottom price, making it an excellent low-risk entry point.
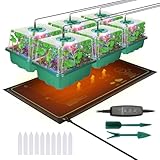
3. SOLIGT 60 Cell Seed Starter Kit with Grow Light and Heat Mat, Seed Starter Tray with Higher 4.3” Humidity Dome, Flexible Light Positioning for Seed Starting & Seedling Growth

Overview:
The SOLIGT 60 Cell Seed Starter Kit represents a premium all-in-one solution for serious indoor gardeners seeking professional results. This comprehensive package includes a 60-cell tray, humidity dome, waterproof heat mat, and an innovative 11.5W full-spectrum grow light with a flexible three-head gooseneck design. The 4.3-inch tall dome provides ample vertical space for seedlings, with adjustable vents for precise humidity control. The grow light offers five brightness levels and three timer settings, while the heat mat delivers consistent warmth for rapid germination. Heavy-duty plastic trays ensure durability across multiple growing seasons. The flexible lighting system mounts via clip or stand, remaining useful even after removing the dome for hardening off plants. This kit eliminates guesswork with included instructions and creates an optimal microenvironment for everything from herbs to vegetables.
What Makes It Stand Out:
The flexible gooseneck lighting system with multiple brightness and timer settings provides customization unmatched by fixed-light kits. The 4.3-inch dome height accommodates seedlings longer before transplanting, reducing transplant shock.
Value for Money:
At $49.99, you’re getting a heat mat ($15 value), advanced LED grow light ($25 value), and quality trays ($15 value) for less than purchasing separately. The convenience and professional results justify the investment for dedicated growers.
Strengths and Weaknesses:
Strengths: Complete all-in-one system, flexible lighting with timers, tall humidity dome, waterproof heat mat, heavy-duty construction, professional germination rates
Weaknesses: Highest price point, may be overkill for casual gardeners, gooseneck requires more space
Bottom Line:
For committed indoor gardeners wanting maximum control and professional germination rates, this kit delivers exceptional performance. It’s a worthwhile investment that streamlines the seed-starting process and pays dividends through healthier seedlings.
4. Seed Starter Trays with Grow Lights and Heat Mat, 72 Cells Seed Starter Kit with Lights, 3 Lighting Mode, 4 Timing Set, Germination Kit for Seed Starting Trays with High Humidity Control Domes
Overview:
This 72-cell seed starting kit strikes an impressive balance between advanced features and affordability, making it ideal for intermediate gardeners ready to upgrade their setup. The package includes six 12-cell trays, a waterproof heat mat, and six grow lights with three distinct lighting modes: white light, blue+red combination, and full spectrum white+blue+red. This versatility allows you to tailor light spectrums for different growth stages—blue light inhibits legginess while red promotes strong stems and flowering. The 21-watt heat mat provides gentle, consistent warmth up to 90-100°F. Each 1.6-inch square cell features proper drainage holes, while base trays capture excess water. Transparent domes include adjustable circular vents controlling humidity from 50-100%. While the brand is less recognizable, the feature set competes with premium options at a mid-range price. The system works exceptionally well for light-hungry seedlings like herbs, tomatoes, and peppers.
What Makes It Stand Out:
The three lighting modes with dedicated blue and red LEDs provide targeted spectral control rarely seen under $30, enabling optimization for vegetative growth and flowering stages that basic white lights cannot match.
Value for Money:
At $29.99, this kit undercuts competitors by $10-20 while offering superior lighting versatility and 20% more cells than typical 60-cell kits, delivering remarkable feature density for the price.
Strengths and Weaknesses:
Strengths: Three lighting modes, included heat mat, 72-cell capacity, excellent drainage, adjustable humidity control (50-100%), spectrum optimization
Weaknesses: Generic brand, shorter dome height, multiple small trays can be cumbersome, no integrated timer function
Bottom Line:
An outstanding value for gardeners wanting spectral control without premium pricing. The lighting versatility makes it perfect for growing herbs and vegetables from seed to transplant, offering professional features at a hobbyist price point.
5. Patigrow 60-Cell Self-Watering Seed Starter Tray with Grow Light, Seed Starter Kit with 4.07” Humidity Dome, Indoor Seedling Starter Tray, Seed Starting Trays for Plant Germination, Seeds Growing

Overview:
The Patigrow 60-Cell Self-Watering Seed Starter Kit combines automation and convenience for busy gardeners seeking consistent results with minimal daily effort. This comprehensive system features a self-watering design using a capillary mat that maintains optimal moisture from germination to transplant, eliminating both drought stress and deadly damping-off from overwatering. The integrated LED system boasts 56 high-efficiency beads per tray, simulating natural sunlight with adjustable brightness and timer functions. A 4.07-inch humidity dome with dual vents provides excellent environmental control, while 1.5mm thick BPA-free PET construction ensures durability and safety. The kit includes thoughtful accessories: plant stand, 20 labels, and gardening tools. The self-watering reservoir reduces maintenance to weekly fill-ups, making it ideal for frequent travelers or beginners. At $39.99, it positions itself between basic and premium kits, justifying the cost through time-saving automation that prevents costly seedling losses.
What Makes It Stand Out:
The self-watering capillary mat system is a game-changer for moisture management, automating the most common cause of seedling failure—improper watering—while the high LED count ensures vigorous growth.
Value for Money:
At $39.99, you’re paying approximately $15 more than basic kits for automation that saves time and prevents seedling losses. The included accessories and robust construction offer solid ROI for busy gardeners.
Strengths and Weaknesses:
Strengths: Self-watering system, high LED count with timers, tall dome, durable BPA-free construction, comprehensive accessory package, prevents watering errors
Weaknesses: Higher price, more complex initial setup, capillary mat requires periodic replacement, may be overkill for small projects
Bottom Line:
Perfect for time-pressed gardeners who want to automate watering while maintaining professional-grade lighting. The self-watering feature alone makes it worth the premium, delivering consistent results with minimal daily intervention.
6. MIXC 10 Packs Seed Starter Tray Seed Starter Kit with Humidity Dome (120 Cells Total Tray) Seed Starting Trays Plant Starter Kit and Base Mini Greenhouse Germination Kit for Seeds Growing Starting

Overview: MIXC offers a comprehensive seed starting solution with 10 complete trays totaling 120 cells. Each unit includes a seed tray, watertight base, humidity dome, and plant labels, creating a mini greenhouse environment. The adjustable vents provide climate control while drainage holes prevent waterlogging, making this kit suitable for both novice and experienced gardeners.
What Makes It Stand Out: The sheer quantity sets this apart—10 full setups allow simultaneous growing of diverse plant varieties. The adjustable vents on each dome give precise control over temperature and humidity, crucial for germination success. Its reusable, portable design means you can start seeds indoors then easily move them outdoors as weather permits.
Value for Money: At $1.80 per complete tray, this kit delivers exceptional bulk value. Purchasing components separately would cost significantly more. For gardeners planning large-scale seed starting, the 120-cell capacity covers extensive growing needs without the premium pricing of professional systems, making it an economical choice for seasonal growing.
Strengths and Weaknesses: Strengths include high tray count, complete accessory package, adjustable ventilation, and proper drainage. The kit is lightweight and reusable across multiple seasons. Weaknesses are the relatively low 12 cells per tray, which may limit larger seedlings, and basic plastic construction that may not match premium durability standards.
Bottom Line: This MIXC kit excels for gardeners wanting quantity and completeness at an accessible price. While not the most robust option, its 10-tray system with humidity control provides everything needed for successful seed starting on a larger scale. Perfect for ambitious home gardeners and beginners alike.
7. MIXC Seedling Trays Seed Starter Tray, 5-Pack Mini Propagator Plant Greenhouse Grow Kit with Humidity Vented Domes and Base for Seeds’ Starting (40 Cells Per Tray, Total 200 Cells), Green

Overview: MIXC’s 5-pack seed starter kit delivers 200 cells across compact trays designed for space-conscious gardeners. The transparent plastic construction allows unobstructed observation of root development and seedling progress. With adjustable vented domes and stackable base trays, this system maximizes efficiency in limited growing spaces while maintaining proper humidity control.
What Makes It Stand Out: The high cell density—40 per tray—distinguishes this kit, offering more growing capacity in a smaller footprint. Transparent trays enable monitoring without disturbing seedlings. The stackable design is ingenious for pre-germination storage, saving valuable indoor space. Included garden tools and labels make this a ready-to-use solution.
Value for Money: At $3.97 per tray, the price reflects the higher cell count and enhanced features. While costlier than basic kits, the 200-cell capacity and space-saving design justify the investment for urban gardeners or those with limited space. The observation-friendly transparent design adds practical value.
Strengths and Weaknesses: Strengths include high cell density, transparency for monitoring, stackable bases, and complete tool inclusion. The 1.5" cells suit small seeds perfectly. Weaknesses are the smaller cell size limiting root space, green plastic potentially reducing light penetration, and fewer trays reducing planting flexibility compared to larger kits.
Bottom Line: Ideal for small-seed varieties and space-limited setups, this MIXC kit prioritizes observation and efficiency. The transparent design and stackable feature make it perfect for serious seed starters needing maximum capacity in minimal space. Best for herbs, flowers, and vegetables with modest root systems.
8. Burpee SuperSeed Seed Starting Tray | 16 XL Cell | Reusable & Dishwasher Safe | for Starting Vegetable Seeds, Flower Seeds & Herb Seeds | Indoor Grow Kit for Deep-Rooted Seedlings, Green

Overview: Burpee’s SuperSeed tray redefines seed starting with 16 extra-large cells designed for deep-rooted seedlings. The food-grade silicone construction provides a flexible, non-stick environment that cradles delicate roots. Alphanumeric row labeling with the included Plant-o-Gram diagram ensures organized planting, while the sophisticated drainage system prevents water-related issues.
What Makes It Stand Out: The silicone cell design is revolutionary—gently flexing to release seedlings without root damage during transplanting. Dishwasher-safe construction ensures sterile conditions between uses. The molded corner slots and deep channels create superior drainage and aeration, addressing common germination failures. Burpee’s 100% satisfaction guarantee backs the quality promise.
Value for Money: At $0.74 per cell, this premium tray delivers professional-grade features at a reasonable price. The reusable silicone construction eliminates annual replacement costs, while the XL cell size reduces transplant shock. Burpee’s brand reputation and guarantee provide additional value unmatched by generic alternatives.
Strengths and Weaknesses: Strengths include innovative silicone cells, exceptional drainage, dishwasher-safe cleaning, XL capacity for deep roots, and brand reliability. Weaknesses are the limited 16-cell capacity, higher upfront cost for large-scale growing, and potential overkill for casual gardeners or small-seed varieties.
Bottom Line: This Burpee tray is the gold standard for serious gardeners starting valuable or deep-rooted plants. The silicone design’s gentle transplanting capability justifies the investment, particularly for tomatoes, peppers, and other vegetables requiring extended indoor growth. Premium quality for discerning growers.
9. SOLIGT [Thick Plastic] 3-Set Strong Seed Starter Trays with 5" Humidity Domes for Seed Starting, Germination, Seedling Propagation & Plant Growing, Holds 144 Cells in Total
![SOLIGT [Thick Plastic] 3-Set Strong Seed Starter Trays with 5" Humidity Domes for Seed Starting, Germination, Seedling Propagation & Plant Growing, Holds 144 Cells in Total](https://m.media-amazon.com/images/I/51m71KzZ2cL._SL160_.jpg)
Overview: SOLIGT’s heavy-duty seed starter system features three robust trays with 144 total cells and impressive 5-inch humidity domes. Constructed from thick, premium plastic, this kit is engineered for durability and longevity. The tall domes accommodate larger seedlings, while the tight seal maintains optimal warmth and humidity for robust germination and propagation.
What Makes It Stand Out: The exceptional build quality distinguishes this kit—thick plastic withstands repeated use without cracking. Extra-high domes (5 inches) support taller seedlings longer, reducing premature transplanting. The tight seal between dome and tray creates a superior mini-greenhouse environment. No-hole trays prevent messy leaks, ideal for indoor use.
Value for Money: At $11.66 per tray, this is a premium investment. However, the heavy-duty construction ensures years of reuse, offsetting initial cost. For serious propagators or those growing microgreens and herbs commercially, the durability and tall dome design provide professional-grade value that cheaper alternatives cannot match.
Strengths and Weaknesses: Strengths include superior durability, tall domes for extended growth, excellent humidity control, leak-proof design, and tight seal. Weaknesses are the higher price point, limited three-tray quantity, and lack of drainage holes requiring careful watering management. The weight, while sturdy, reduces portability.
Bottom Line: Built for longevity and performance, SOLIGT’s kit suits dedicated gardeners and small-scale commercial growers. The tall domes and robust construction justify the premium price for those prioritizing durability over quantity. An excellent choice for propagating prized varieties or growing microgreens.
10. PlantaPulse 5 Packs Seed Starter Tray with Humidity Dome, Seed Starter Kit with Transparent Drain Hole Base Indoor Greenhouse Mini Propagator for Seeds Growing Starting(60 Cell Trays, Green)
Overview: PlantaPulse delivers an affordable 5-pack seed starter kit with 60 cells and comprehensive humidity control. The transparent design enables root observation, while adjustable vents and drainage holes provide essential environmental management. Heat resistance from 0-172°F makes this kit uniquely compatible with heating mats and lamps, expanding growing possibilities for temperature-sensitive seeds.
What Makes It Stand Out: The exceptional heat compatibility sets this apart—most trays warp under heating equipment, but PlantaPulse maintains integrity across extreme temperatures. The transparent construction allows monitoring root health and soil moisture. Despite the low price, it includes all essentials: domes, bases, labels, and tools, creating a complete starter solution.
Value for Money: At $2.20 per tray, this kit offers remarkable affordability without sacrificing key features. The heat resistance adds significant value for gardeners using propagation equipment. For beginners or those on tight budgets, it provides professional features like adjustable vents and drainage at a fraction of premium brand costs.
Strengths and Weaknesses: Strengths include heat compatibility, transparency, complete accessory package, adjustable ventilation, and budget price. Weaknesses are the low 60-cell total capacity, basic plastic durability concerns, and smaller cell size limiting growth duration. The lightweight design aids portability but may sacrifice stability.
Bottom Line: PlantaPulse excels as an entry-level kit with professional features, especially for heat mat users. The temperature tolerance and transparent design make it ideal for learning seed starting basics. While not the most durable, its affordability and completeness make it perfect for beginners testing their green thumb.
1. Professional-Grade Seed Starting Trays and Containers
Features to Consider
The foundation of your seed starting operation begins with the trays that hold your precious seeds. Professional-grade trays differ dramatically from the flimsy, disposable versions found in big-box stores. Look for trays with reinforced corners that resist cracking when filled with wet soil and lifted repeatedly. The plastic should feel substantial—at least 0.6mm thick—and be rated for multiple growing seasons. UV-stabilized polypropylene prevents brittleness under grow lights and resists degradation from cleaning solutions.
Cell Size and Tray Configuration
Cell size directly impacts root development and transplant success. Standard 72-cell trays work well for most vegetables, but serious growers often invest in a variety of configurations. Deep-cell trays (2-3 inches) prevent root binding in slow-growing crops like peppers and eggplants, while 128-cell trays maximize space for fast-germinating lettuce or onions. The best systems feature removable inserts that let you customize tray density based on what you’re growing each season.
Material Quality and Durability
BPA-free, food-grade plastic isn’t just a health precaution—it ensures the material won’t leach chemicals that inhibit germination. Professional trays withstand repeated sterilization with a 10% bleach solution or hydrogen peroxide without warping. Check for smooth interior surfaces without rough seams that could damage delicate roots during transplanting. The tray bottom should have minimal flex when lifted full of soil to prevent disturbing developing root systems.
Reusability and Sterilization Design
Top-tier trays include features that facilitate cleaning, such as rounded corners and smooth drainage holes that won’t trap soil particles. Some professional models are dishwasher-safe, allowing for high-temperature sterilization between uses. This reusability factor quickly offsets the higher initial investment while preventing disease transmission from season to season.
2. Premium Seed Starting Mix
What Makes a Mix “Premium”
Premium seed starting mix bears little resemblance to potting soil or garden dirt. These specialized blends provide the ideal balance of moisture retention, drainage, and aeration that seeds require. The texture should feel light and fluffy, almost like coarse coffee grounds, with no large particles or clumps. Professional mixes are sterilized to eliminate pathogens, weed seeds, and fungus gnats that plague homemade compost blends.
Ingredients to Look For
The gold standard contains fine-grade peat moss or coconut coir as the base, providing consistent moisture without waterlogging. Added perlite or vermiculite creates air pockets essential for oxygen exchange around germinating seeds. Some premium blends incorporate beneficial mycorrhizae that colonize roots immediately after emergence, accelerating growth by up to 30%. Look for mixes with a small amount of limestone to maintain stable pH between 5.8 and 6.2—the sweet spot for most vegetable seeds.
What to Avoid
Never use garden soil, even from your best beds. It compacts too easily, contains pathogens, and harbors insects that decimate seedlings. Avoid mixes with added fertilizers or “moisture crystals”—these can burn delicate seedlings and create uneven moisture distribution. Steer clear of any blend containing bark chips, wood shavings, or other large organic matter that impedes tiny seeds from making proper soil contact.
pH and Moisture Retention Properties
Professional mixes maintain consistent pH throughout the germination period, preventing nutrient lockout that stunts seedlings. The water-holding capacity should keep cells moist for 24-48 hours without becoming soggy. Test a small amount by squeezing it in your fist—it should hold together briefly before crumbling apart, indicating perfect moisture balance.
3. Precision Heat Mats
Temperature Range and Control
Seeds are remarkably specific about temperature requirements—tomatoes germinate best at 80°F, while lettuce prefers 65°F. Professional heat mats offer precise temperature control within 1-2 degrees, not the broad 10-20 degree swings of consumer models. Look for mats with adjustable thermostats that reach at least 90°F for heat-loving crops like peppers and eggplants. The heating element should distribute warmth evenly across the entire mat surface without hot spots that cook seeds.
Size and Wattage Considerations
Calculate your needs based on standard 1020 tray dimensions. A 20-watt mat adequately warms one tray, while larger 48-watt models handle four trays simultaneously. Professional growers prefer modular systems that allow adding mats as their operation expands. The wattage should be low enough to run continuously without tripping circuits but sufficient to maintain temperature in rooms that drop to 60°F at night.
Waterproofing and Safety Features
Electrical components and moisture create dangerous combinations. Professional-grade mats feature multiple waterproofing layers and are rated IP67 or higher, meaning they can withstand temporary submersion. The power cord should include a grounded three-prong plug and be at least 6 feet long for flexible placement. Automatic shutoff features prevent overheating if the thermostat fails.
Thermostat Compatibility and Precision
Never operate a heat mat without a compatible thermostat. Professional thermostats include a temperature probe that inserts directly into the soil, measuring actual root-zone temperature rather than ambient air. Digital displays showing both setpoint and current temperature allow for precise monitoring. The best models include timers that gradually reduce temperature after germination to prevent leggy growth.
4. Full-Spectrum LED Grow Lights
Light Spectrum Requirements
Seedlings require specific wavelengths for proper development. Full-spectrum LEDs mimic natural sunlight, providing the blue light (400-500nm) that prevents stretching and red light (600-700nm) that drives photosynthesis. Professional fixtures include UV and far-red diodes that stimulate robust root development and disease resistance. Avoid “blurple” lights that emit only red and blue—these create unnatural growth patterns and weak plants.
Intensity and Distance Measurements
Light intensity, measured in micromoles (μmol/m²/s), determines seedling quality. Professional fixtures deliver 200-400 μmol/m²/s at the recommended hanging height. Look for lights with adjustable intensity settings or dimmers that let you start seeds at lower levels and increase power as they mature. The fixture should include clear guidelines for hanging distances at different growth stages—typically 24-36 inches for germination, 12-24 inches for seedlings.
Timer Functionality and Automation
Consistent photoperiods trigger proper germination and growth. Professional lights integrate programmable timers that automatically provide 14-16 hours of light daily. The best systems include gradual sunrise/sunset features that slowly ramp intensity up and down, mimicking natural light transitions and reducing seedling stress. Battery backup ensures programs aren’t lost during power outages.
Energy Efficiency and Heat Output
Quality LED fixtures convert over 90% of electricity into light rather than heat, preventing the temperature fluctuations that plague fluorescent systems. Look for efficacy ratings above 2.5 μmol/joule, indicating efficient conversion. Low heat output allows positioning lights closer to seedlings without scorching leaves, maximizing light absorption while maintaining proper temperatures.
5. Humidity Domes and Covers
Height and Ventilation Control
Humidity domes create the greenhouse effect seeds crave, but stagnant air breeds disease. Professional domes feature adjustable vents that allow gradual humidity reduction from 90% at sowing to 50% as seedlings develop. Dome height matters—2-inch domes suit most vegetables, but 4-7 inch domes accommodate larger seedlings and prevent them from touching moist plastic, which causes leaf rot.
Material Clarity and Light Transmission
Crystal-clear polycarbonate or acrylic transmits over 90% of light, while cloudy domes block crucial wavelengths. Professional-grade domes resist scratching and yellowing from UV exposure, maintaining clarity through multiple seasons. Some models include built-in magnifiers or observation windows that let you monitor progress without removing the dome and disrupting the microclimate.
Fit and Seal Quality
A proper dome should create a gentle seal with the tray without being airtight. Look for domes with reinforced edges that won’t crack when removed repeatedly. The fit should be snug enough to maintain humidity but loose enough to lift off easily with one hand. Professional systems include handles or grip points that prevent fingerprints on the clear surface.
6. Specialized Watering Tools
Spray Bottles and Misters
Seedlings require gentle moisture delivery that won’t dislodge seeds or compact soil. Professional-grade spray bottles produce a fine, even mist rather than a stream or large droplets. Look for bottles with adjustable nozzles that transition from mist to stream for different growth stages. The reservoir should hold at least 32 ounces to minimize refilling, and the pump mechanism must withstand daily use without failing mid-season.
Bottom-Watering Trays and Systems
Bottom watering encourages deep root growth and prevents fungal diseases on foliage. Professional systems include solid trays that hold 1-2 inches of water, allowing soil to wick moisture upward without sitting in standing water. The best designs feature fill spouts or indicators that show water levels without lifting trays. These systems should integrate seamlessly with your seed starting trays, creating a unified watering method.
Moisture Meters and Monitoring
Overwatering kills more seedlings than any other mistake. Professional moisture meters with thin probes (1/8 inch diameter) insert into cells without disturbing roots. Digital models provide percentage readings accurate to within 2-3%, while analog versions use color-coded zones. The meter should calibrate easily and include separate settings for different soil types.
7. Permanent Plant Labels and Markers
Material Durability and Longevity
Flimsy plastic labels become brittle and fade, leaving you with mystery seedlings. Professional labels use UV-stabilized plastic or metal that lasts 5+ years outdoors. The writing surface should be matte to prevent glare under grow lights and textured to hold ink. Metal labels with embossed writing areas provide the ultimate in permanence for varieties you’ll grow repeatedly.
Marker Ink Formulations
Standard permanent markers fade within weeks under intense grow lights. Professional garden markers use paint-based inks or wax pencils that resist fading for entire growing seasons. Some systems include thermal printers that create weatherproof labels from specialized tape. The ink should dry instantly and remain legible after repeated watering and handling.
Organization and Tracking Systems
Professional growers use color-coded labels or numbered systems that correspond to detailed records. Look for labels with both a stake portion and a detachable tag that can move with transplants. Some premium systems include QR codes or barcodes that link to digital growing journals, tracking sowing dates, germination times, and variety performance.
8. Gentle Seedling Fertilizers
NPK Ratios for Early Development
Seedlings require different nutrition than mature plants. Professional seedling fertilizers use diluted formulations like 2-1-2 or 3-1-2 NPK ratios that provide nitrogen for leaf growth without burning tender roots. The nitrogen should be partially derived from ammonium sources, which acidify soil slightly and improve nutrient uptake. Avoid any fertilizer with nitrogen levels above 5% during the first true leaf stage.
Liquid vs. Water-Soluble Options
Liquid concentrates offer precise dosing control—critical when feeding hundreds of seedlings. Professional formulations dilute at ratios like 1/4 teaspoon per gallon, allowing fine adjustments based on growth stage. Water-soluble powders should dissolve completely without residue that clogs spray bottles. The best products include chelated micronutrients like iron and manganese that prevent deficiency yellowing.
Organic vs. Synthetic Considerations
Organic fertilizers derived from fish emulsion or seaweed provide gentle nutrition and beneficial hormones but can develop odors indoors. Professional organic options are deodorized and filtered to remove solids. Synthetic formulations offer consistency and immediate nutrient availability but lack the biological benefits. Many serious growers use a hybrid approach—organic for initial feeding, synthetic for precision control before transplanting.
9. pH Testing and Adjustment Kits
Digital vs. Test Strip Accuracy
Seed germination is extremely pH-sensitive—most vegetables require 5.8-6.5. Digital pH pens provide accuracy to 0.1 pH units, while test strips offer only 0.5-unit precision. Professional pens feature automatic temperature compensation (ATC) since pH readings shift with soil temperature. The probe should be replaceable and the unit should calibrate easily with included buffer solutions.
pH Up/Down Solutions
When your mix tests outside the ideal range, professional-grade pH adjusters correct it without harming seedlings. These highly concentrated acids or bases dilute at rates like 1ml per gallon, allowing minute adjustments. The solutions should be food-grade and include detailed dosing charts. Avoid household vinegar or baking soda—they create unpredictable swings and introduce unwanted compounds.
Calibration and Maintenance Protocols
Professional pH pens require weekly calibration during heavy use. Quality kits include pH 4.0, 7.0, and 10.0 buffer solutions for three-point calibration. The probe should store in KCl solution, not distilled water, to maintain accuracy. Look for pens with replaceable probes—significantly cheaper than replacing the entire unit annually.
10. Timing and Organization Tools
Seed Starting Calendars and Planners
Success starts with sowing at the right time. Professional gardeners use customized spreadsheets or specialized apps that calculate sowing dates based on last frost, days to germination, and days to transplant size. The best systems integrate with weather data, adjusting recommendations if spring arrives early or late. Look for planners that account for your specific hardiness zone and microclimate variations.
Record-Keeping Systems
Tracking germination rates, vigor, and transplant success identifies which varieties and techniques work best. Professional growers maintain detailed logs including sowing date, germination percentage, days to emergence, and final yield. Digital apps with photo integration let you visually track progress and compare year-over-year results. The system should be simple enough to update in under 2 minutes daily.
Germination Trackers and Monitors
Specialized thermometers with min/max memory track temperature fluctuations that affect germination. Some professional setups use wireless sensors that transmit soil temperature, humidity, and light levels to your phone, alerting you when conditions drift outside optimal ranges. These devices typically log 30+ days of data, revealing patterns that help refine your technique.
Understanding Core Germination Requirements
The Science of Seed Viability
A seed is a dormant embryo surrounded by a protective coat, containing stored energy reserves. Germination triggers when moisture penetrates the seed coat, activating enzymes that convert starches to sugars. Temperature controls the speed of these biochemical reactions, while oxygen fuels respiration. Even with perfect supplies, you can’t exceed the natural viability rate—typically 85-95% for fresh, properly stored seeds. Professional supplies ensure you capture every possible viable seed.
Moisture, Temperature, and Oxygen Balance
These three factors form the germination triangle. Too much water fills soil pores, suffocating seeds. Too little prevents enzyme activation. Temperatures too low slow metabolism to a crawl; too high denatures proteins. Professional supplies create micro-environments where these factors remain in optimal ranges. Heat mats maintain temperature, humidity domes preserve moisture, and quality mix provides oxygen-rich structure.
Temperature Control Strategies
Heat Mat Placement Techniques
Positioning matters as much as the mat itself. Place mats on rigid insulation board rather than directly on cold surfaces to direct heat upward. For heat-loving crops, stack two thin mats with a sheet of reflective bubble wrap between them to create gentle, even warmth. Professional growers separate mats by crop type, creating zones for cool-season and warm-season plants in the same space.
Room Temperature vs. Soil Temperature
Soil temperature can lag 5-10°F behind room temperature, especially in large trays. Professional setups prioritize soil temperature using probe thermostats, often running mats 24/7 initially while keeping ambient air cooler to slow disease development. This approach uses 30% less energy than heating an entire room and provides superior results.
Light Management Techniques
Photoperiod Optimization
Different crops respond to day length. While most vegetables germinate under any light schedule, providing 16 hours of light and 8 hours of darkness from day one prevents etiolation (stretching) and builds robust plants. Professional timers with battery backup ensure this schedule never falters, even during power blips. Some advanced systems gradually increase day length to simulate spring progression, hardening seedlings naturally.
Light Height Adjustment Schedule
Keeping lights at the correct distance maximizes growth while preventing heat stress. Professional growers raise lights 1-2 inches weekly as seedlings grow, maintaining 6-12 inches above the canopy. This adjustment schedule should be logged and followed religiously. Lights positioned too far cause leggy seedlings; too close scorches leaves and stunts development.
Air Circulation and Ventilation
Preventing Damping-Off Disease
Stagnant, humid air creates perfect conditions for Pythium and Rhizoctonia fungi that cause damping-off. Professional setups include small oscillating fans that create gentle air movement (not directly on seedlings). This strengthens stems while keeping foliage dry. The fan should run continuously on low speed, positioned to circulate air around the growing area without creating drafts that dry soil too quickly.
Gradual Hardening-Off Preparation
Proper air circulation from day one reduces transplant shock. Professional growers introduce gentle air movement when cotyledons first appear, gradually increasing fan speed as seedlings mature. This simulates outdoor conditions and builds stronger cell walls. Two weeks before transplanting, increase fan speed and duration to match outdoor breezes, reducing hardening-off time by half.
Common Germination Mistakes to Avoid
Overwatering Pitfalls
The number one killer of seedlings is well-intentioned but excessive watering. Professional supplies help prevent this through bottom-watering systems and moisture meters. The rule is simple: water only when the top 1/4 inch of mix feels dry to the touch. Overwatered seeds rot before emerging; overwatered seedlings develop root rot and topple overnight. Quality trays with excellent drainage prevent water from pooling at the bottom.
Incorrect Temperature Settings
Every seed variety has an optimal germination temperature range, typically 65-85°F. Setting your heat mat to 75°F for everything yields mediocre results. Professional growers maintain a chart of optimal temperatures for each crop and adjust mats accordingly. Tomatoes and peppers thrive at 80-85°F, while lettuce and spinach germinate best at 65-70°F. This attention to detail separates 70% germination from 99% success.
Insufficient Light Exposure
Windowsills rarely provide enough light for stocky seedlings. Even with grow lights, insufficient duration or intensity causes weak, stretched plants that never recover. Professional setups provide 200-400 μmol/m²/s of full-spectrum light for 14-16 hours daily from germination onward. This intensity equals bright shade outdoors and produces seedlings that transplant successfully without setback.
Frequently Asked Questions
Why are my seeds germinating unevenly even with professional supplies?
Uneven germination usually stems from inconsistent moisture or temperature within the tray. Seeds on the edges often dry faster or receive less heat mat contact. Rotate trays 180° daily and use a spray bottle to moisten dry cells individually. Ensure your heat mat covers the entire tray bottom and isn’t smaller than the tray itself.
How long should I keep the humidity dome on after seeds sprout?
Remove the dome immediately after 50-75% of seeds have germinated. Extended high humidity causes fungal issues and weak stems. If some seeds haven’t sprouted after a week, prop the dome open 1-2 inches to reduce humidity while maintaining moisture for the stragglers. Never leave domes on past the cotyledon stage.
Can I reuse seed starting mix from last year?
Never reuse seed starting mix. It compacts during the first use, reducing oxygen availability. More importantly, it may harbor pathogens that cause damping-off. Professional growers discard used mix or compost it for mature plants only. The small cost savings isn’t worth risking an entire season’s seedlings.
What’s the ideal distance between grow lights and seedlings?
Start with lights 24-36 inches above the soil surface during germination. Once seedlings emerge, lower lights to 6-12 inches above the canopy. If you see leaf bleaching or feel heat on your hand at seedling level, raise the lights 2-3 inches. Leggy, stretched seedlings indicate lights are too far away.
Do I need a heat mat for cool-season crops like lettuce?
Cool-season crops germinate best at 65-70°F, which most homes maintain. However, heat mats set to the lowest setting (around 65°F) provide consistent temperatures that speed germination by 2-3 days and improve uniformity. If your seed starting area drops below 60°F at night, a mat becomes essential even for cool crops.
How often should I fertilize seedlings?
Wait until the first true leaves appear, then fertilize at 1/4 strength every 7-10 days. Over-fertilizing burns roots and creates salt buildup that inhibits growth. Professional growers use clear water for the first watering after fertilizing to flush excess salts. If leaves develop brown tips, reduce fertilizer concentration by half.
Why do my seedlings fall over and die suddenly?
This is classic damping-off disease, caused by fungal pathogens in overly wet conditions. Ensure your seed starting mix is sterile and you’re not overwatering. Improve air circulation with a small fan and remove humidity domes promptly after germination. Water in the morning so soil surface dries slightly by evening when fungal spores are most active.
Can I start seeds successfully without grow lights?
While possible with extremely bright south-facing windows, success rates drop significantly. Winter and early spring sun angles are too low, and day length too short, for robust growth. If you must use natural light, supplement with a simple shop light fixture holding daylight LED bulbs positioned 6 inches from seedlings for 14 hours daily.
How do I know if my seeds are too old to germinate?
Perform a simple germination test: place 10 seeds on a damp paper towel, fold it, and put it in a plastic bag at room temperature. After the typical germination period, count sprouted seeds. If 8-10 germinate, the batch is viable. If fewer than 5 sprout, replace the seeds. Professional growers test all seeds over 2 years old before committing tray space.
What’s the single most important supply for improving germination rates?
While all supplies work synergistically, a quality seed starting mix has the biggest impact. Even with perfect temperature and light, poor soil structure prevents oxygen from reaching seeds or causes them to rot. Invest in premium, sterile mix first, then add other supplies as budget allows. This one change often improves germination from 50% to 80% immediately.