There’s something magical about peeking into a cold frame on a crisp spring morning and seeing rows of vibrant green seedlings reaching toward the light. That vision of garden potential—tomatoes, peppers, herbs, and flowers all getting their start in your protected microclimate—represents one of the most cost-effective ways to extend your growing season. But here’s the challenge: cold frames are compact by design, and maximizing that limited square footage requires strategic thinking. The right seed starting rack system transforms that humble box into a vertical nursery, multiplying your capacity without sacrificing the tender care each seedling deserves.
Whether you’re working with a homemade wooden frame or a sleek commercial model, understanding how to integrate shelving systems properly can mean the difference between a chaotic jumble of trays and an organized propagation powerhouse. Let’s explore the essential design principles, material considerations, and spatial strategies that will help you create the perfect seed starting setup for your cold frame environment.
Top 10 Seed Starting Racks for Cold Frames
Detailed Product Reviews
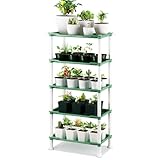
1. RooTrimmer 5-Tier Seed Starter Trays Plant Stand, with Bottom-Watering Design– Reinforced Thickened Shelf for Small Pots, Balcony/Indoor Seed Starting & Greenhouse, Black

Overview: The RooTrimmer 5-Tier Seed Starter Stand offers an innovative bottom-watering solution for urban gardeners and seed starting enthusiasts. At $35.99, this black metal frame provides a space-efficient vertical growing system measuring approximately 37.6 inches tall, designed specifically for small pots and seed trays on balconies or indoor spaces.
What Makes It Stand Out: The self-watering reservoir system sets this apart from basic plant stands. Instead of daily top-watering, the bottom reservoir distributes moisture evenly, preventing both root rot and drought stress. The thickened black frame ensures durability while maintaining a sleek, professional appearance that complements modern decor. Its five-tier design maximizes vertical space without sacrificing accessibility.
Value for Money: At under $36, this stand costs less than many basic metal shelving units while offering specialized horticultural features. The integrated watering system eliminates the need for separate self-watering trays, saving an additional $15-25. For apartment dwellers, the space optimization alone justifies the investment compared to horizontal growing methods.
Strengths and Weaknesses: Pros: Innovative bottom-watering design reduces maintenance; sturdy reinforced frame; excellent space utilization; simple assembly; smooth finish for easy cleaning. Cons: No protective cover limits climate control; plastic trays not included; black color may absorb heat excessively in direct sunlight; lacks mobility features.
Bottom Line: Perfect for beginners and space-constrained gardeners seeking a low-maintenance seed starting solution. The self-watering feature alone makes it worth considering over standard shelving units, though serious growers may want to supplement with a humidity dome.
2. Indoor Greenhouse with Grow Light, Ohuhu 4-Tier Mini Green House for Winter - Full Spectrum Greenhouses for Seed Starting Small Portable Green Houses Waterproof PVC Cover & Adjustable Shelves

Overview: The Ohuhu 4-Tier Mini Greenhouse represents a complete indoor growing system for $129.99, integrating full-spectrum LED lighting with a portable greenhouse structure. Measuring 27.2" x 19.9" x 61.8", it creates a controlled environment for year-round seed starting and plant cultivation, ideal for winter gardening.
What Makes It Stand Out: This system eliminates the guesswork from indoor growing. The full-spectrum grow light (400-750 nm) mimics natural sunlight, while smart timer options (4/8/12 hours) and 11 brightness levels provide precision control typically found in professional setups. The 95% light-transmitting PVC cover maintains 70-80% humidity, creating optimal growing conditions.
Value for Money: Purchasing equivalent components separately—a quality grow light ($60-80), timer ($15), and greenhouse ($40-60)—would exceed $115. The integrated design, tool-free assembly, and professional-grade features justify the premium price for serious gardeners wanting consistent results.
Strengths and Weaknesses: Pros: Complete all-in-one system; intelligent lighting controls; excellent light transmission; sturdy steel frame; each shelf supports 22 lbs; energy-efficient design. Cons: Premium price may deter casual users; limited to four tiers; PVC cover may yellow over time; light intensity might be insufficient for fruiting plants.
Bottom Line: An excellent investment for dedicated indoor gardeners seeking professional results. The smart features and integrated design make it superior to piecing together separate components, though hobbyists with modest needs may find it more than necessary.
3. RooTrimmer 5-Tier Seed Stand with 5 Trays, Seed Starting Rack Propagation Rack Kit for Stackable Seedling Tray Seedling Staging Table for Indoor Outdoor Growing(Green)
Overview: The RooTrimmer 5-Tier Seed Stand delivers exceptional value at $32.98, including five trays in a lightweight yet durable plastic framework. Standing 37.6 inches tall with an 11.6" x 18.1" footprint, this green-colored system offers versatile functionality beyond just seed starting.
What Makes It Stand Out: Unlike competitors selling stands alone, this kit includes matching trays, eliminating compatibility guesswork. The waterproof, corrosion-resistant plastic construction allows seamless indoor-outdoor transitions. Its multifunctional design adapts to storage needs—organizing toys, books, or kitchen items—making it useful year-round, not just during growing season.
Value for Money: At approximately $6.60 per tier including trays, this represents outstanding value. Comparable metal stands cost $25-35 without trays, and quality seed trays run $3-5 each. You’re essentially getting the framework for free, making it the budget champion for beginners testing their gardening interest.
Strengths and Weaknesses: Pros: Includes five trays; extremely affordable; lightweight and portable; waterproof; versatile non-gardening uses; tool-free assembly. Cons: Plastic construction less sturdy than metal; lower weight capacity; no humidity cover or climate control; green color may not suit all decors; stability concerns with tall seedlings.
Bottom Line: The ultimate starter kit for budget-conscious gardeners. While not as robust as metal alternatives, the included trays and multifunctional design provide unmatched value. Ideal for those wanting to experiment with seed starting without significant investment.
4. Abimars 5-Tier Greenhouse with Caster Wheel, Each Shelf Height Adjustable Metal Plant Shelf with PVC Cover for Seed Starting Trays, Seedling Pots, Plant Pots, 13x29x73inch

Overview: The Abimars 5-Tier Greenhouse commands $128.99 for a heavy-duty, mobile growing solution. At 13" x 29" x 73", this welded metal frame supports an impressive 250 lbs total weight, catering to serious gardeners requiring both capacity and mobility for seed starting and plant cultivation.
What Makes It Stand Out: Welded construction (not bolted) delivers exceptional stability unmatched by assembly-required competitors. The integrated caster system with locking mechanisms and floor-protecting polyurethane wheels provides true portability. One-inch height adjustability across all shelves accommodates everything from tiny propagation cells to mature plants, while the thicker PVC cover maintains optimal humidity.
Value for Money: While pricier than basic greenhouses, the professional-grade construction justifies the cost. Welded metal frames typically cost $150-200 alone. Adding heavy-duty casters ($30-40) and a quality PVC cover ($25-35) makes this competitively priced for its durability class.
Strengths and Weaknesses: Pros: Superior 250 lb capacity; welded metal construction; excellent mobility; adjustable shelf height; thick PVC cover with double zippers; floor-protecting casters; easy one-person assembly. Cons: Larger footprint may overwhelm small spaces; premium price; 73" height requires ceiling clearance; cover may trap excessive heat in warm climates.
Bottom Line: A professional-quality greenhouse for dedicated gardeners prioritizing durability and mobility. The welded frame and robust casters make it worth the investment for those managing large seedling operations or needing to move plants seasonally.
5. Abimars 5-Tier Mini Greenhouse with Caster Wheels, Each Shelf Height Adjustable Metal Plant Shelf with PVC Cover for Seed Starting Trays, Seedling Pots, Plant Pots, 11x16x57inch

Overview: The Abimars 5-Tier Mini Greenhouse scales down the premium features of its larger sibling to $75.99, offering mobility and durability in a compact 11" x 16" x 57" package. This welded metal frame supports 175 lbs while maintaining the flexibility serious gardeners demand in space-constrained environments like apartments or small patios.
What Makes It Stand Out: This model delivers the same professional features—welded construction, adjustable shelves, and quality PVC cover—as the larger version, but in an apartment-friendly size. The caster system with locking mechanisms and floor-protecting wheels provides unmatched mobility for its class, allowing effortless transitions between rooms or indoor-outdoor locations without floor damage.
Value for Money: At $75.99, it bridges the gap between flimsy $40 greenhouses and professional $130+ models. You’re getting welded metal durability and mobility features typically reserved for premium units, making it an intelligent mid-range investment for serious hobbyists who prioritize longevity.
Strengths and Weaknesses: Pros: Welded metal construction; excellent mobility; adjustable shelf height; compact footprint; thick PVC cover; floor-protecting casters; one-person assembly. Cons: Reduced 175 lb capacity versus larger model; smaller dimensions limit tray sizes; premium over basic models; cover ventilation requires monitoring to prevent overheating.
Bottom Line: The sweet spot for gardeners wanting professional mobility without the bulk or price of larger models. Perfect for apartment dwellers and those needing to move plants seasonally, offering durability that justifies spending more than budget alternatives.
6. Abimars 5-Tier Greenhouse with Caster Wheel, Each Shelf Height Adjustable Metal Plant Shelf with PVC Cover for Seed Starting Trays, Seedling Pots, Plant Pots, 21x49x80inch

Overview: The Abimars 5-Tier Greenhouse is a robust indoor gardening solution measuring 21x49x80 inches. Featuring an all-metal welded frame and PVC cover, this unit supports up to 300 pounds across its five shelves, making it ideal for serious plant enthusiasts who need a dedicated, climate-controlled environment for seedlings, herbs, and houseplants.
What Makes It Stand Out: Unlike flimsier alternatives, this greenhouse boasts welded metal construction rather than bolted assembly, ensuring exceptional stability. Each shelf adjusts in one-inch increments and can be removed entirely, offering unmatched flexibility for plants of varying heights. The locking polyurethane casters provide smooth mobility without floor damage, while height-adjusting nuts eliminate wobbling on uneven surfaces.
Value for Money: At $239.99, this greenhouse commands a premium price, but delivers commensurate quality. Comparable units with plastic frames fail under heavy loads, while this metal system endures. The adjustable configuration effectively replaces multiple single-purpose plant stands, justifying the investment for dedicated gardeners.
Strengths and Weaknesses: Strengths include superior weight capacity, flexible shelf configuration, excellent mobility, and easy one-person assembly with video guidance. The thicker PVC cover maintains 70-80% humidity effectively. Weaknesses involve the price point being steep for casual users, and the PVC material may degrade with prolonged direct sunlight if used outdoors.
Bottom Line: This greenhouse excels for indoor gardeners seeking a permanent, adaptable growing station. Its sturdy construction and thoughtful features make it worth the premium for those serious about seed starting and plant cultivation.
7. Zenport SH3212A+BTP Garden Raised Bed and Cold Frame Greenhouse Cloche for Easy Access Protected Gardening
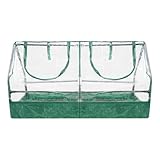
Overview: The Zenport SH3212A+BTP serves as both a raised bed and cold frame greenhouse cloche, measuring 47 inches long by 23-5/8 inches wide and high. This compact unit features a sturdy green steel frame with a waterproof transparent plastic cover, designed for protected gardening on decks, patios, or balconies where space is limited.
What Makes It Stand Out: This product’s dual-functionality sets it apart—functioning simultaneously as a raised planting bed and a protective greenhouse. The zippered roll-up panel provides exceptional easy access for planting, harvesting, and ventilation control, eliminating the awkward reaching associated with traditional cold frames. Its self-assemble design makes it accessible for beginners.
Value for Money: At $66.26, this represents excellent value for a two-in-one gardening solution. Purchasing separate raised beds and cold frames would cost significantly more. It’s an affordable entry point for gardeners wanting to extend their growing season without permanent infrastructure.
Strengths and Weaknesses: Strengths include versatile dual-purpose design, easy access panel, sturdy steel frame, compact footprint, and simple assembly. It’s ideal for small-space gardening. Weaknesses include limited growing height restricting taller plants, potential plastic cover durability issues over multiple seasons, and modest dimensions that may not suit ambitious gardeners.
Bottom Line: Perfect for balcony gardeners and beginners seeking an affordable, space-efficient way to protect crops. While not built for large-scale growing, it brilliantly extends the season for small vegetables and herbs.
8. ANSIKE Soil Heating Cable 49 Ft Electric Soil Warming Cable Greenhouse Plant Soil Heater Cable Keep Soil Warm for Soil, Garden, Cold Frame

Overview: The ANSIKE 49 Ft Soil Heating Cable is an electric warming system designed to maintain optimal soil temperatures for seed germination and plant growth. Featuring a built-in thermostat that activates below 131°F, this waterproof cable suits greenhouses, raised beds, and cold frames, providing consistent bottom heat crucial for starting seeds in cooler conditions.
What Makes It Stand Out: The integrated thermostat automatically regulates temperature, eliminating manual monitoring and preventing overheating. The substantial 49-foot length covers large propagation areas, while the robust construction—nickel alloy core, glass fiber braid, and silicone rubber coating—ensures durability and safety in moist environments. The bright color coating enhances visibility during installation.
Value for Money: Priced at $36.99, this cable offers strong value for serious gardeners. The automatic thermostat feature alone justifies the cost compared to basic heating mats. The 49-foot length provides coverage equivalent to multiple smaller mats at a fraction of the price, making it economical for large-scale seed starting operations.
Strengths and Weaknesses: Strengths include automatic temperature control, durable waterproof construction, generous length, and versatility across various applications. The 131°F target temperature optimizes most seed germination. Weaknesses include the fixed temperature being potentially too warm for some delicate seeds, the need for careful burial to prevent damage, and ongoing electricity costs during operation.
Bottom Line: An excellent investment for dedicated gardeners starting large quantities of seeds. The automatic thermostat and durable build make it superior to basic heating mats, though casual gardeners may prefer simpler solutions.
9. ANSIKE Soil Heating Cable 25 Ft Electric Soil Warming Cable Greenhouse Plant Soil Heater Cable Keep Soil Warm for Soil, Garden, Cold Frame
Overview: The ANSIKE 25 Ft Soil Heating Cable delivers the same technology as its longer counterpart in a more compact package. This electric soil warming cable features a built-in thermostat that maintains 131°F, providing consistent bottom heat for seed germination and plant growth in soil, raised beds, or cold frames.
What Makes It Stand Out: The integrated thermostat automatically manages temperature, preventing overheating while maintaining ideal germination conditions. Its shorter 25-foot length makes it perfect for small-scale setups, propagation trays, or targeted heating zones. The durable construction—nickel alloy, glass fiber braid, and silicone rubber coating—ensures safe, waterproof operation.
Value for Money: At $32.99, this cable is only $4 less than the 49-foot version, making it less economical per foot. While still reasonably priced for the thermostat feature, budget-conscious buyers should consider whether the longer version offers better long-term value. It’s best suited for gardeners with modest heating needs.
Strengths and Weaknesses: Strengths include automatic temperature control, durable waterproof materials, easy installation, and suitability for small spaces. The built-in safety features provide peace of mind. Weaknesses include limited coverage area, questionable value compared to the 49-foot option, and the fixed 131°F temperature that may not suit all plant varieties.
Bottom Line: Ideal for hobbyists with limited space or small propagation setups. While functional and well-built, the minimal price difference from the 49-foot version makes the longer cable a smarter purchase for most gardeners planning future expansion.
Why Combine Seed Starting Racks with Cold Frames?
Cold frames create a protected microclimate that shields young plants from harsh weather while capturing solar energy. Adding a rack system leverages vertical space, allowing you to start hundreds of seedlings in a footprint that might otherwise accommodate only a few dozen. This combination gives you professional greenhouse capabilities on a backyard budget, letting you harden off plants gradually while keeping them organized and accessible. The synergy between ground-level warmth and elevated shelving creates natural temperature gradients that different plant varieties can benefit from during various growth stages.
Understanding Cold Frame Dimensions and Space Constraints
Before selecting any rack system, you must become intimately familiar with your cold frame’s interior measurements. Most cold frames range from 2x4 feet to 4x8 feet, with heights typically between 12-24 inches at the back and sloping down to 8-16 inches at the front. These angled lids create unique spatial challenges—what fits at the back may not clear the front opening. Always measure the narrowest point, accounting for lid operation and any interior framing members that protrude into the space.
Accounting for Lid Operation and Clearance
Remember that your cold frame lid needs to open and close freely, sometimes at a moment’s notice when temperatures spike. Your rack system must sit low enough to avoid interference with the lid mechanism, whether it’s hinged, sliding, or removable. Leave at least 2-3 inches of clearance between the top of your highest shelf and the fully opened lid position. This buffer prevents damage during hurried ventilation and allows you to reach in and adjust trays without contorting your arms at impossible angles.
Key Design Features to Look For
The ideal seed starting rack system for cold frame use shares several non-negotiable characteristics. Look for designs that prioritize air circulation between shelves, as stagnant air promotes damping-off disease. Slatted or wire mesh shelving dramatically outperforms solid surfaces in this environment. The frame should be sturdy enough to support wet soil trays—remember, a single 1020 tray can weigh 15-20 pounds when fully watered and planted. Finally, the system should allow you to remove individual shelves or reconfigure spacing as seedlings grow and their light requirements change.
Material Considerations for Durability
Cold frames create intense humidity cycles—damp mornings give way to scorching afternoon heat, then cool nights. This environment wreaks havoc on the wrong materials. Powder-coated steel offers excellent rust resistance and strength but can conduct cold to tray edges. Cedar and redwood naturally resist rot and moisture damage, making them premium choices for DIY builders. Aluminum provides lightweight durability but may flex under heavy loads. Avoid standard plywood unless it’s specifically rated for exterior use and properly sealed, as delamination begins surprisingly quickly in these conditions.
Weather Resistance and Longevity
Consider how your chosen material will perform after three seasons of freeze-thaw cycles. Stainless steel hardware prevents rust streaks and structural failure at connection points. Plastic components should be UV-stabilized to prevent brittleness from sun exposure through the cold frame glazing. If you’re using wood, apply a non-toxic, plant-safe sealant to all surfaces, including hidden edges where moisture loves to hide. The extra effort during assembly adds years to your system’s lifespan.
Adjustable Shelving Systems
Seedlings don’t stay small for long, and their light needs evolve dramatically from germination to hardening off. Fixed-shelf systems might work for a single crop type but quickly become limiting for diverse gardeners. Look for racks with peg-hole systems, notched uprights, or clamp-style adjustments that let you modify shelf height without tools. The sweet spot is having shelves adjustable in 1-2 inch increments, allowing you to raise trays as plants grow or lower them to capture ground-level warmth during germination phases.
Vertical Space Optimization Strategies
Think beyond simple horizontal layers. Tiered systems that step back like stadium seating allow shorter plants in front to receive light without being shaded by taller seedlings behind them. This design works exceptionally well in deeper cold frames where you can sacrifice some front-to-back depth for improved light distribution. Another clever approach uses narrow, vertically oriented racks along the sides, leaving a central walkway for tending plants. This creates a U-shaped configuration that maximizes perimeter space while maintaining access.
Maximizing Light Penetration
Every shelf you add reduces light reaching the levels below. Combat this by keeping shelves shallow—no deeper than 10-12 inches for standard cold frames. Position taller seedlings on the top tier and shade-tolerant varieties (like lettuce or kale) on lower levels. Some advanced systems incorporate reflective Mylar or white-painted surfaces on the underside of each shelf to bounce light downward, effectively doubling your light efficiency without adding electricity.
Lighting Integration Options
While cold frames rely primarily on natural sunlight, early spring and late winter days remain short and often overcast. Integrated LED grow light strips can supplement natural light, especially on lower shelves. Look for racks with built-in cable management channels and mounting points for light fixtures. Battery-powered timer systems eliminate the need for running extension cords into your cold frame, reducing shock hazards and simplifying setup. The key is choosing lights with low heat output—LEDs running at 15-20 watts per shelf provide ample supplemental light without creating temperature spikes that stress seedlings.
Ventilation and Airflow Considerations
Stagnant, humid air is seedling enemy number one. Your rack system should facilitate, not hinder, air movement throughout the cold frame. Designs that maintain at least 1-2 inches of clearance from the cold frame walls allow air to circulate around the entire structure. Some premium systems incorporate small, solar-powered fans mounted to the rack uprights, creating gentle air movement that strengthens stems and prevents fungal issues. Even without fans, ensure your shelving doesn’t create dead air pockets where moisture can accumulate.
Creating Microclimates Within Your Rack
Different plant families prefer different conditions. Use your rack’s verticality to create natural temperature and humidity zones. The top shelf, closer to the glazing, runs warmer and drier—perfect for tomatoes and peppers. Lower shelves stay cooler and more humid, ideal for brassicas and leafy greens. This stratification lets you diversify your seed starting schedule without building multiple cold frames.
Water Management and Drainage Solutions
Watering seedlings creates runoff, and in a cold frame, that water has nowhere to go. Your rack system must address drainage proactively. Trays with built-in reservoirs catch excess water but require monitoring to prevent root rot. Better yet, choose racks designed to hold standard 1020 trays at a slight angle (1-2 degrees) with integrated drainage channels that direct water to collection points. Some systems include sloped collection trays that can be emptied without disturbing plants. Never let water pool at the cold frame base—it breeds disease and attracts pests.
Portability and Modular Design Benefits
Your gardening needs evolve seasonally. A rack system that breaks down into flat components stores easily during summer when the cold frame might house mature plants. Modular systems let you add sections as your operation grows or reconfigure for specific crops. Wheeled bases transform your rack into a mobile unit, allowing you to roll the entire assembly out of the cold frame for thorough cleaning or to harden off plants in partial shade. Just ensure wheels lock securely—cold frames aren’t perfectly level, and a rolling rack full of seedlings is a disaster waiting to happen.
Temperature Regulation Features
Sophisticated rack systems incorporate features that help moderate temperature swings. Some designs include thermal mass elements—hollow uprights you can fill with water that absorb heat during the day and release it slowly overnight. Others have mounting points for small thermostats or temperature probes, letting you monitor conditions at multiple heights. The most advanced integrate with automatic vent openers, where the rack structure actually supports the vent mechanism, creating a cohesive climate control system.
DIY vs. Pre-Built Systems
Building your own rack system allows complete customization to your cold frame’s exact dimensions and your specific crops. Simple designs using PVC pipe or dimensional lumber cost a fraction of pre-built units and can be assembled in an afternoon. However, pre-built systems offer precise engineering, consistent quality, and often include clever features you’d never think to add. Consider your skill level, available time, and whether you value customization over convenience. Many serious gardeners start with a basic pre-built system, then modify it based on their first season’s experience.
Essential Tools for DIY Assembly
If you choose the DIY route, invest in a quality miter saw for clean, square cuts that ensure stability. A drill press creates perfectly perpendicular pilot holes, preventing wood splitting at connection points. For metal systems, a tube cutter designed for conduit produces clean edges without deforming the pipe. Always dry-fit your entire assembly before final fastening—you’ll inevitably spot improvements during the mockup phase.
Seasonal Adaptability and Multi-Function Use
The best rack systems serve multiple purposes throughout the year. In early spring, they hold seed starting trays. By late spring, the same shelves can support potted plants hardening off. Summer might see the system repurposed for drying herbs or curing garlic. Some designs transform into vertical growing systems for strawberries or salad greens. Look for racks with removable shelf inserts that reveal trellis supports or pot hangers underneath. This versatility justifies the investment and storage space.
Budget-Friendly Design Principles
You don’t need to spend a fortune to get excellent results. Repurposed wire shelving units from restaurant supply stores offer incredible durability at low cost. Just ensure they’re not chrome-plated, which flakes off in humid conditions. Look for epoxy-coated or stainless versions. Another trick: search for “garage shelving” rather than “greenhouse shelving”—identical products often cost 30-40% less when marketed for utility rather than horticulture. Focus your budget on the uprights and frame; shelves can be upgraded later as needs grow.
Advanced Features for Serious Gardeners
Once you’ve mastered the basics, consider systems with integrated seedling heat mats that fit perfectly between shelf slats, providing bottom heat exactly where needed. Some high-end racks include graduated shelf depths—the front edge of each shelf sits 2 inches back from the one above it, creating a terraced effect that maximizes light exposure for every plant. Others feature removable drip irrigation manifolds that clip onto the uprights, delivering precise water amounts to each tray through a network of micro-tubing.
Automation and Monitoring Integration
Tech-savvy gardeners can integrate soil moisture sensors into rack systems, with probes for each shelf feeding data to a central monitor. Some systems include mounting brackets for small Wi-Fi cameras, letting you check seedlings from your phone without opening the cold frame and disrupting the microclimate. These features aren’t necessary for beginners but represent the future of precision home propagation.
Common Mistakes to Avoid
The most frequent error is overloading racks with too many shelves. Remember, seedlings need light more than they need vertical density. Another mistake is placing racks directly against cold frame glazing, where temperature fluctuations are most extreme. Always maintain that buffer zone. Gardeners often forget to account for the height of their tallest seedlings when adjusting shelves—those tomato plants will be 8 inches tall before you know it. Finally, never use pressure-treated lumber for any part that contacts trays or plants; the chemicals leach into soil and stunt growth.
Installation and Setup Best Practices
Level your rack system perfectly using a spirit level, not just eyeballing it. An unlevel rack causes water to pool in tray corners and creates uneven light distribution. Place the heaviest trays on lower shelves to maintain a low center of gravity—cold frames are vulnerable to wind when open, and a top-heavy rack can tip. Install your rack before filling the cold frame with trays; maneuvering a loaded system is nearly impossible. Finally, test the entire setup with empty trays for a week, opening and closing the lid daily, before committing precious seeds to the configuration.
Frequently Asked Questions
What size rack fits in a standard cold frame? Most 3x6 foot cold frames accommodate 2-foot wide racks beautifully, leaving 6 inches of air space on each side. For 4x8 foot models, two 18-inch wide racks placed side-by-side create a central walkway. Always measure your specific cold frame interior, accounting for any lid hardware or framing members that reduce usable space.
How many shelves should my system have? Resist the temptation to maximize shelf count. For a 24-inch tall cold frame, three shelves typically work best—this gives you roughly 6-7 inches of vertical growing space per level, adequate for most seedlings until they’re ready to transplant. If you’re growing only microgreens or lettuce, you might squeeze in four shelves, but light penetration becomes severely limited.
Do I need grow lights inside a cold frame? Not necessarily, but supplemental lighting dramatically improves results during short winter days. If your cold frame receives less than 6 hours of direct sunlight, LED strip lights on the two lower shelves can prevent leggy, weak seedlings. Choose full-spectrum LEDs rated for damp locations, and run them on a timer for 12-14 hours daily.
What’s the best material for a seed starting rack in a humid environment? Powder-coated steel or aluminum offers the best durability-to-cost ratio. For DIY builders, cedar or redwood naturally resists rot without chemical treatments. Avoid plain steel (it rusts within one season) and most plastics (they become brittle from UV exposure unless specifically UV-stabilized).
How do I prevent mold and mildew on my rack system? Ensure each shelf has at least 30% open area for air circulation. Space shelves vertically to allow air movement between levels, and water early in the day so surfaces dry before evening temperature drops. A small fan running intermittently works wonders. Wipe down shelves monthly with a diluted hydrogen peroxide solution during the growing season.
Can I use a regular bookshelf as a seed starting rack? Only if it’s made of solid wood or metal and designed for damp environments. Standard particleboard or MDF bookshelves swell and disintegrate within weeks. If you must repurpose furniture, look for outdoor-rated pieces or plan to seal every surface thoroughly with marine-grade varnish, focusing especially on unsealed edges.
How much weight can a cold frame rack system hold? A well-built system should support 50-75 pounds per shelf, distributed evenly. However, consider your cold frame’s base strength too—many DIY cold frames have wooden bottoms that weaken when loaded with multiple heavy, water-laden trays. Reinforce the base or place racks directly on level ground inside the frame.
Should I anchor my rack to the cold frame structure? Generally, no. Freestanding racks allow you to remove the entire assembly for cleaning or reconfiguration. However, in extremely windy locations, consider tethering the top of the rack to the cold frame’s back wall with removable bungee cords. This prevents tipping during lid adjustments without permanent modification.
How do I clean and maintain my seed starting rack system? At season’s end, remove all shelves and scrub them with hot, soapy water. For metal systems, check for rust spots and touch up with rust-inhibiting paint. Wooden racks benefit from light sanding and reapplication of plant-safe sealant every two years. Store disassembled systems in a dry location over winter to extend their lifespan dramatically.
Can I use these systems year-round? Absolutely. In summer, remove shelves to use the cold frame for heat-loving crops. Fall sees the rack system repurposed for over-wintering hardy seedlings. Some gardeners even move their racks outdoors to harden off plants in partial shade, or into basements under grow lights for late-season starts. The versatility is limited only by your creativity and storage space.