Transforming your apartment balcony into a thriving green oasis doesn’t require a backyard—or even much square footage. As urban gardening continues its meteoric rise, savvy city dwellers are discovering that the secret to lush container plants and vibrant herb gardens lies beneath the surface: vermicomposting. This compact, odor-free method of composting with worms turns your kitchen scraps into black gold, creating a closed-loop system that nourishes your plants while diverting waste from landfills. Unlike traditional composting that demands space and tolerates odors, modern vermicomposting systems are specifically engineered for balcony life, offering sophisticated solutions that blend seamlessly into urban aesthetics while delivering nutrient-dense castings that make container plants explode with growth.
The market has responded to this urban gardening revolution with an impressive array of systems designed explicitly for apartment dwellers. But not all worm composting bins are created equal when it comes to balcony applications. From stackable trays that maximize vertical space to weatherproof designs that withstand the elements, choosing the right system requires understanding how features translate to real-world balcony conditions. This comprehensive guide walks you through everything you need to know to select the perfect vermicomposting setup for your apartment balcony garden—no green thumb or engineering degree required.
Top 10 Vermicomposting Systems for Apartment Balcony Gardens
 | 5-Layer Worm Compost Bin, 85L Worm Composter for Indoor & Outdoor, Starter Kits for Vermicomposting Starter, Garden Worm Composting Bin for Recycling Food Waste (Black) | Check Price |
Detailed Product Reviews
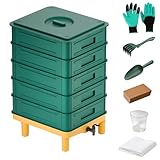
1. 5-Layer Worm Compost Bin, 85L Worm Composter for Indoor & Outdoor, Starter Kits for Vermicomposting Starter, Garden Worm Composting Bin for Recycling Food Waste (Black)
Overview: This 85L five-tray worm composting system transforms kitchen waste into premium fertilizer through an efficient vertical design. Constructed from durable black PP plastic, it serves both novice and experienced vermicomposters seeking a self-contained solution for indoor or outdoor use. The stackable configuration maximizes composting capacity while minimizing footprint.
What Makes It Stand Out: The integrated faucet for harvesting worm tea provides a distinct advantage over basic models, allowing easy nutrient extraction. Each tray features carrying handles for effortless separation, and the comprehensive starter kit—including coconut brick substrate, gloves, rake, shovel, and measuring cup—eliminates guesswork. The ventilation system expertly balances odor containment with aerobic efficiency, making it viable for apartment dwellers.
Value for Money: Priced at $72.99, this kit outperforms budget alternatives by bundling $30+ worth of essential accessories. The 85L capacity matches units costing $90-100, while the faucet mechanism adds premium functionality. For beginners, the included coconut brick and tools remove initial setup costs and complexity, delivering immediate usability without hidden expenses.
Strengths and Weaknesses: Strengths: generous capacity, complete accessory package, odor-controlled design, convenient tea collection, and stackable modularity. Weaknesses: worms sold separately, plastic construction may degrade under intense sun, requires dedicated floor space, and fully loaded trays can be challenging to separate. The black color absorbs heat, which may stress worms in hot climates.
Bottom Line: An excellent choice for eco-conscious households ready to commit to vermicomposting. The all-inclusive design and smart features justify the investment, particularly for beginners. While not the most compact option, its capacity and convenience make it a worthwhile purchase for serious waste reduction enthusiasts.
Why Vermicomposting is Perfect for Apartment Balcony Gardens
Vermicomposting offers unique advantages that make it ideal for confined urban spaces. The process is remarkably efficient, with red wiggler worms processing organic waste up to three times faster than traditional composting methods. For balcony gardeners, this means a steady supply of plant-ready nutrients without the bulk and maintenance of conventional compost piles. The systems are inherently compact, typically occupying less than two square feet of floor space, while the vertical designs we’re seeing this year maximize output in minimal footprints.
Perhaps most importantly for apartment living, properly maintained vermicomposting systems produce virtually no odor. The aerobic decomposition process, combined with the worms’ rapid consumption, prevents the anaerobic conditions that create foul smells. This makes balcony vermicomposting neighbor-friendly and landlord-approved in most situations. The resulting worm castings are also perfectly suited for container gardening—they’re gentle on confined root systems, improve soil structure in pots, and provide a slow-release nutrient profile that eliminates the risk of chemical fertilizer burn.
Understanding Different Vermicomposting System Types
Before diving into specific features, it’s crucial to understand the three primary categories of vermicomposting systems available to balcony gardeners. Each type operates on different principles and suits different lifestyles, space constraints, and composting goals.
Stackable tray systems function like multi-story worm condominiums, allowing worms to migrate upward toward fresh food while you harvest finished castings from the bottom. Continuous flow systems feature a harvesting mechanism at the base, letting you collect compost without disturbing the worms or adding new trays. Single bin systems offer simplicity—a straightforward container where worms, bedding, and food coexist until manual harvesting. Your choice among these will fundamentally shape your composting experience and maintenance routine.
Stackable Tray Systems: The Multi-Level Approach
Stackable tray systems represent the most popular choice for serious balcony composters, and for good reason. These units typically consist of three to five individual trays that nest together, creating a vertical composting tower. The magic happens through worm migration: you start with bedding and worms in the lowest tray, add food scraps, and when that level fills, you place the next tray on top with fresh bedding and food. The worms naturally crawl up through the mesh bottoms to reach the new food source, leaving behind fully processed castings in the lower tray.
For balcony applications, this design offers several distinct advantages. The vertical orientation maximizes composting capacity while minimizing floor space—critical when every square foot counts. Most quality systems measure under 18 inches in width and depth but can process several pounds of waste weekly across multiple trays. The modular nature also allows you to scale your system up or down based on seasonal produce availability or travel schedules. However, these systems require more hands-on management and a slightly steeper learning curve than simpler designs.
Continuous Flow Systems: Set It and Forget It
If you’re a busy professional who loves the idea of balcony composting but craves minimal maintenance, continuous flow systems deserve your attention. These innovative units feature a large, single chamber with a harvesting grate or drawer at the bottom. You continuously add food and bedding at the top while finished compost naturally settles and compresses at the bottom. When you’re ready to harvest, you simply open the bottom mechanism and collect the castings—no tray rotation, no worm sorting, no fuss.
The primary advantage for balcony gardeners is the reduced frequency of interaction. You can feed your worms daily without ever disturbing their environment, and harvesting becomes a monthly task rather than a weekly project. These systems typically have larger capacities than single-tray units, making them suitable for households generating more kitchen waste. The trade-off comes in physical size and weight; continuous flow bins are often bulkier and heavier, which matters when you’re placing them on a balcony with structural limitations. They also tend to carry higher price tags, though many users find the convenience worth the investment.
Single Bin Systems: Simplicity at Its Best
Don’t overlook the humble single bin system, especially if you’re testing the vermicomposting waters or working with an extremely compact balcony. These straightforward containers house everything—worms, bedding, food, and eventually finished compost—in one space. After several months of feeding and processing, you manually separate the worms from the castings (using light migration methods or hands-on sorting) and start fresh.
The beauty of single bin systems lies in their simplicity and affordability. They’re lightweight, easy to clean, and require virtually no assembly. For balconies with strict weight limits or minimal square footage, a single bin under 12 inches wide can tuck into corners or slide under plant stands. The downside? Harvesting requires more effort and interrupts the composting cycle. You’ll need a temporary holding container for worms during harvest, and the system can’t process waste continuously like tray or flow designs. Still, for one-person households or as a secondary system for specific waste streams, single bins offer unmatched accessibility.
Size Matters: Matching Your System to Balcony Space
Selecting the appropriately sized vermicomposting system begins with honest assessment of your balcony’s physical constraints and your household’s waste output. Most balcony systems range from 1 to 4 cubic feet in capacity, but the critical measurement is surface area rather than volume. A general rule of thumb: you need roughly one square foot of bin surface area for each pound of food waste generated per week.
Measure your available space carefully, considering not just floor dimensions but also vertical clearance. Remember that you’ll need room to lift trays for harvesting and potentially stand over the unit. Weight becomes another crucial factor—filled systems can weigh 50-80 pounds, particularly when saturated with moisture. Check your building’s balcony load limits, especially for older apartments. For weight-restricted balconies, consider distributing the system across a larger surface area (like a wide, shallow design) rather than a tall, narrow tower that concentrates pounds per square foot.
Material Matters: Plastic, Wood, or Metal?
The construction material of your vermicomposting system significantly impacts its balcony performance, longevity, and aesthetic integration. High-density polyethylene (HDPE) plastic dominates the market for good reason—it’s lightweight, weather-resistant, non-porous (preventing odor absorption), and easy to sanitize. UV-stabilized plastics won’t degrade in direct sunlight, a critical feature for exposed balconies. Look for BPA-free, food-grade plastic to ensure no chemicals leach into your compost.
Wood offers natural breathability and rustic charm that some balcony gardeners prefer. Cedar and redwood naturally resist rot and insects, but they’ll still require periodic sealing and will eventually deteriorate in outdoor conditions. Wood systems weigh considerably more than plastic, and their porous nature can harbor odors if not properly maintained. Metal systems, typically galvanized steel or powder-coated aluminum, provide durability and a modern aesthetic but conduct temperature extremes that can stress worms. They also risk rusting if drainage isn’t perfect. For most balcony applications, UV-stabilized plastic provides the best balance of performance and practicality.
Drainage and Moisture Control: The Key to Healthy Worms
Worms breathe through their skin, requiring moist but not waterlogged conditions—a delicate balance that makes drainage arguably the most critical feature in balcony systems. Excess moisture, whether from wet food scraps or rain, creates anaerobic conditions that kill worms and produce foul odors. Quality systems incorporate multiple drainage elements: perforated false bottoms, spigots for draining leachate (the liquid byproduct), and ventilation channels that promote evaporation.
When evaluating systems, examine the drainage grate design—holes should be small enough to prevent worms from falling through but plentiful enough to prevent water pooling. A functional spigot lets you collect leachate, which dilutes into excellent liquid fertilizer for balcony plants. The system’s overall moisture management should handle typical rainfall when placed in a semi-sheltered balcony corner, though direct exposure requires additional weatherproofing. Some advanced systems now feature moisture collection reservoirs with water-level indicators, taking the guesswork out of drainage maintenance.
Ventilation and Airflow: Preventing Odor and Pests
Proper ventilation serves two essential functions: providing oxygen for the aerobic decomposition process and creating airflow that deters fruit flies and other pests. The best balcony vermicomposting systems integrate passive ventilation through precisely engineered air channels, mesh screens over openings, and breathable tray connections. These design elements create a slight negative pressure that draws fresh air through the system while exhausting moisture-laden air.
Look for systems with ventilation holes along the sides and lid, covered with fine mesh (at least 1/16 inch) that prevents fly entry while allowing air exchange. The lid design matters significantly—tight-fitting lids with gasket seals prevent odors from escaping and pests from entering, but they must include vent ports to prevent anaerobic conditions. Some premium systems feature adjustable ventilation, letting you increase airflow during humid summer months or close things down during cold snaps. For balcony applications, ensure vents are positioned to avoid direct rain entry while still catching prevailing breezes.
Worm Capacity: How Many Worms Do You Really Need?
The success of your balcony vermicomposting system hinges on maintaining appropriate worm population density. Red wigglers (Eisenia fetida), the composting worm of choice, consume roughly half their body weight in food scraps daily under optimal conditions. A new system requires about one pound of worms (approximately 1,000 individuals) to start processing one-half pound of food waste per day.
Most apartment balcony systems support populations between one and four pounds of worms. Starting with a smaller population and gradually increasing food input prevents the common mistake of overfeeding, which leads to acidic conditions and worm die-off. Tray systems allow population expansion across multiple levels, while single bins have finite capacity limits. When selecting your system, consider not just your current waste output but potential growth—once you experience the plant-boosting power of worm castings, you’ll likely seek out more compostable materials from neighbors or local coffee shops.
Weatherproofing Your Balcony Vermicomposting System
Balcony environments expose vermicomposting systems to temperature extremes, precipitation, and wind that indoor systems never face. Worms thrive between 55-77°F (13-25°C), making weatherproofing essential for year-round operation. In summer, direct sunlight can push internal bin temperatures above 100°F, fatal to worms. Position systems in shaded corners, use reflective insulation wraps, or choose models with double-wall construction that buffers temperature swings.
Winter presents the opposite challenge. While worm activity slows in cooler temperatures, sustained freezing will kill your colony. Insulating wraps made from recycled denim or bubble wrap can maintain adequate warmth, and some gardeners use seedling heat mats (set to low) beneath bins during deep freezes. Rain protection requires elevating systems slightly off balcony floors to prevent flooding and ensuring lids seal tightly against downpours. Wind protection matters too—secure systems against railings or walls to prevent tipping during gusts that could scatter worms across your balcony and distress neighbors below.
Aesthetic Considerations for Urban Living
Let’s face it: your balcony vermicomposting system will be visible to you, your neighbors, and potentially your landlord. Modern designs have evolved far beyond the utilitarian rubber totes of early adopters. Contemporary systems feature clean lines, neutral colors, and finishes that complement urban architecture. Some mimic planter boxes or storage benches, doubling as functional furniture that disguises their composting function.
Color selection impacts both aesthetics and functionality. Dark colors absorb more solar heat, potentially beneficial in cool climates but dangerous in hot ones. Light colors reflect heat and blend with modern balcony decor but show stains more readily. Some manufacturers offer decorative wraps or sleeves that customize appearance while adding insulation. For balconies visible from the street, consider systems with lockable lids that prevent tampering and present a tidy appearance. Remember that a well-maintained, attractive system becomes a conversation starter about sustainable living rather than an eyesore.
Maintenance and Harvesting Ease
The most sophisticated vermicomposting system becomes shelfware if harvesting feels like a chore. Evaluate how easily you can access finished compost without disrupting the entire worm population. Tray systems excel here—simply remove the bottom tray once worms have migrated upward, typically every 2-3 months. The best designs include handles and smooth-sliding trays that don’t require Herculean strength to manipulate on a cramped balcony.
Continuous flow systems offer the simplest harvesting experience—just open the bottom hatch and collect castings. However, ensure the collection area is accessible without moving the entire unit, which might weigh over 60 pounds when full. Single bin systems demand more hands-on separation techniques, like the light method (worms burrow away from light, letting you scrape off top layers of castings) or manual sorting. Consider your physical capabilities and patience level when choosing. Systems with tool-free disassembly and dishwasher-safe components significantly reduce maintenance friction for busy urbanites.
DIY vs. Commercial Systems: Making the Right Choice
The DIY route tempts many balcony gardeners with promises of cost savings and customization. Building a system from storage totes costs a fraction of commercial units and allows precise tailoring to your balcony’s dimensions. However, DIY systems often lack engineered ventilation, proper drainage, and pest-proofing that commercial designs refine through years of development. They also require time, tools, and a willingness to troubleshoot design flaws.
Commercial systems justify their price through convenience, reliability, and support. They arrive ready-to-use with optimized worm-to-space ratios, integrated drainage, and customer service when problems arise. For balcony applications, commercial systems offer tested weather resistance and aesthetic designs that appease landlords and neighbors. The sweet spot for many lies in hybrid approaches—purchase a commercial system for primary composting, then build a simple DIY bin for overflow or specific waste streams like coffee grounds. Consider your budget, handiness, and how much trial-and-error you’re willing to endure before committing to either path.
Budget Considerations: Finding Value Without Compromise
Balcony vermicomposting systems span a wide price spectrum, from $30 DIY setups to $300 premium commercial units. The entry-level tier ($50-$100) typically includes basic plastic tray systems or simple continuous flow designs with essential features but minimal weatherproofing. Mid-range options ($100-$200) offer improved materials, better ventilation engineering, and more elegant aesthetics suitable for visible balconies.
Premium systems ($200-$400) justify their cost through superior durability, innovative harvesting mechanisms, and extended warranties—some offering 10-year guarantees on UV-stabilized components. When calculating true cost, factor in hidden expenses: initial worm purchase ($30-$50), bedding materials, replacement filters, and potential insulation accessories. A $150 system that lasts five years and processes 500 pounds of waste annually costs pennies per pound of compost produced, compared to $15-$25 bags of organic fertilizer at garden centers. Consider value over price; a slightly more expensive system that prevents worm die-offs and produces consistently better compost saves money and frustration long-term.
Common Mistakes to Avoid
Even the best vermicomposting system fails without proper management. Overfeeding tops the mistake list—adding more food than worms can process creates acidic, anaerobic conditions that trigger odors and worm mortality. Start with small amounts and increase gradually as your population grows. Moisture mismanagement runs a close second; worms need damp bedding (like a wrung-out sponge), not soggy or dry conditions. Learn to recognize proper moisture levels and adjust by adding dry bedding or draining excess liquid.
Temperature neglect kills more balcony worm colonies than any other factor. Remember that metal railings and concrete balcony floors amplify temperature swings. Don’t place systems where they’ll bake in afternoon sun or freeze against cold exterior walls. Ignoring the carbon-to-nitrogen ratio causes similar problems. Balance nitrogen-rich food scraps with carbon-rich bedding like shredded cardboard, paper, or coconut coir. Finally, disturbing worms too frequently—constantly checking progress or digging around—stresses the colony and reduces processing efficiency. Trust the process and let your worms work undisturbed.
Seasonal Adjustments for Year-Round Composting
Successful balcony vermicomposting requires seasonal management strategies that indoor systems bypass. In spring, gradually increase feeding as temperatures rise and worms become more active. This is also ideal for expanding your system—add trays or upgrade to a larger unit before summer produce floods you with scraps. Summer demands aggressive heat management. Move systems to the coolest balcony corner, increase ventilation, and reduce feeding during heatwaves above 85°F. Some gardeners freeze food scraps beforehand, which cools the bin as they decompose.
Fall presents prime composting conditions—moderate temperatures and abundant carbon sources from dried leaves make it the easiest season. Stockpile shredded leaves in sealed bags for winter bedding. Winter requires protection strategies. Insulate systems with blankets or specialized wraps, and reduce feeding frequency as worm metabolism slows. In climates with hard freezes, consider bringing a small tray system indoors temporarily or using a heating mat. The goal isn’t peak production year-round but maintaining a healthy, living colony that rebounds when spring returns.
Troubleshooting Basics
Every balcony composter encounters problems, but most have simple solutions. If worms are crawling up the sides or trying to escape, check moisture levels first—this behavior signals either too-wet or too-dry conditions. A sour, vinegar-like smell indicates overfeeding and acidity; stop adding food, add generous amounts of fresh bedding, and consider a light dusting of agricultural lime. Fruit flies appear when food sits exposed; always bury scraps under bedding and ensure fine mesh screens cover all vents.
Slow decomposition suggests insufficient worms, low temperatures, or improper carbon-nitrogen balance. Add more worms if the population seems sparse, insulate the system if it’s chilly, and balance wet food with dry bedding. If your balcony system attracts rodents or larger pests (rare but possible), secure the lid with bungee cords and eliminate any spilled food around the unit. Remember that worms self-regulate their population based on available space and food; seeing fewer worms than expected isn’t necessarily a problem if the system processes waste effectively.
Frequently Asked Questions
How long does it take to get usable compost on a balcony system?
Expect your first harvest of worm castings in 3-4 months when starting with a new system and a pound of worms. Tray systems may produce small amounts from the bottom tray as early as 2 months if conditions are optimal. The timeline depends on temperature, worm population, and feeding consistency. Once established, you’ll harvest continuously every 2-3 months.
Will my neighbors smell the vermicomposting system?
Properly maintained balcony vermicomposting systems produce no noticeable odor beyond a pleasant earthy smell when opened. The aerobic process and rapid worm consumption prevent the anaerobic decomposition that creates foul odors. If you detect sour or rotten smells, it indicates a problem—usually overfeeding or poor drainage—that needs immediate correction.
Can I vermicompost year-round on an exposed balcony?
Yes, with proper weatherproofing. In climates with mild winters (above freezing), insulated systems with heat mats maintain active composting year-round. In harsh winter areas, worm activity slows dramatically but the colony survives if kept above 40°F. Some balcony gardeners move a small tray system indoors during the coldest months to maintain continuous processing.
What happens if it rains heavily on my balcony worm bin?
Quality systems feature tight-fitting lids and drainage systems that handle typical rainfall. However, direct exposure to driving rain can oversaturate bedding. Elevate your system slightly off the balcony floor, position it in a sheltered corner, and ensure the drainage spigot remains open during wet seasons. Consider a weatherproof cover for extreme storms.
How do I prevent fruit flies on my balcony?
Bury all food scraps under at least two inches of bedding, maintain proper moisture levels, and ensure all ventilation holes have fine mesh screens. Freeze fruit and vegetable scraps for 24 hours before feeding to kill any fly eggs present on the peels. A layer of cardboard or newspaper on top of the bedding creates an additional barrier.
Can I use regular earthworms from my garden?
No. Garden earthworms (Lumbricus terrestris) are soil-dwellers that won’t survive in the rich, organic environment of a composting bin. You need red wigglers (Eisenia fetida) or European nightcrawlers (Eisenia hortensis), which thrive in decomposing organic matter and tolerate the confined bin conditions. Purchase from reputable suppliers who ship specifically for vermicomposting.
How much food waste can a balcony system handle?
A standard two-tray system (approximately 1.5 square feet surface area) processes 3-5 pounds of scraps weekly with a healthy worm population. Single-person households typically generate 2-3 pounds weekly, making these systems perfectly matched. A family of two might need a three-tray system or continuous flow unit to handle 5-7 pounds weekly.
Is leachate from balcony systems safe for all plants?
Leachate—the liquid draining from your system—is potent and should be diluted 10:1 with water before application. It’s excellent for balcony container plants but use sparingly on seedlings or sensitive plants. If your system smells bad, the leachate may contain harmful compounds—discard it and correct the bin conditions before collecting more.
What if my balcony gets full sun all day?
Full sun exposure is challenging but manageable. Choose light-colored systems to reflect heat, position them against the balcony wall for afternoon shade, and use reflective insulation wraps. Some gardeners build simple wooden enclosures that shade the bin while allowing airflow. During extreme heat, freeze food scraps before adding to help cool the system from within.
How much should I budget for a complete balcony vermicomposting setup?
Plan for $150-$250 total for a quality commercial system, one pound of red wiggler worms, initial bedding, and basic accessories like a moisture meter and hand rake. DIY setups can cost $50-$75 but require more troubleshooting time. This initial investment pays for itself within 12-18 months when compared to purchasing organic fertilizer and soil amendments for balcony containers.