Winter greenhouse gardening doesn’t have to break the bank. As temperatures drop, passionate growers face the annual challenge of keeping their plants thriving without watching their energy bills skyrocket. The good news? You don’t need a commercial-grade heating system costing hundreds or thousands of dollars to maintain a productive growing environment. This year, the market is brimming with innovative, budget-friendly heating solutions that pack surprising performance into sub-$150 packages.
Whether you’re overwintering tender perennials, starting seeds early, or cultivating cold-season crops, understanding your heating options is crucial for success. This comprehensive guide explores the must-have greenhouse heating strategies that balance affordability with effectiveness, helping you make informed decisions based on your specific climate, greenhouse size, and plant requirements. We’ll dive deep into the features that matter most, safety considerations you can’t afford to ignore, and clever techniques to maximize every degree of warmth your budget can buy.
Top 10 Greenhouse Heating Solutions Under $150
Detailed Product Reviews
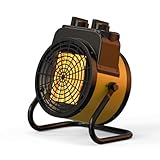
1. VEVOR Greenhouse Heater, 1500W PTC Fast Heating With Overheat Protection, 3-Speed Setting Small Grow Tent Fan, Electric Portable for Green House, Flower Room, Workplace

Overview: The VEVOR Greenhouse Heater delivers 1500W of PTC heating power in a compact, sub-5-pound package. Designed for small to medium growing spaces, it pumps out 5100 BTU of heat while addressing humidity concerns that plague enclosed environments. Its IP20-rated alloy steel construction and ETL certification make it a reliable entry-level choice for gardeners seeking basic climate control without complex features.
What Makes It Stand Out: This unit’s 3-speed adjustment knob and dual hot/cold modes provide year-round utility, functioning as both winter warmer and summer fan. The 25° angle adjustment and stable anti-slip base offer directional flexibility rarely seen at this price point. Its “3-second heating” claim translates to near-instant warmth when plants need protection from sudden temperature drops, while the dehumidifying function actively combats mold and mildew.
Value for Money: At $34.99, this represents exceptional value for hobbyists and casual growers. Comparable PTC heaters typically start at $45+, making this an accessible entry point. While lacking digital controls, the manual knob operation eliminates electronic failure points. The multi-scene versatility—spanning chick brooding to renovation drying—maximizes return on investment beyond greenhouse use.
Strengths and Weaknesses: Strengths: Unbeatable price-to-performance ratio; IP20 protection against object intrusion; true year-round dual-mode operation; sub-5-pound portability; 3-speed granular control; ETL-certified overheat protection.
Weaknesses: No digital thermostat or temperature display; manual control requires frequent monitoring; IP20 offers limited moisture protection; noise level unspecified; coverage area not formally rated.
Bottom Line: Perfect for budget-conscious gardeners needing reliable spot heating in spaces under 100 sq ft. The VEVOR excels as a set-it-and-monitor solution for seed starting and frost protection, though serious growers will eventually crave automated temperature control.
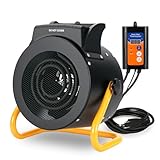
2. TRUSTECH Greenhouse Heater, 1500W Outdoor Electric Heater, 3S Heating &3 Heat Modes, Overheat Protection, 90° Tilt, Portable Outdoor Heaters for Patio, Green House, Flower Room, Workplace
Overview: TRUSTECH’s vibrant yellow heater combines rapid PTC ceramic heating with outdoor-ready design elements. Weighing just 3.1 pounds with a generous 71-inch cord, this 1500W unit prioritizes mobility and flexibility. The three-mode system (High/Low/Fan) and smart thermostat create a user-friendly experience for gardeners who need quick deployment across multiple locations.
What Makes It Stand Out: The 90° tilt mechanism provides exceptional directional control, allowing precise heat targeting for plant benches or work areas. Its ETL certification and smart overheat protection offer peace of mind for unattended operation. The bold yellow housing isn’t just aesthetic—it improves visibility in dim greenhouses. The 3-second heat-up time and powerful fan ensure even distribution in spaces up to 120 sq ft.
Value for Money: Priced at $39.99, this sits in the sweet spot between basic and premium models. You’re paying $5 more than the VEVOR for enhanced tilt functionality, longer cord, and lighter weight. For mobile gardeners who frequently reposition heaters, the 3.1-pound design and extended reach justify the modest premium. It lacks digital controls but delivers core performance reliably.
Strengths and Weaknesses: Strengths: Superior 90° tilt range; ultra-lightweight at 3.1 lbs; 71-inch cord for flexible placement; three distinct operating modes; ETL-certified safety; rapid 3-second heating; high-visibility design.
Weaknesses: No digital display or thermostat; IP rating unspecified for moisture; fan-only mode may be underpowered for summer cooling; stability concerns on uneven surfaces; limited to 120 sq ft coverage.
Bottom Line: An excellent choice for gardeners who prioritize portability and directional control. The TRUSTECH shines in dynamic setups where heat needs shift daily, though it requires manual monitoring that automated models eliminate.
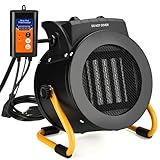
3. Greenhouse Heater with Thermostat, 1500W Electric Heater for Winter Plants and Grow Tents, Digital Display, Fast Heating, Overheat Protection, Portable for Greenhouse Patio Flower Room

Overview: This mid-tier heater bridges the gap between manual and automated climate control. The integrated digital thermostat with display brings precision to small-space heating, maintaining optimal conditions for sensitive plants. Its 1500W PTC element covers 120 sq ft while tip-over protection and overheat auto-shutoff address key safety concerns for enclosed growing environments.
What Makes It Stand Out: Automatic temperature maintenance eliminates constant manual adjustments—a game-changer for tropical plants or orchid cultivation. The digital display provides real-time feedback, while the claimed 30% energy reduction over conventional heaters translates to measurable savings. Dual-mode operation switches seamlessly between heating and fan-only circulation, promoting air movement without humidity disruption.
Value for Money: At $69.99, this commands a $30 premium over basic models but undercuts premium kits by $20. The digital thermostat alone justifies the upgrade for serious growers, preventing temperature swings that stunt growth. While build quality details are sparse, the feature set matches units costing $80+, making it a smart middle-ground investment for dedicated hobbyists.
Strengths and Weaknesses: Strengths: Precise digital thermostat with display; automatic temperature control; tip-over protection enhances safety; 30% energy savings claim; dual-season heating/cooling modes; maintains stable environment for delicate plants.
Weaknesses: IP rating not specified; durability of digital components unproven; coverage limited to 120 sq ft; no adjustable tilt mentioned; noise level unspecified; brand recognition unclear.
Bottom Line: Ideal for intermediate growers ready to automate their setup. The digital control transforms plant care from reactive to proactive, though outdoor durability questions remain. Best suited for covered patios and indoor grow tents.
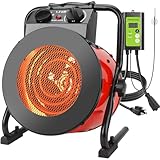
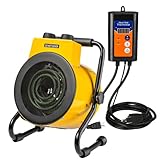
4. Greenhouse Heater with Thermostat, Auto Temperature Control Kit with Digital Display, Fast Heating, Overheat Protection, for Grow Tent, Greenhouse, Flower Room, Patio, Winter Plants

Overview: This professional-grade kit separates the heater from the thermostat, offering superior control for serious cultivation. The independent 15A-rated digital thermostat monitors ambient conditions and cycles the 1500W heater automatically, maintaining precise setpoints across 120 sq ft. Fireproof construction and dedicated overheat protection prioritize safety in demanding environments.
What Makes It Stand Out: The standalone thermostat provides placement flexibility—position the sensor at plant level while keeping the heater elevated. This eliminates hot spots and ensures accurate readings. Adjustable temperature and wind speed settings allow fine-tuning for germination, vegetative, or flowering stages. The kit’s design supports indoor/outdoor use, including humid grow tents and exposed patios.
Value for Money: At $89.99, this matches premium integrated units but offers modular advantages. The 15A thermostat can control additional equipment, effectively serving as a multi-device controller. For commercial growers or advanced hobbyists, the precision and expandability justify the cost. It eliminates the need for separate timer and thermostat purchases, consolidating control in one reliable system.
Strengths and Weaknesses: Strengths: Independent thermostat for optimal sensor placement; 15A capacity supports additional devices; fireproof materials enhance safety; adjustable wind speed; automatic on/off optimizes energy use; versatile indoor/outdoor application.
Weaknesses: Highest price point; may be overkill for casual gardeners; two-piece system requires more setup; IP rating not detailed; heater unit aesthetics are utilitarian; no mention of cord length.
Bottom Line: The definitive choice for committed growers managing multiple zones or life-cycle stages. The modular design scales with your operation, delivering professional-grade control that pays dividends in plant health and energy savings.
5. Noarixa Greenhouse Heater with Digital Thermostat Controller, 1500W Green House Heater for Plants,Electric Grow Tent Heaters, Fast Heating with Overheat Protection, Space Heater for Flower Room,Yellow

Overview: Noarixa’s premium heater targets damp environments with IPX4 splash-proofing and stainless steel construction. The 1500W unit outputs 5118 BTU to cover 160 sq ft—33% more area than competitors. A digital thermostat with 40℉-108℉ range provides granular control, while internal heat limiters and overheat protection safeguard both plants and structure.
What Makes It Stand Out: IPX4 rating distinguishes this for high-humidity greenhouses where water contact is unavoidable. The stainless steel casing resists corrosion from fertilizers and condensation, outlasting painted units. Enhanced airflow design and low-noise operation make it suitable for residential-adjacent spaces. The wide temperature range supports everything from tropical orchids to cool-weather vegetables.
Value for Money: At $89.99, it competes directly with Product 4 but trades modular control for superior build quality and moisture resistance. The 160 sq ft coverage and IPX4 rating justify the premium for growers battling humidity. While lacking a separate thermostat, the integrated digital controller simplifies installation. It’s an investment in longevity for challenging environments.
Strengths and Weaknesses: Strengths: IPX4 splash-proof rating; stainless steel construction for durability; 160 sq ft coverage exceeds competitors; wide 40℉-108℉ temperature range; low operating noise; enhanced airflow design; stable base reduces tipping risk.
Weaknesses: No independent thermostat; limited tilt adjustment mentioned; weight not specified; cord length unlisted; yellow color may not suit all aesthetics; price matches professional kits with fewer features.
Bottom Line: The top pick for humid climates and splash-prone setups. The Noarixa’s weather-resistant build and expanded coverage handle challenging conditions where standard heaters fail, making it worth the premium for serious growers in wet environments.
6. Noarixa Greenhouse Heater with Digital Thermostat, 1500W/750W Electric Grow Tent Heater, IPX4 Waterproof, Overheat Protection, Fast Heating for Patio, Flower Room, Green House, Ourdoor, Black
Overview: The Noarixa Greenhouse Heater delivers precise climate control for serious horticulturists. This dual-power unit maintains temperatures from 40-108°F through intelligent auto-adjustment, preventing plant stress in delicate environments. Its 5118 BTU output effectively warms medium-sized greenhouses and grow tents up to 150 square feet, while IPX4 waterproofing and corrosion-resistant construction ensure reliable performance in humid conditions. Comprehensive safety features including tip-over and overheat protection make it suitable for continuous operation.
What Makes It Stand Out: The intelligent digital thermostat automatically adjusts between 750W and 1500W modes to maintain exact temperatures without manual intervention. This auto-regulation prevents energy waste and temperature swings that can damage sensitive plants. The combination of tip-over protection and corrosion-resistant components exceeds standard safety offerings, making it uniquely suited for active growing environments where water and movement are constant factors.
Value for Money: At $99.99, this heater occupies the sweet spot between basic models and premium units. You’re investing in intelligent temperature control and dual-layer safety features that cheaper alternatives lack. Compared to $110+ competitors, it delivers similar performance for medium spaces at a 10% discount, while its auto-adjustment capability saves energy costs long-term, making it a financially sound choice for dedicated gardeners.
Strengths and Weaknesses: Pros include precise auto-adjusting thermostat, flexible dual-power modes, comprehensive safety protections (tip-over and overheat), weather-resistant design, and corrosion-resistant construction. Cons are limited 150 ft² coverage for larger structures, absence of a fan-only circulation mode, and moderate price point that may exceed casual hobbyist budgets.
Bottom Line: An excellent choice for horticulture enthusiasts needing reliable, safe heating for medium-sized growing spaces. The intelligent controls and robust safety features justify the investment for serious plant cultivation.
7. LHUKSGF Greenhouse Heater with Thermostat, Outdoor Heaters for Patio, 3 Modes for PTC Ceramic Fast Heating, Overheat Protection, IPX4 Waterproof for Greenhouse, Grow Tents, Patio, Black
Overview: The LHUKSGF Greenhouse Heater offers versatile climate management at a competitive price point. Featuring three power modes—20W, 750W, and 1500W—this PTC ceramic heater precisely controls temperatures from 40-108°F. Advanced ceramic technology delivers rapid, energy-efficient warmth for spaces up to medium size. The IPX4+ waterproof and dustproof housing with anti-corrosion coating ensures durability, while dual installation options (hanging hook and ground base) provide exceptional flexibility for various growing setups.
What Makes It Stand Out: The unique 20W eco mode enables air circulation without heat, perfect for maintaining airflow during mild weather. PTC ceramic heating provides faster warm-up and greater efficiency than traditional coil elements. The dual-mounting system offers installation versatility rarely found in sub-$90 heaters, allowing you to optimize placement in greenhouses, patios, or grow tents.
Value for Money: At $89.99, this is among the most feature-rich heaters under $90. The three-mode flexibility and ceramic technology typically cost $20-30 more from established brands. For budget-conscious gardeners wanting advanced features without premium pricing, it delivers exceptional value and energy savings that quickly offset the investment.
Strengths and Weaknesses: Pros include three power modes with eco option, PTC ceramic efficiency, versatile mounting options, superior IPX4+ protection, and attractive pricing. Cons involve lesser-known brand reputation, potential long-term durability questions, and the 20W mode’s limited practical application for growers in consistently cold climates.
Bottom Line: Perfect for value-seekers wanting maximum versatility. The ceramic heating and triple-mode operation make it a smart, efficient choice for small to medium growing spaces with flexible setup requirements.
8. Orvella Greenhouse Heater with Digital Thermostat, 1500W Grow Tent Heater, Overheat Protection & Fast Heating, Electric Space Heaters for Patio, Garage, Greenhouse, Flower House, Yellow

Overview: The Orvella Greenhouse Heater in yellow combines powerful performance with exceptional portability. This 1500W unit heats areas up to 215 square feet in under three seconds, making it the most expansive coverage option in its category. The digital thermostat maintains precise 41-108°F control, while the lightweight design with sturdy handle enables easy repositioning. An adjustable head directs warmth exactly where needed, and IPX4 splash resistance plus overheat protection ensure safe operation in damp conditions.
What Makes It Stand Out: The 215 ft² coverage exceeds competitors by 40-50%, ideal for larger greenhouses or multiple grow tents. Sub-three-second heating delivers near-instant warmth when temperatures drop unexpectedly. The portable design with adjustable head provides unmatched flexibility for targeting heat zones or moving between locations, a significant advantage over fixed units.
Value for Money: At $109.99, it’s the priciest option reviewed, but the premium is justified. You get 40% more coverage than 150 ft² models for only $10-20 more. For growers with larger spaces, this eliminates needing multiple heaters, actually saving money while reducing energy consumption and simplifying temperature management.
Strengths and Weaknesses: Pros include largest coverage area (215 ft²), ultra-fast heating, excellent portability, adjustable directional head, and robust stainless steel construction. Cons are highest price point, single 1500W mode (no low-power option), and possible overkill for very small setups where less powerful units would suffice.
Bottom Line: The top choice for heating larger growing areas or for gardeners prioritizing portability and rapid heating. Worth the premium for its superior coverage and convenience.
9. Orvella Greenhouse Heater with Digital Thermostat, 1500W Grow Tent Heater, Overheat Protection & Fast Heating, Electric Space Heaters for Patio, Garage, Greenhouse, Flower House, Red
Overview: The Orvella Greenhouse Heater in red offers identical performance to its yellow counterpart with a bold aesthetic choice. This 1500W powerhouse delivers rapid heating to 215 square feet in under three seconds, controlled by a precise 41-108°F digital thermostat. The portable design features a sturdy handle and adjustable head for directing warmth. IPX4 splash resistance and overheat protection ensure safe operation in humid environments, while stainless steel construction provides durability. The vibrant red finish adds visual appeal without compromising functionality.
What Makes It Stand Out: Beyond the eye-catching color, this heater provides the largest coverage area in the review set—215 ft²—making it ideal for spacious greenhouses. The sub-three-second heating response is unmatched for combating sudden temperature drops. Its portable design with directional control offers flexibility that fixed heaters cannot match, while the red color improves visibility in busy growing spaces.
Value for Money: Priced at $109.99, it matches the yellow version’s value proposition exactly. The color choice is purely aesthetic and adds no cost, giving you the same premium performance and coverage. For larger spaces, the cost-per-square-foot ratio beats buying multiple smaller units, making it economically sensible despite the higher upfront price.
Strengths and Weaknesses: Pros include maximum coverage area, instant heating, excellent portability, adjustable heat direction, and durable stainless build. Cons remain the premium price, lack of variable power settings, and potential excess capacity for smaller applications where a less powerful unit would be more appropriate.
Bottom Line: Choose this for the same superior performance as the yellow model, with a red finish that stands out. Perfect for large spaces and those wanting maximum heating flexibility with a touch of style.
10. GNRZZT Greenhouse Heater with Digital Thermostat, Green House Heater for Plants,1500W Electric Grow Tent Heaters, Overheat Protection, Fast Heating for Green House, Flower Room, Yellow
Overview: The GNRZZT Greenhouse Heater balances performance, safety, and affordability in a robust stainless steel package. This 1500W unit efficiently warms up to 160 square feet with 5118 BTU output, controlled by a precise digital thermostat ranging 40-108°F. The heater features overheat protection that automatically shuts down and restarts when cooled. A uniquely designed stable base prevents tipping, while IPX4 splash resistance ensures safe operation in damp growing environments. Its versatility extends beyond greenhouses to garages, workshops, and basements.
What Makes It Stand Out: The enhanced base stability addresses a common concern with portable heaters in active growing spaces where hoses and tools create hazards. The 160 ft² coverage bridges the gap between 150 ft² and 215 ft² models perfectly. Automatic shutoff when temperature exceeds setpoint by 1°C provides tighter control than many competitors, preventing harmful temperature spikes.
Value for Money: At $89.99, this heater matches the lowest price point while offering superior coverage than some $100+ models. The stable base design and precise overheat threshold add premium features without premium cost, making it an exceptional value for budget-focused growers who refuse to compromise on safety.
Strengths and Weaknesses: Pros include competitive pricing, stable base design, good 160 ft² coverage, precise temperature control, IPX4 protection, and durable stainless steel construction. Cons include single power mode (no low-wattage option), limited brand recognition, and less portability than handle-equipped competitors.
Bottom Line: An outstanding budget option for medium-sized growing spaces. The stable design and reliable performance make it ideal for permanent installation where portability isn’t a priority, delivering professional features at an entry-level price.
Understanding Your Greenhouse Heating Needs
Before browsing heating options, you need a clear picture of your specific requirements. A heater that works perfectly for a 6x8 foot hobby greenhouse in Zone 7 might prove completely inadequate for a larger structure in Zone 4. Your heating strategy starts with three critical calculations: the volume of space you need to warm, the temperature differential between your desired interior temperature and your region’s coldest nights, and how quickly your greenhouse loses heat.
Calculating BTU Requirements for Your Space
British Thermal Units (BTUs) measure heating power, and calculating your needs prevents buying an underpowered heater or wasting money on excessive capacity. Start by multiplying your greenhouse’s square footage by the height to get cubic footage. For example, a 10x12 foot greenhouse with 8-foot walls equals 960 cubic feet. Next, determine your temperature differential—if you want to maintain 45°F when outside temperatures drop to 15°F, that’s a 30-degree difference. Multiply your cubic footage by the temperature differential, then by a heat loss factor (0.15 for double-walled polycarbonate, 0.20 for single-pane glass, 0.10 for well-insulated structures). This gives you the baseline BTU rating needed for continuous heating. For that 960 cubic foot greenhouse, you’d need approximately 4,300 BTUs with polycarbonate walls.
Climate Zone Considerations
Your USDA Hardiness Zone dramatically impacts heating demands. Zone 8 gardeners might only need supplemental heating during occasional frosts, while Zone 5 growers battle months of sub-freezing temperatures. Research your area’s average lowest winter temperature over the past decade, not just historical records. Climate change has shifted many regions’ winter patterns, and planning for the coldest recent night provides a safety margin. Also consider microclimates—urban gardeners benefit from heat island effects, while rural growers face more extreme temperature swings. Coastal areas experience moderating influences, whereas inland locations see sharper drops.
Assessing Your Greenhouse Insulation Quality
Even the best heater struggles in a leaky greenhouse. Evaluate your structure’s insulation before shopping. Check for gaps in panel joints, deteriorating weatherstripping around doors and vents, and cracks in foundation seals. A well-sealed greenhouse can reduce heating costs by 40% or more. Consider adding bubble wrap insulation to north walls during winter—it costs pennies per square foot but dramatically reduces heat loss. The R-value of your glazing matters too; twin-wall polycarbonate offers R-1.7 compared to single-pane glass at R-0.9. Your heater choice should complement your insulation, not compensate for poor structure maintenance.
Electric Heating Solutions Under $150
Electric heaters dominate the sub-$150 category, offering convenience, cleanliness, and precise temperature control. Modern units have evolved far beyond the energy-guzzling models of decades past, incorporating ceramic elements, efficient fans, and smart thermostats that maintain steady temperatures without constant cycling.
Ceramic Space Heaters: Features and Limitations
Ceramic heaters use electricity to warm a ceramic plate, which then radiates heat while a fan distributes warm air. They heat up rapidly and offer excellent spot heating for small to medium greenhouses. Look for models with oscillation features to prevent hot spots and cold corners. The best budget units include adjustable thermostats, multiple heat settings (typically 750W and 1500W), and tip-over protection. However, ceramic heaters struggle in larger spaces and can dry the air, potentially stressing plants. They also stop producing heat immediately when turned off, offering no residual warmth. For optimal performance, position them at plant level, not on shelves, to ensure heat reaches root zones where it’s most needed.
Oil-Filled Radiators for Stable Temperature
Oil-filled radiators operate silently by heating oil sealed inside metal columns, which then radiates warmth without fans. They excel at maintaining consistent temperatures and continue emitting heat for hours after cycling off, making them ideal for overnight temperature maintenance. The lack of moving parts means less maintenance and no air disturbance that could spread fungal spores. Budget models under $150 typically offer 700-1500 watts and mechanical thermostats. While they heat up slowly, their steady, gentle warmth mimics natural thermal mass. Place them centrally and allow 12-18 inches of clearance on all sides. The main drawback is weight—these units can weigh 15-20 pounds when filled, limiting portability.
Infrared Heaters: Direct Plant Warming
Infrared technology heats objects directly rather than warming the air, similar to how sunlight warms surfaces. This makes them incredibly efficient for greenhouse applications because they warm soil, benches, and plant tissues without wasting energy heating vast air volumes. Budget infrared heaters under $150 typically use quartz tubes or carbon fiber elements. They’re perfect for spot heating specific zones like seedling tables or tropical plant corners. Since they don’t rely on air circulation, they won’t disturb humidity levels or spread diseases. However, they provide directional heat, so placement matters immensely. Position them to cover the maximum plant surface area without creating shadows that block natural light.
Seedling Heat Mats: Targeted Micro-Climates
While not a whole-greenhouse solution, heat mats deserve mention for serious propagators. These waterproof electric pads provide bottom heat that dramatically improves germination rates for warm-season crops like tomatoes, peppers, and eggplants. Quality mats under $150 offer thermostatic controls and uniform heating across the entire surface. They use minimal electricity—typically 20-50 watts—but create ideal conditions for starting hundreds of seedlings. Use them on insulated surfaces to prevent heat loss downward, and always pair with a humidity dome to trap moisture and warmth. The limitation is obvious: they warm only what sits directly on them, not the surrounding air.
Combustion-Based Heating Options
When electricity costs are prohibitive or power reliability is an issue, combustion heaters offer powerful alternatives. Propane and natural gas units deliver significantly more BTUs per dollar than electric models, though they introduce safety considerations that demand respect and proper installation.
Portable Propane Heaters: Power and Portability
Budget propane heaters in the sub-$150 range typically deliver 4,000-9,000 BTUs—enough for medium greenhouses in moderate climates. These units connect to 1-pound propane cylinders or can be adapted to larger tanks with separate hoses. The best models feature piezo ignition (no batteries needed), oxygen depletion sensors that automatically shut off if air quality drops, and tip-over switches. They produce instant, powerful heat and work during power outages, a crucial advantage for growers in storm-prone regions. However, they consume oxygen and produce water vapor and carbon dioxide, requiring ventilation to prevent suffocation and excessive humidity. Never use propane heaters in completely sealed greenhouses; crack a vent or roof window at least one inch.
Natural Gas Conversion Considerations
Some portable propane heaters can be converted to natural gas with manufacturer-approved kits, offering even lower operating costs if you have a home gas line nearby. Natural gas burns cleaner than propane and eliminates the need to refill tanks. However, conversion requires professional installation to ensure proper gas pressure and leak-free connections. Budget constraints often make this impractical, as conversion kits plus installation can exceed the heater’s cost. For most sub-$150 budgets, stick with propane and focus on efficiency rather than conversion complexity.
Essential Ventilation for Combustion Heaters
Any combustion heater demands active ventilation management. Install a battery-powered carbon monoxide detector at plant level—never assume your heater’s built-in sensor is sufficient. Position heaters away from flammable materials like shade cloth, plastic sheeting, and wooden benches. Maintain at least three feet of clearance above the unit. For greenhouses under 200 square feet, provide a minimum of two square feet of permanent ventilation (open vents or louvers) that cannot accidentally close. Larger structures need proportionally more. Run a small circulating fan to prevent heat stratification and ensure fresh air reaches all corners.
Passive and Thermal Mass Heating Techniques
The most budget-conscious heating strategy combines active heaters with passive techniques that store free daytime heat for nighttime release. These methods cost little to implement but dramatically reduce how often your primary heater cycles on.
Water Barrel Thermal Mass Systems
Water barrels act as batteries for heat, absorbing warmth during sunny days and releasing it slowly after sunset. Place 55-gallon drums painted flat black along the north wall where they won’t block light. A single barrel can store over 2,000 BTUs per degree of temperature change, meaning water cooling from 75°F to 65°F releases 20,000 BTUs—equivalent to running a 1500-watt heater for four hours. Scour local classifieds for food-grade barrels often available for $10-20. Fill them with water, add a tablespoon of bleach to prevent algae, and seal tightly. For maximum effect, circulate water through the barrels using a small solar-powered pump to distribute heat evenly.
Stone and Brick Heat Sinks
Dense materials like concrete, brick, and stone excel at thermal mass. A 4-inch thick concrete floor can store enormous amounts of solar heat if exposed to direct sunlight. For existing greenhouses, stack concrete blocks or pavers along sunny walls. Dark-colored materials absorb more heat, so paint them black or dark green. A cubic foot of concrete stores roughly 25 BTUs per degree of temperature change—less than water but still significant. The advantage over water is zero maintenance and no leakage risk. Create thermal mass benches by filling hollow frames with sand or gravel, combining growing space with heat storage.
Compost Heating: Harnessing Biological Energy
A properly managed compost pile generates substantial heat through microbial decomposition. While not a plug-and-play solution, a 3x3x3 foot compost bin can maintain internal temperatures of 140-160°F for weeks, producing steady warmth. Position the bin against the greenhouse’s north wall and run perforated drainage pipe through the pile, using a small fan to pull warm air into the greenhouse. This technique requires active management—turning the pile, maintaining carbon-nitrogen ratios, and monitoring moisture levels. It’s best suited for dedicated gardeners who already compost, as the heat is a bonus rather than the primary goal. The compost itself becomes valuable soil amendment come spring.
Solar-Powered Supplemental Heating
Harnessing free solar energy makes environmental and financial sense, especially for budget-conscious growers. While a complete solar heating system exceeds $150, targeted solar supplements fit comfortably within budget.
DIY Solar Air Heaters
Build a simple solar air collector using aluminum downspouts painted black inside a shallow wooden box covered with polycarbonate glazing. Mount it on the greenhouse’s south-facing exterior wall. As air flows through the heated downspouts, it warms and naturally rises into the greenhouse through a top vent, while cooler greenhouse air enters through a bottom vent, creating passive circulation. A 2x4 foot collector can raise temperatures 20-30 degrees on sunny days, reducing heater runtime. Materials cost $50-100 at hardware stores. The key is proper sizing—too small and the effect is negligible; too large and you risk overheating on bright winter days.
Solar-Powered Fan Circulation Systems
Even distribution of whatever heat you generate is crucial. A $30-50 solar panel kit can power 12-volt computer fans to circulate air, eliminating cold pockets and reducing stratification. Position fans to blow horizontally across the greenhouse at plant level, creating gentle air movement that strengthens plant stems while distributing warmth. During the day, these fans run purely on solar power. At night, they can switch to a small battery backup (like a car battery with charge controller) to continue circulating air from your primary heater. This hybrid approach maximizes efficiency for minimal investment.
Critical Safety Features to Demand
Budget pricing should never compromise safety. The damp, plant-filled environment of a greenhouse presents unique hazards that standard indoor heaters aren’t designed for. Knowing which safety features are non-negotiable protects both your investment and your plants.
Overheat Protection and Tip-Over Switches
Every electric heater you consider must have automatic overheat shutoff—this cuts power if internal components exceed safe temperatures, preventing fires. Tip-over switches are equally critical; they immediately turn off the heater if knocked over by wind, watering hoses, or enthusiastic pets. Test these features before relying on them: carefully tilt the heater while it’s running to ensure it shuts off instantly. For propane heaters, verify the oxygen depletion sensor works by temporarily blocking the air intake (briefly and carefully) and confirming automatic shutdown. These aren’t optional extras; they’re essential insurance.
GFCI Protection in Damp Environments
Greenhouses are wet environments, and electricity plus water equals danger. Never plug heaters into standard outlets. Use Ground Fault Circuit Interrupter (GFCI) outlets or portable GFCI adapters that cut power within milliseconds if they detect current leakage. Your heater’s cord should be heavy-duty, three-pronged, and rated for outdoor use. Inspect cords monthly for cracks or fraying, especially near plugs. If your greenhouse lacks GFCI protection, hire an electrician to install it—this $100-150 upgrade costs less than most heaters and lasts decades. For budget workarounds, use a heavy-duty outdoor extension cord with built-in GFCI protection, keeping all connections elevated off the ground.
Carbon Monoxide Detection for Gas Heaters
Propane and natural gas heaters produce carbon monoxide (CO), an odorless, deadly gas. Install a battery-powered CO detector designed for RV or marine use—these are built for humid environments and cost $20-40. Place it at plant level, not near the ceiling, since CO mixes with air but you want to detect it where you and your plants breathe. Replace batteries every six months and test weekly during heating season. Symptoms of CO exposure in plants include yellowing leaves and stunted growth—if you notice these patterns and your detector hasn’t alarmed, increase ventilation immediately and inspect the heater for incomplete combustion (yellow flames instead of blue).
Smart Control Features on a Budget
Precise temperature control saves money and prevents plant stress from temperature swings. Modern budget heaters include surprisingly sophisticated controls that rival expensive thermostats.
Mechanical vs. Digital Thermostats
Mechanical thermostats use bimetallic strips that expand and contract to turn heaters on and off. They’re reliable, have no batteries to fail, and cost less, but typically maintain a 5-10 degree temperature swing. Digital thermostats offer precision within 1-2 degrees and often include displays showing current temperature. For seed starting and tropical plants, digital control justifies the small price premium. However, mechanical units excel in harsh greenhouse conditions where electronics might fail from humidity. Consider your plant sensitivity: lettuce tolerates temperature swings; orchids do not.
Timer Functions and Programmable Cycles
Many sub-$150 heaters now include 24-hour timers that let you pre-warm the greenhouse before sunrise when temperatures plummet, then reduce heat during the day when solar gain helps. Programmable models can maintain 50°F overnight for cold-hardy greens, then boost to 65°F at dawn for seed germination activities. This zoning saves enormous energy. Look for models with battery backup that retain settings during power outages. Some advanced budget heaters even offer dual-timer modes—one for weekdays, another for weekends—matching your gardening schedule.
Installation and Placement Best Practices
Where you put your heater affects efficiency, safety, and plant health more than the heater’s specifications. Poor placement creates hot and cold zones, wastes energy, and increases fire risk.
Strategic Positioning for Even Heat Distribution
Place heaters centrally along the greenhouse’s long axis, slightly offset from the center to create a circular airflow pattern. Avoid corners where heat gets trapped. Keep heaters at plant level or slightly below—heat rises naturally, so positioning too high warms the roof while roots stay cold. For greenhouses longer than 12 feet, use two smaller heaters at opposite ends rather than one large unit in the middle. This creates overlapping heat zones and provides redundancy if one fails. Never aim heaters directly at plants; the concentrated heat and airflow can desiccate foliage. Instead, point them toward a thermal mass surface like water barrels to create gentle, radiative warmth.
Elevation and Clearance Requirements
Maintain at least 18 inches of clearance on all sides of electric heaters, and 36 inches above propane units. Use sturdy, non-flammable platforms like concrete pavers or metal stands to elevate heaters off damp floors. This prevents moisture damage and improves heat distribution. Secure tall, narrow heaters to walls or benches with straps to prevent tipping in high winds or from accidental bumps. For hanging infrared heaters, use chains rated for triple the unit’s weight and install eye bolts into structural framing, not just glazing bars.
Electrical Circuit Planning and Load Management
A 1500-watt heater draws 12.5 amps—most greenhouse circuits are only 15 amps, leaving little margin for lights or fans. Before buying, check your circuit breaker and understand what else shares that circuit. Running two heaters simultaneously on one circuit will trip the breaker. For serious heating needs, have an electrician install a dedicated 20-amp circuit to the greenhouse. This costs $150-300 but allows safe operation of heaters plus accessories. As a budget alternative, use heavy-duty outdoor-rated timers to stagger heater operation—run the primary heater for two hours, then a secondary unit, preventing simultaneous high draw.
Maximizing Efficiency and Heat Retention
The best heater in the world wastes energy if your greenhouse hemorrhages warmth. Complement any heating system with aggressive heat retention strategies that cost little but deliver massive returns.
Sealing Air Leaks and Drafts
On a windy day, close all vents and move a lit incense stick along seams, corners, and panel joints. Watch for smoke disturbances that reveal leaks. Seal gaps with greenhouse-specific repair tape that withstands UV exposure and temperature extremes. Replace deteriorating weatherstripping around doors with adhesive foam tape costing under $10 per roll. Pay special attention to the foundation—bury a strip of insulation board along the perimeter to prevent ground cold from seeping in. These simple fixes can reduce heat loss by 25-30%, effectively giving you a more powerful heater without spending more on the unit itself.
Using Thermal Curtains and Row Covers
Install a retractable thermal curtain made from bubble wrap or horticultural fleece that you pull across the greenhouse interior at night. This creates a micro-climate around plants, reducing the volume of air your heater must warm by 50-70%. For even more targeted protection, use floating row covers directly over plant beds. These lightweight fabrics trap heat while allowing light and water penetration, creating a buffer zone that can raise temperatures 5-10 degrees around foliage. Combined with a modest heater, row covers let you grow tender plants in surprisingly cold conditions.
Nighttime Insulation Strategies
Heat loss peaks after sunset when temperature differentials are greatest. Boost your heater’s effectiveness by adding temporary insulation to the north wall—the surface that never receives direct sunlight. Affix rigid foam insulation boards (R-5 to R-10) to the interior north wall using removable clips. Cover them with reflective Mylar film to bounce light back onto plants during the day. At night, drape heavy-duty bubble wrap across the south-facing glazing, securing it with magnets or clips. This reduces radiant heat loss while still allowing morning sun to penetrate. These removable layers let you adapt to changing seasons without permanent modifications.
Maintenance and Troubleshooting Guide
A well-maintained $100 heater outperforms a neglected $500 unit. Regular upkeep extends lifespan, maintains efficiency, and prevents mid-winter failures when replacements are hard to find.
Seasonal Cleaning and Storage
At season’s end, thoroughly clean heaters before storage. For electric models, unplug and vacuum dust from intake and exhaust grilles using a brush attachment. Wipe down housings with a damp cloth and mild detergent, ensuring complete dryness before storage. Oil-filled radiators need only exterior cleaning—never open them. Propane heaters require more care: disconnect cylinders, clean burner ports with compressed air, and inspect hoses for cracks. Store all heaters in a dry, rodent-free location. Mice love to nest in heater housings, chewing wires and creating fire hazards. Place mothballs or peppermint oil-soaked cotton balls in storage boxes as natural deterrents.
Common Issues and DIY Fixes
If your electric heater runs but produces little heat, check for blocked air intakes or a failed heating element. Unplug the unit, remove the grille, and visually inspect the element for breaks or severe corrosion. Replacement elements cost $15-30 and install with basic tools. For propane heaters with weak flames, clean the orifice with a fine needle and ensure the regulator isn’t frozen. Yellow flames indicate incomplete combustion—immediately increase ventilation and check for spider webs in burner tubes. If your heater cycles too frequently, the thermostat may be dirty; blow compressed air around the sensor to remove dust buildup.
When to Replace vs. Repair
Follow the 50% rule: if repairs cost more than half the price of a new heater, replace it. Also consider age—electric heaters over seven years old lack modern safety features and efficiency improvements. Replace any heater with a damaged cord, cracked housing, or malfunctioning safety shutoff, regardless of age. For propane heaters, replace units showing rust on the burner or heat exchanger, as this indicates internal corrosion that compromises safety. Keep a “heater fund” of $50-75 annually; this spreads the cost of inevitable replacement and lets you jump on end-of-season sales.
Cost-Saving Operation Strategies
Intelligent operation multiplies your heater’s value, stretching that $150 investment across multiple seasons while keeping utility bills manageable.
Zone Heating: Warming Only What You Need
Divide your greenhouse into zones based on plant temperature requirements. Keep tropical plants in one section with a dedicated heater, while cold-hardy greens occupy cooler areas. Use polycarbonate panels or heavy plastic sheeting to create physical barriers between zones. This lets you maintain 65°F in a 20-square-foot propagation area while the main greenhouse stays at 45°F, slashing energy use. Infrared heaters excel at zone heating since their directional heat doesn’t waste energy warming unused spaces.
Utilizing Thermal Mass for Night Warmth
Program your heater to run during late afternoon when outdoor temperatures are mildest and electricity rates may be lower (on time-of-use plans). Heat your thermal mass (water barrels, stone benches) during this period, then let the stored warmth carry plants through the night with minimal supplemental heating. A digital timer can activate the heater for two hours before sunset, warming mass to 80-85°F. As outdoor temperatures drop, the mass releases heat gradually, reducing heater runtime by 60-70% during expensive peak evening hours.
Timing Heat Cycles with Plant Needs
Plants don’t need constant temperatures. Most seedlings and tropicals tolerate nighttime drops of 10-15 degrees below daytime highs. Set your thermostat to lower temperatures 2-3 hours after sunset when plants are metabolically less active, then raise it again two hours before sunrise when they begin photosynthesizing. This “night setback” saves 15-20% on heating costs without harming plants. Use a programmable thermostat to automate these cycles, ensuring consistency even when you’re away. For extreme cold snaps, override the setback to protect plants—the occasional high-use night costs less than maintaining maximum heat all winter.
Frequently Asked Questions
What size heater do I need for my 8x10 foot greenhouse?
An 8x10 foot greenhouse (80 square feet) with 7-foot walls equals 560 cubic feet. In Zone 6 with double-wall polycarbonate, you’ll need approximately 2,500-3,000 BTUs for continuous heating. A 1500-watt electric heater (5,100 BTUs) provides ample capacity with a safety margin, allowing you to maintain 50°F when outdoor temperatures hit 10°F. For intermittent heating or milder climates, a 750-watt unit suffices. Always size up slightly—an underpowered heater running constantly costs more than a larger unit cycling normally.
Are electric heaters safe in damp greenhouse conditions?
Only with proper precautions. Use GFCI-protected outlets or adapters, keep heaters elevated off wet floors, and choose models with IPX4 or higher water resistance ratings. Inspect cords monthly for damage, and never use extension cords as permanent wiring. Position heaters away from direct water spray from irrigation systems. For maximum safety, install a dedicated 20-amp circuit with weatherproof outlet covers. While no electric device is 100% safe in wet conditions, these measures reduce risks to acceptable levels.
Can I run a greenhouse heater on solar panels with a $150 budget?
A complete off-grid solar heating system exceeds $150, but you can create a hybrid setup. Use a $50 solar panel kit to charge a deep-cycle battery that powers a low-wattage circulating fan and LED grow lights. Run the primary heater on grid electricity. This reduces overall energy costs while providing backup circulation during outages. For true solar heating, focus on passive thermal mass and DIY solar air collectors that require no electricity. These strategies cost under $100 and provide meaningful heat contributions.
How much will a $150 heater cost to run monthly?
A 1500-watt heater running 8 hours daily consumes 12 kWh per day. At the national average of $0.14 per kWh, that’s $1.68 daily or about $50 monthly. However, with proper insulation, thermal mass, and thermostat cycling, actual runtime drops to 3-4 hours daily, reducing costs to $20-25 monthly. Propane heaters cost $30-40 monthly for a 9,000 BTU unit running 6 hours nightly, depending on local propane prices ($3-4 per gallon). Your actual costs depend on climate, insulation quality, and temperature settings.
What’s the cheapest way to heat a small greenhouse under $150 total investment?
Combine a $40 seedling heat mat for starting plants with $60 worth of water barrels as thermal mass and $30 of bubble wrap insulation. Add a $20 ceramic heater as emergency backup for extreme cold. This hybrid approach leverages free solar energy stored in thermal mass, provides targeted heating where needed, and only uses electricity during emergencies. The strategy requires more management but costs under $150 total and can maintain 40-45°F in a 6x8 foot greenhouse in Zone 7.
Do I need ventilation with electric heaters?
Yes, but less than with combustion heaters. Electric heaters don’t consume oxygen or produce CO, but they can create stagnant air, humidity imbalances, and temperature stratification. Run a small circulating fan to prevent mold and mildew, especially during humid winter months. Crack a roof vent 1/2 inch during the day to allow excess moisture to escape. This prevents condensation that drips on heater components and reduces disease pressure. The ventilation needed is minimal—just enough to keep air moving, not the substantial airflow combustion heaters require.
Can I leave my greenhouse heater on overnight unattended?
Modern heaters with safety certifications (ETL, UL) are designed for unsupervised operation, but exercise caution. Ensure your heater has tip-over protection, overheat shutoff, and is on a GFCI circuit. Keep a smoke detector and CO detector (for gas heaters) installed. Check that surrounding area is clear of debris and flammable materials. For peace of mind, use a smart plug to monitor power draw and receive alerts if the heater shuts off unexpectedly. Never leave very old heaters or units with damaged cords running overnight. When in doubt, use thermal mass to store daytime heat and set the thermostat to a lower nighttime temperature.
How do I prevent my heater from drying out the air and harming plants?
Place water trays on top of or near heaters to add humidity as they warm. Group plants together to create a micro-climate with higher moisture. Run a humidifier on a separate timer during the day, or simply leave watering cans full of water to evaporate. Infrared heaters cause less drying since they heat surfaces rather than air. Target humidity levels of 50-70% for most plants. Monitor with a hygrometer and adjust accordingly. Misting plants in the morning helps, but avoid evening misting that can promote fungal diseases when water sits on leaves overnight.
Are propane heaters cheaper to run than electric heaters?
In most regions, propane costs less per BTU than electricity. A gallon of propane (91,500 BTUs) at $3.50 delivers 26,143 BTUs per dollar. Electricity at $0.14/kWh provides 24,428 BTUs per dollar (since 1 kWh = 3,412 BTUs). The difference is modest—about 7% savings with propane. However, propane heaters often waste more heat through ventilation requirements, narrowing the gap. Electric heaters offer precise control and no fuel storage hassles. For intermittent use, electricity’s convenience may outweigh propane’s slight cost advantage. Calculate your local fuel prices to determine the true difference.
What temperature should I keep my greenhouse in winter?
Target temperatures based on what you’re growing, not a universal number. Cold-hardy greens (lettuce, kale, spinach) thrive at 40-50°F. Overwintering tender perennials need 45-55°F. Tropical plants and active seed starting require 60-70°F. Maintaining 70°F for tropicals when you could grow lettuce at 45°F quadruples heating costs. Zone your greenhouse accordingly. A good baseline for mixed winter growing is 50°F, which prevents freezing while keeping costs reasonable. Invest in a minimum-maximum thermometer to track temperature fluctuations and adjust your heater’s thermostat based on actual performance, not assumptions.