If your tomatoes are stubbornly yellowing, your spinach is stunted, and your carrots look more like twisted twigs than robust roots, the culprit might not be pests or poor watering—it could be your soil’s pH. Acidic soil locks away essential nutrients, creating a frustrating cycle where even the best fertilizers can’t reach your plants. Garden lime pellets offer a precise, mess-free solution to “sweeten” your vegetable beds, transforming them from inhospitable to thriving. Unlike dusty powdered lime that blows away in the breeze, pelletized formulations deliver consistent results with minimal waste, making them the modern gardener’s secret weapon for optimal vegetable production.
Understanding how to select and apply the right lime pellets for your specific vegetable garden requires more than just grabbing the first bag at the garden center. Soil chemistry, application timing, pellet composition, and long-term soil management all play critical roles in success. This comprehensive guide walks you through everything you need to know to make an informed decision and implement a strategic liming program that will keep your vegetable beds productive season after season.
Top 10 Garden Lime Pellets for Acidic Vegetable Beds
Detailed Product Reviews
1. Organic Dolomite Lime - Made in USA - Garden Soil Amendment Fertilizer for Lawns, Plants & Flowers. Calcium/Magnesium Additive. Safely Stabilize pH. Cures Blossom End Rot in Tomatoes. OMRI Listed

Overview: This 5-pound package of Organic Dolomite Lime from Cz Garden is an OMRI-listed soil amendment designed for organic gardening. Made in the USA, this ultra-fine powder provides essential calcium and magnesium while stabilizing soil pH. It’s specifically formulated to prevent and cure blossom end rot in tomatoes and peppers, making it a targeted solution for vegetable gardeners.
What Makes It Stand Out: The OMRI certification ensures compliance with USDA organic standards, a crucial feature for certified organic growers. The ultra-fine powder formulation delivers rapid reaction time compared to coarser products, correcting pH imbalances quickly. Its dual-action approach supplies both calcium and magnesium, addressing common deficiencies that cause blossom end rot. The professional-grade resealable pouch provides excellent storage and easy pouring.
Value for Money: At $15.99 for 5 pounds ($0.20 per ounce), this product sits in the mid-range price category. While not the cheapest option, the OMRI certification, fine grind quality, and specialized packaging justify the premium. For organic gardeners seeking fast-acting results, it offers better value than unverified alternatives.
Strengths and Weaknesses:
- Strengths: OMRI certified for organic use; ultra-fine powder reacts quickly; prevents blossom end rot; resealable heavy-duty packaging; supplies both calcium and magnesium; made in USA
- Weaknesses: Powder form can be messy and dusty; requires careful application to avoid inhalation; may need more frequent reapplication than pelletized versions
Bottom Line: An excellent choice for serious organic gardeners, particularly those growing tomatoes and peppers. The quality and certification justify the moderate price point.
2. MYGP Organic Garden Lime; Raises Soil pH Contains pelletized dolomitic Lime for Organic Gardening; 5 lb with a My Garden Pool PH Soil Test Strips 20 ct, and Superior Gardening Claw Gloves - 2 Pack
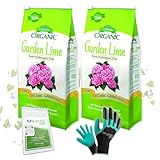
Overview: This MYGP bundle combines 5 pounds of pelletized dolomitic lime with 20 pH test strips and two pairs of gardening claw gloves. Marketed as an all-in-one solution for organic gardeners, it promises to balance soil pH while providing the tools needed for application and monitoring. The pelletized form ensures even distribution and reduces dust.
What Makes It Stand Out: The value-added bundle distinguishes this from competitors. The inclusion of pH test strips allows immediate soil testing, while the claw gloves serve dual purposes—hand protection and cultivation tools. Its pelletized formulation eliminates the mess associated with powdered lime. The product specifically targets hydrangea enthusiasts with its color-changing capability, turning blue blooms pink in acidic soils.
Value for Money: At $24.99, this bundle costs significantly more than standalone lime products. However, when factoring in the pH test strips ($8-10 value) and two pairs of specialized gloves ($10-15 value), the core lime product costs roughly market rate. For beginners needing accessories, it offers convenience, though experienced gardeners may find better value purchasing components separately.
Strengths and Weaknesses:
- Strengths: Pelletized form is clean and easy to apply; includes practical accessories; pH test strips enable immediate soil monitoring; claw gloves provide protection and functionality; organic gardening approved
- Weaknesses: Higher overall cost; accessories may be unnecessary for experienced gardeners; limited lime quantity for larger gardens; price per pound is elevated compared to bulk options
Bottom Line: Ideal for novice gardeners starting their soil amendment journey. The convenience factor justifies the premium, but seasoned growers should compare individual component pricing.
3. Pro Pelleted Calcitic Limestone - 50lb
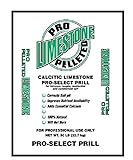
Overview: This professional-grade pelleted calcitic limestone comes in a substantial 50-pound bag designed for large-scale applications. Unlike dolomitic lime, it provides calcium without magnesium, making it ideal for soils already sufficient in magnesium. The pelleted formulation ensures uniform coverage and minimizes dust during application, suitable for lawns, gardens, and agricultural use.
What Makes It Stand Out: The sheer quantity sets this apart from consumer-focused products. At 50 pounds, it serves large properties, commercial operations, or serious hobby farmers. The calcitic formulation specifically targets calcium deficiency without adding magnesium, crucial for soils with existing magnesium imbalances. Its “won’t burn” guarantee allows confident application without risk of plant damage, even at higher rates.
Value for Money: At $64.99 for 50 pounds, this product delivers exceptional per-pound value, costing roughly $1.30 per pound—significantly less than smaller packages. The low unit price makes it economical for treating large areas, though the upfront investment is substantial. For properties exceeding 5,000 square feet, this bulk option outperforms multiple small bags economically.
Strengths and Weaknesses:
- Strengths: Unbeatable price per pound for large areas; pelleted form spreads evenly; safe, non-burning formula; long-lasting pH correction; ideal for calcium-specific needs; professional-grade quality
- Weaknesses: Excessive quantity for small gardens; heavy and difficult to store; lacks magnesium supplementation; no OMRI certification mentioned; requires spreader equipment for best results
Bottom Line: Perfect for large properties and professional landscapers. The bulk sizing offers tremendous savings, but casual gardeners should consider smaller alternatives.
4. Pulverized Garden Limestone 12 lb Pail
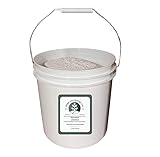
Overview: This pulverized garden limestone arrives in a sturdy 12-pound pail, offering a middle-ground quantity between small bags and bulk options. The pulverized formulation provides rapid pH adjustment and delivers both calcium and magnesium essential for plant health. Designed for versatile use across gardens, lawns, and flower beds, it targets gardeners seeking quick results without committing to large quantities.
What Makes It Stand Out: The durable pail packaging distinguishes it from bagged competitors, providing superior moisture protection and easier storage. The pulverized texture ensures faster soil reaction than pellets, making it ideal for immediate pH correction. Its balanced calcium-magnesium content addresses multiple nutrient deficiencies simultaneously. The 12-pound size suits medium-sized gardens without overwhelming storage capacity.
Value for Money: Priced at $29.99 ($0.16 per ounce), this product offers moderate value. It costs less per ounce than OMRI-certified alternatives but more than bulk professional options. The pail packaging adds convenience worth approximately $3-5 over bagged equivalents. For gardeners needing 10-15 pounds of lime, it eliminates waste while providing quality amendment.
Strengths and Weaknesses:
- Strengths: Pulverized form acts quickly; pail packaging prevents moisture damage; supplies calcium and magnesium; versatile for multiple garden types; manageable quantity for medium gardens; no organic certification premium
- Weaknesses: Not OMRI certified; powder creates dust during application; pail takes more storage space than bags; higher per-pound cost than bulk options; lacks specialized features like blossom end rot targeting
Bottom Line: A solid, no-frills choice for conventional gardeners prioritizing fast action and convenient storage over organic certification.
Understanding Soil pH and Why It Matters for Vegetables
Soil pH directly controls nutrient availability, microbial activity, and root development—the three pillars of vegetable garden success. When pH drops below 6.0, critical nutrients like phosphorus, calcium, and magnesium become chemically bound in the soil matrix, unavailable for plant uptake. This creates the paradox of “starvation in the midst of plenty,” where your soil tests high in nutrients but your plants show classic deficiency symptoms.
The Science Behind Soil Acidity
Acidic conditions develop naturally through rainfall leaching basic cations, decomposition of organic matter releasing organic acids, and certain fertilizer applications. The pH scale is logarithmic, meaning a soil pH of 5.0 is ten times more acidic than 6.0. For vegetable gardens, this mathematical reality translates into dramatic differences in crop performance. Aluminum and manganese toxicity also becomes problematic below pH 5.5, actively damaging root tips and further reducing nutrient absorption.
Ideal pH Ranges for Popular Vegetables
Different vegetables have evolved different pH preferences. Brassicas like broccoli and cabbage thrive between 6.5-7.5, while potatoes and sweet potatoes tolerate slightly more acidic conditions at 5.5-6.5. Leafy greens generally prefer 6.0-7.0, and legumes perform best at 6.0-7.5. Understanding your specific crop mix helps target your liming strategy rather than applying a one-size-fits-all approach that might over-correct for some plants while under-serving others.
What Are Garden Lime Pellets and How Do They Work?
Garden lime pellets are finely ground limestone that has been compressed with a binding agent—typically a natural lignin or clay—to create uniform, easy-to-handle granules. This pelletization process revolutionizes lime application by solving the dust, uneven distribution, and rapid wash-off problems associated with traditional powdered lime. Each pellet dissolves gradually with moisture, releasing calcium and magnesium carbonate into the soil solution where they neutralize acidity through chemical reaction.
Pelletized vs. Powdered: The Manufacturing Difference
The manufacturing process involves grinding limestone to a fine powder, then feeding it through a pelletizing disc or extruder with a moisture-activated binder. This creates durable pellets that resist crushing during transport but dissolve readily when exposed to soil moisture. The key advantage is particle size uniformity—every pellet contains the same chemical composition, ensuring even application rates across your entire garden bed. Powdered lime, by contrast, contains particles of varying sizes, with the smallest dust particles often blowing away before they can work, while larger chunks may take years to break down.
The Role of Calcium and Magnesium
Both calcitic and dolomitic lime pellets supply calcium, essential for cell wall structure and disease resistance. Dolomitic lime additionally provides magnesium, the central atom in chlorophyll molecules. When pellets dissolve, these elements displace acidic hydrogen ions on soil exchange sites, effectively “sweetening” the soil. The carbonate component reacts with water to form bicarbonate, which further buffers pH fluctuations and provides a stable growing environment for beneficial soil microbes.
The Benefits of Using Lime Pellets Over Traditional Lime
The advantages of pelletized lime extend far beyond convenience, though the ease of application is certainly compelling. Modern gardeners choose pellets for measurable improvements in efficiency, effectiveness, and environmental stewardship that directly impact their harvest quality and quantity.
Dust-Free Application
Powdered lime creates a respirable dust cloud that can irritate lungs and settle on nearby surfaces, potentially damaging patio furniture or neighboring ornamental plants. Pellets eliminate this hazard entirely, making application safer for gardeners with respiratory sensitivities and preventing collateral damage to your outdoor living spaces. This clean application also means you can lime on breezy days without watching your soil amendment blow into your neighbor’s yard.
Even Distribution and Reduced Waste
The uniform size and density of lime pellets allow spreaders to distribute them with precision unmatched by powdered products. This consistency means every square foot of your vegetable bed receives the same treatment, preventing the patchy results that occur when powder clumps in some areas while missing others entirely. Less waste translates directly to cost savings—you’re paying for lime that actually reaches your soil, not for product that volatilizes or washes away before it can work.
Slower Release for Longer-Lasting Effects
Pelletized lime dissolves over weeks rather than days, creating a sustained-release effect that prevents the pH spikes that can shock sensitive vegetable roots. This gradual neutralization allows soil biology to adapt naturally, maintaining microbial populations that are essential for nutrient cycling. The result is a more stable, long-term pH adjustment that typically lasts 2-3 years in most garden soils, compared to the shorter-lived effects of quick-dissolving powders.
Key Factors to Consider Before Buying Lime Pellets
Selecting the right lime pellets requires evaluating several technical specifications that directly impact performance. Understanding these factors helps you compare products effectively and choose the formulation that matches your garden’s specific needs.
Purity and Calcium Carbonate Equivalent (CCE)
The effectiveness of lime pellets is measured by Calcium Carbonate Equivalent (CCE), which indicates neutralizing power relative to pure calcium carbonate. A product with 90% CCE means you’d need slightly more of it compared to a 100% CCE product to achieve the same pH change. High-quality pellets typically show CCE values between 85-105%. The purity of the source limestone also affects heavy metal content—a critical consideration for food gardens where contaminants can accumulate in your vegetables.
Pellet Size and Durability
Pellet diameter typically ranges from 2-5mm. Smaller pellets dissolve faster but may be harder to spread evenly with some equipment. Larger pellets resist crushing during handling but dissolve more slowly. Durability matters for storage—brittle pellets that crumble in the bag defeat the purpose of pelletization. Look for pellets that feel firm but not rock-hard, indicating proper binder ratios that ensure both durability and appropriate dissolution rates.
Moisture Content and Storage Stability
Excess moisture in the bag causes pellets to pre-dissolve or fuse together into unusable clumps. Quality manufacturers package pellets with moisture barriers and maintain production standards that keep water content below 2%. Check bag integrity before purchase—any punctures or tears may have allowed humidity infiltration that compromises pellet structure. Properly stored pellets in sealed bags maintain effectiveness for 2-3 years, while compromised product may lose potency within months.
Certification for Organic Gardening
If you maintain an organic vegetable garden, verify that lime pellets carry OMRI (Organic Materials Review Institute) listing or equivalent certification. This ensures the binding agents and processing methods meet organic standards. Some conventional pellets use synthetic binders or may source limestone from quarries with contamination concerns that, while safe for conventional agriculture, don’t meet organic purity requirements. The certification provides third-party verification of suitability for organic production.
Types of Garden Lime Pellets Explained
Not all lime pellets are chemically identical. The mineral composition of the source material creates distinct products with different applications in vegetable gardening. Understanding these differences prevents costly mistakes and ensures you’re addressing your soil’s specific deficiencies.
Calcitic Lime Pellets
Derived from calcium carbonate limestone, calcitic pellets are the go-to choice when soil tests show adequate magnesium levels but low calcium and low pH. They provide the fastest pH adjustment for calcium-deficient soils and are particularly valuable for preventing blossom end rot in tomatoes and peppers. Calcitic lime works more quickly than dolomitic formulations because calcium carbonate is slightly more soluble, making it ideal for situations requiring rapid pH correction before planting.
Dolomitic Lime Pellets
These pellets contain both calcium and magnesium carbonates, typically in a 3:1 or 2:1 ratio. They’re the appropriate choice when soil tests reveal deficiencies in both elements—a common scenario in sandy soils or regions with high rainfall. The magnesium component is crucial for photosynthesis and enzyme activation. However, unnecessary application of dolomitic lime to soils already high in magnesium can create nutrient imbalances that interfere with potassium uptake, potentially reducing vegetable quality.
Hydrated Lime Pellets (and Why They’re Different)
Hydrated lime (calcium hydroxide) is occasionally available in pelletized form and works much faster than carbonate-based limes. While tempting for quick results, hydrated lime pellets pose significant risks for vegetable gardens. Their rapid reaction can burn plant roots and create extreme pH swings that devastate soil biology. They’re also caustic, requiring extra safety precautions. For most vegetable applications, carbonate-based pellets are safer and provide more sustainable results, with hydrated lime reserved for emergency situations under expert guidance.
Calculating How Much Lime Pellet Your Garden Needs
Applying the correct amount of lime is critical—too little fails to correct acidity, while too much creates alkaline conditions that are equally problematic. Precision requires testing and calculation, not guesswork.
Soil Testing: Your First Critical Step
A professional soil test provides not just pH but also buffer pH, which indicates how resistant your soil is to pH change. Heavy clay soils with high organic matter have high buffering capacity and require more lime to shift pH than sandy soils. Home test kits measure only active acidity, potentially leading to under-application. Send samples to a cooperative extension service or certified lab for comprehensive analysis that includes CEC (Cation Exchange Capacity) and base saturation percentages—the data needed for accurate lime calculations.
Understanding Buffer pH and Lime Recommendations
Soil labs provide lime recommendations in pounds per 1,000 square feet, typically based on 100% CCE. If your chosen pellets have a different CCE, you must adjust the application rate. For example, if the recommendation calls for 50 lbs of 100% CCE lime but your pellets are 90% CCE, you need 55.5 lbs (50 ÷ 0.90) to achieve the same effect. The buffer pH tells you how much “reserve acidity” is locked in soil colloids—this hidden acidity determines the total lime requirement, not just the current pH reading.
Adjusting for Different Soil Textures
Sandy soils require less lime to change pH but need more frequent applications because they lack buffering capacity. Clay soils need significantly more lime—sometimes double the sandy soil rate—but the correction lasts longer. For vegetable gardens in raised beds filled with purchased soil mixes, the organic component may already buffer pH effectively, requiring minimal lime. Always calculate based on the actual soil volume in your growing area, not just surface area, especially for deep vegetable beds where root zones extend 12-18 inches below the surface.
Application Timing: When to Sweeten Your Vegetable Beds
Timing significantly impacts lime pellet effectiveness. Applying at the wrong time wastes effort, reduces efficiency, and can even interfere with crop growth. Strategic timing aligns with natural soil processes and your vegetable rotation schedule.
Seasonal Considerations for Best Results
Fall application is ideal for most vegetable gardens. Cooler temperatures and winter precipitation allow pellets to dissolve gradually and react with soil over several months before spring planting. This slow reaction integrates the lime thoroughly into the root zone. If you missed fall application, early spring 2-3 months before planting is the second-best option. Avoid mid-season application around actively growing plants, as the concentrated dissolution zone can temporarily raise pH in root areas, causing nutrient lockout.
Weather Conditions That Impact Effectiveness
Apply lime pellets when soil is moist but not saturated—damp soil helps pellets adhere and begin dissolving, while overly wet soil can cause surface runoff. Light rain after application is beneficial, but heavy downpours may wash away pellets before they dissolve, especially on slopes. Avoid application during drought conditions when pellets will sit dormant without moisture to activate them. For optimal results, apply 24-48 hours before predicted light rainfall, or water gently after application if no rain is forecast.
Step-by-Step Guide to Applying Lime Pellets
Proper technique ensures even coverage and maximum soil contact, translating your investment into measurable pH improvement. The process is straightforward but requires attention to detail for professional-grade results.
Preparing Your Garden Bed
Remove all plant debris and weeds from the area. If applying to an existing bed, consider waiting until after harvest when the bed is empty. For new beds, till the soil to a depth of 8-12 inches first. Break up large clods and level the surface—pellets will roll off high spots and collect in depressions, creating uneven application on rough terrain. Mark off your garden into 100-square-foot sections using stakes and string to help visualize the application area and ensure accurate distribution.
Tools You’ll Need for Proper Application
A drop spreader or broadcast spreader designed for pelletized products provides the most uniform coverage. Calibrate your spreader before use by measuring a known quantity of pellets, spreading over a tarp, and weighing what was delivered to verify the rate. For small gardens, a handheld shaker or scoop can work, but divide the total lime needed into smaller portions and apply in two perpendicular passes to avoid striping. A garden rake with flexible tines helps incorporate pellets without crushing them prematurely.
Incorporation Techniques for Maximum Soil Contact
Lime pellets must contact soil to work—they cannot neutralize acidity from the surface. After spreading, lightly rake pellets into the top 2-3 inches of soil. For established beds where deep tilling isn’t possible, use a garden fork to create holes 4-6 inches deep across the bed, then work pellets into these aeration holes. Water thoroughly after incorporation to begin the dissolution process. In no-till systems, apply before a heavy mulch application, allowing irrigation to wash lime down through the mulch layer into the soil.
Common Mistakes to Avoid When Using Lime Pellets
Even experienced gardeners can make errors that reduce lime effectiveness or create new problems. Awareness of these pitfalls saves time, money, and prevents damage to your vegetable crops.
Over-Liming: The Hidden Danger
Applying too much lime creates alkaline soil (pH above 7.5) where iron, manganese, and zinc become unavailable, causing chlorosis and stunted growth. Over-liming is particularly problematic with perennial vegetables like asparagus or rhubarb, where correcting the mistake requires years of amendment. Always follow soil test recommendations precisely, and remember that it’s easier to apply more lime later than to correct an over-application. If you suspect over-liming, apply elemental sulfur to lower pH, but expect a slow correction process.
Applying Lime Without Testing
Never apply lime based on guesswork or because “it seems like a good idea.” Some soils, especially those recently amended with wood ash or certain composts, may already be neutral or alkaline. Adding lime to these soils can quickly create nutrient lockout. Additionally, symptoms of nutrient deficiency can mimic pH problems—stunted growth might indicate nitrogen deficiency rather than acidity. Soil testing eliminates this uncertainty and provides the quantitative data needed for proper application rates.
Mixing Lime with Incompatible Amendments
Lime pellets should never be mixed with fertilizers containing ammonium nitrogen or applied simultaneously with fresh manure. The high pH environment causes ammonia volatilization, wasting your fertilizer investment and creating nitrogen loss to the atmosphere. Wait at least 2-3 weeks between lime application and ammonium-based fertilizer application. Similarly, don’t mix lime with elemental sulfur or acidic fertilizers—the chemical reactions neutralize both products, wasting your investment.
Safety Considerations for Handling and Storage
While less hazardous than hydrated lime, pelletized lime still requires basic safety precautions. Calcium carbonate dust can irritate respiratory systems, and the alkaline nature demands skin protection.
Personal Protective Equipment (PPE) Requirements
Always wear gloves when handling lime pellets—prolonged skin contact can cause dryness and irritation. A dust mask or respirator is advisable during application, especially on windy days or when using spreaders that may crush some pellets. Safety goggles protect eyes from dust and accidental contact. Long sleeves and pants prevent skin irritation, and closed-toe shoes are essential. Wash hands thoroughly after application, and launder clothing separately from regular laundry to avoid cross-contamination.
Proper Storage to Maintain Pellet Integrity
Store lime pellets in a dry, weatherproof location away from moisture sources. Even small amounts of humidity can cause pellets to fuse into solid masses in the bag. If you must store partially used bags, seal them tightly with tape or transfer to airtight plastic containers. Keep pellets off concrete floors, which can wick moisture. Label containers clearly and store away from children and pets. Never store lime pellets near fertilizers, seeds, or pesticides—cross-contamination can affect germination or create unexpected chemical reactions.
Environmental Considerations
Avoid applying lime pellets near waterways or drainage ditches, as runoff can raise the pH of aquatic ecosystems, harming fish and beneficial organisms. Maintain a 10-foot buffer zone around streams and ponds. Clean spreaders and tools away from sensitive areas, collecting any spilled material for proper disposal. Never dump excess pellets in natural areas—they can alter native plant communities. Follow local regulations for disposal of unused product—most municipalities accept small quantities at household hazardous waste facilities.
Organic vs. Synthetic Lime Pellets: What Gardeners Should Know
The distinction between organic and conventional lime pellets isn’t about the limestone itself—calcium carbonate is a natural mineral. The difference lies in processing, additives, and sourcing transparency.
OMRI-Listed Products: What the Label Means
OMRI listing verifies that every component, including binding agents and anti-caking additives, meets organic standards. It also confirms that the quarrying and processing methods don’t introduce prohibited substances. For certified organic vegetable production, this documentation is essential for inspection records. Non-listed products may be perfectly safe and effective but lack the third-party verification required for organic certification.
Natural Sourcing vs. Industrial Processing
Some lime pellets come from ancient shell deposits (oolitic limestone), while others derive from modern marine sediments or industrial byproducts like paper mill lime mud. While chemically similar, the trace mineral profile differs. Gardeners growing nutrient-dense vegetables for maximum nutritional value may prefer limestone from specific geological formations known for higher trace mineral content. Product data sheets sometimes provide this sourcing information—worth investigating if you’re pursuing beyond-organic, nutrient-focused growing methods.
How Long Do Lime Pellets Take to Work?
Patience is essential when liming. Unlike fertilizers that show results in days, lime works through slow chemical reactions that require time, moisture, and microbial activity to complete.
Factors Affecting Reaction Time
Pellet size, soil moisture, temperature, and soil texture all influence reaction speed. In warm, moist, sandy soils, you might see measurable pH changes within 4-6 weeks. In cool, dry, clay soils, the full effect may take 6-12 months. The carbonate must dissolve, react with acidic components, and then stabilize throughout the soil matrix. Fall application allows this entire process to complete before spring planting, ensuring uniform pH throughout the growing season.
Monitoring pH Changes Over Time
Test soil pH again 6-12 months after application to verify results. Don’t expect dramatic changes in the first month—early testing may show minimal movement. If pH hasn’t reached target levels after a full year, you can apply a second, smaller dose. Keep records of application rates, dates, and subsequent soil tests to build a long-term liming history for your garden. This data becomes invaluable for predicting future needs and maintaining optimal growing conditions year after year.
Signs Your Vegetable Beds Need Lime Pellets
Visual diagnosis can indicate acidic soil problems, but symptoms often appear only after significant pH depression. Regular testing is better, but knowing these signs helps you recognize problems between tests.
Visual Clues from Plant Performance
Chlorosis (yellowing) of older leaves while veins remain green often indicates magnesium deficiency in acidic soils. Stunted growth despite adequate water and fertilizer suggests nutrient lockout from low pH. Poor nodulation on legume roots (peas, beans) can signal pH problems, as the beneficial bacteria responsible for nitrogen fixation are pH-sensitive. Blossom end rot in tomatoes and peppers, while often a calcium deficiency symptom, frequently appears in acidic soils where calcium is present but unavailable.
Weed Indicators That Signal Acidic Conditions
Certain weeds thrive in acidic soils and their presence suggests a pH problem. Sorrel, plantain, and moss growth indicate pH below 6.0. While these plants don’t cause acidity, they’re reliable indicators. If you notice these weeds proliferating in your vegetable beds while struggling to grow your crops, it’s time to test pH and likely apply lime pellets. Conversely, their disappearance after liming confirms your treatment was effective.
Integrating Lime Pellets Into Your Soil Amendment Strategy
Lime pellets are one tool in a comprehensive soil health program. Strategic integration with other amendments maximizes benefits while preventing counterproductive interactions.
Coordinating with Fertilizer Applications
Plan your liming schedule around your fertilization program. Apply lime in fall, then wait until spring to add phosphorus and potassium fertilizers, which are most available in the near-neutral pH that lime creates. Nitrogen applications should be timed 3-4 weeks after lime incorporation to prevent volatilization losses. This sequential approach ensures each amendment performs optimally rather than competing or reacting in ways that reduce effectiveness.
Building a Long-Term Soil Health Plan
Think of liming as a multi-year investment. After achieving target pH, retest every 2-3 years to monitor drift. Sandy soils may need small annual applications, while clay soils might require treatment only every 3-5 years. Keep a garden journal documenting pH trends, application rates, and crop performance. This long-term perspective helps you anticipate needs rather than reacting to problems, creating a proactive soil management system that supports consistently high vegetable yields.
Frequently Asked Questions
1. Can I apply lime pellets at the same time as compost?
Yes, lime pellets and compost work well together when applied correctly. Apply lime first, incorporate it into the soil, then add compost on top. The lime stabilizes pH while compost provides organic matter and microbes that help distribute the lime’s effects. Avoid mixing them before application, as the moisture in compost can cause pellets to dissolve prematurely and create concentrated pockets of alkalinity.
2. Will lime pellets burn my vegetable plants if applied during the growing season?
Lime pellets won’t burn plants like fertilizer can, but applying during active growth is still problematic. The dissolution zone around each pellet temporarily creates high pH micro-sites that can cause nutrient lockout in nearby roots. If you must apply mid-season, water heavily to disperse the lime quickly and consider using half the recommended rate, applying the other half several weeks later to minimize root zone disruption.
3. How do I know if I need calcitic or dolomitic lime pellets?
The only reliable method is a soil test showing magnesium levels. If magnesium is adequate or high, use calcitic lime. If magnesium is low, choose dolomitic. Applying dolomitic lime when magnesium is already sufficient can cause potassium deficiency and other imbalances. The small additional cost of a comprehensive soil test saves money and prevents problems compared to guessing.
4. Can I use lime pellets in container vegetable gardens?
Generally, no. Container mixes are typically soilless and have different pH buffering systems. Most commercial potting mixes already contain limestone to adjust pH. Adding more can quickly over-alkalize the limited soil volume. If you suspect pH issues in containers, test the mix specifically and use liquid pH adjusters designed for container culture rather than lime pellets.
5. Do lime pellets expire or lose potency over time?
Properly stored lime pellets remain effective for 2-3 years. The calcium carbonate doesn’t degrade, but moisture can cause pellets to fuse, reducing their ability to distribute evenly. Once pellets clump into solid masses, the surface area decreases dramatically, slowing dissolution. Store in airtight conditions away from humidity to maintain full potency.
6. Are lime pellets safe for pets and wildlife?
Lime pellets are relatively low-toxicity but not harmless. Ingestion can cause gastrointestinal irritation in pets. The dust may irritate respiratory systems if animals disturb recently applied product. Keep pets off treated areas until pellets are incorporated and watered in. Birds may mistake pellets for grit—apply when birds are less active or cover lightly with soil to prevent ingestion.
7. How soon after liming can I plant my vegetables?
Wait at least 2-3 months after lime application before planting for best results. This allows the pH to stabilize throughout the root zone. If you applied lime in fall, the bed will be ready by spring. For spring applications, do so at least 8-12 weeks before transplanting or direct seeding. Quick-growing crops like lettuce may show tolerance to shorter intervals, but fruiting vegetables are more sensitive to pH fluctuations.
8. Can lime pellets help with clay soil compaction?
Indirectly, yes. By improving calcium levels and pH, lime enhances soil structure and flocculation, helping clay particles aggregate into larger crumbs. This improves drainage and aeration. However, lime is not a substitute for organic matter. For best results on heavy clay, combine lime application with generous compost incorporation and consider gypsum for additional calcium without pH change.
9. What’s the difference between “fast-acting” lime pellets and regular ones?
“Fast-acting” products are typically more finely ground before pelletization, creating smaller particles that dissolve quicker. They may also contain additives to accelerate breakdown. While they work faster, they don’t neutralize more acidity overall. The speed advantage is marginal in most garden situations where you have weeks or months before planting. Standard pellets are usually more economical and provide perfectly adequate timing for vegetable gardeners planning ahead.
10. Can I make my own lime pellets at home?
No practical home method exists for creating durable, uniform lime pellets. The industrial pelletizing process requires specialized equipment and binders to achieve the right balance of durability and dissolution. Attempting to mix powdered lime with water and dry it will create hard chunks that dissolve unevenly and don’t spread properly. For home use, purchase commercial pelletized lime and focus your DIY efforts on composting and other soil amendments where homemade versions are effective.